Having issues ejecting an external hard drive on Windows 10? When removing a hard drive from your Windows, you have to remove it safely if you do not want your data to be corrupted or damaged. If you cannot eject the external hard drive safely or the option is greyed out, there can be some causes to this error, such as the hard drive still being used or outdated drivers.
Can’t eject External Hard drive Drive or USB

In this scenario, You may be unable to use the Safely remove hardware option or see a message that This device is currently in use. If you are unable to or cannot eject the External Hard drive Drive or USB on Windows 11/10 then one of these methods is sure to help you fix the issue.
- Restart your computer
- Use Task Manager to end task
- Use Command prompt
- Run Hardware and Devices Troubleshooter
- Configure Device Removal Policy
- Update USB drivers
Before you begin wait for a minute and see if that helps.
1] Restart your computer
Restarting your computer is known to help. When you encounter the issue, this method refreshes the computer system by closing all programs and removing any temporary corrupt data that may cause the issue.
2] Use Task to Task Manager to end task
If you follow everything above, it still does not work the only option is to use the Task Manager.
Right-click the blank area of the Windows taskbar and select ‘Task Manager.’
Once on the Task Manager Window, click the Process tab.
The Process tab allows users to see all running processes of programs on your computer.
If any of the programs appear to be hogging high resources, right-click it and select End Task to terminate it.
Related: Windows can’t stop your Generic volume device because a program is still using it.
3] Use Command prompt
Open the command prompt, type the following RunD1132 command and hit Enter:
RunDll32.exe shell32.dll,Control_RunDLL hotplug.dll
This will help you Unplug/Eject Hardware.
In the Safely Remove Hardware dialog box that opens, select your external hard drive and press Stop.
4] Run Hardware and Devices Troubleshooter
If this happens frequently, run the Hardware and Devices Troubleshooter.
5] Configure Device Removal Policy

To prevent this issue from recurring, you may configure the Device Removal Policy.
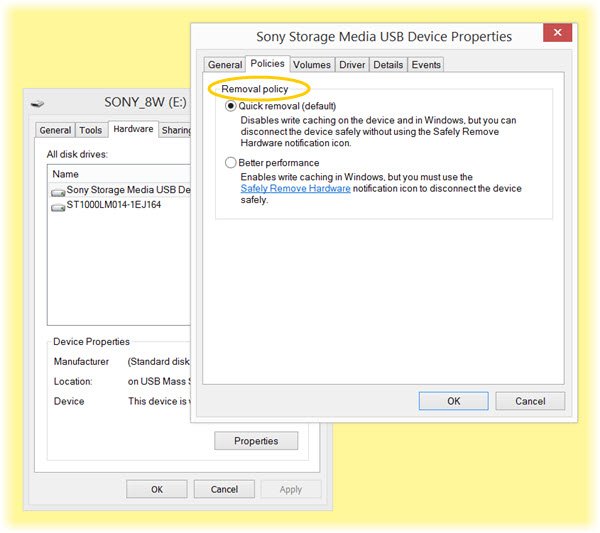
Open File Explorer, and right-click on the drive that is encountering the error that is mentioned above. From the context menu, select Properties.
Now, navigate to the tab labeled as Hardware. Under the section of All disk drives, select the disk drive that is causing you the issue.
Select Properties under the section of Device Properties.
This will open another mini window. On the bottom portion of the mini window, select Change Settings.
Navigate to the tab labeled as Policies. Under the section of Removal Policy, select Quick Removal (default).
Select OK and then click on Apply and check if that fixes your issues.
Related: USB Quick removal vs. Better performance.
6] Update USB drivers
You need to update your drivers.
You can use Windows Update to download Driver Updates or directly visit the manufacturer’s site to download the latest drivers for your device..
If nothing helps, you may need to take an educated guess about whether the operation (Eg Copy/Move) you were carrying out has been completed and then just pull out the USB.
TIP: USB Disk Ejector and USB Disk Ejector are free tools that can help you eject external drives.
We hope this tutorial helps you eject a USB or Hard Drive on Windows 11/10.
Leave a Reply