Windows image capture is used to deploy operating systems across networked computers. We must prepare a reference PC, install applications, customize settings, and capture its Windows image using MDT. Let us see how you can capture Windows image using Microsoft Deployment Toolkit.
Capture Windows Image using Microsoft Deployment Toolkit (MDT)
Microsoft Deployment Toolkit is designed to streamline the deployment of Windows operating systems, applications, and configurations across multiple devices. If you want to capture Windows Image using MDT, follow these steps:
- Create and configure a new deployment share
- Add the operating system
- Create a new task schedule
- Update the Deployment Share
- Complete the Deployment.
1] Create and configure a new deployment share
First, we need to create a new deployment share and configure it for the capture. We will do this using the Deployment Workbench. Follow the steps mentioned below to create a new deployment share.
- First of all, launch the Deployment Workbench.
- Right-click on the Deployment Share and select New Deployment Share.
- Select a new path for the Deployment share and select Next.
- Now, give it a name and click on Next.
- Enter a description and keep clicking on Next until you reach the Progress tab. Let the process complete, and click on Finish.
This would create a new share, which you can see under the Deployment Shares option. We now have to make changes to prepare it for the capture. To do so, right-click on the newly created deployment share and click on Properties.
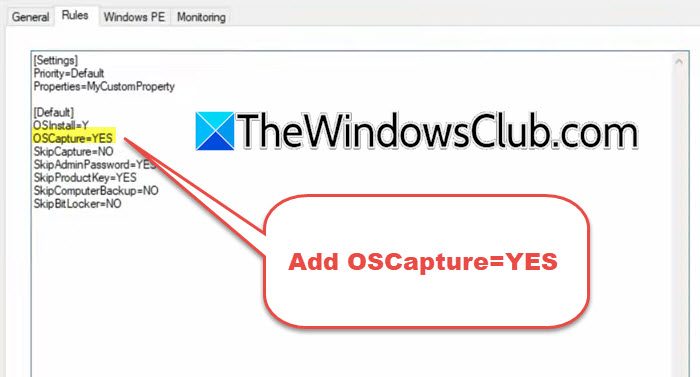
Go to the Rules tab and then add OSCapture=YES (check the attached screenshot).
Go to the General tab and untick x86 from Platform Supported if you are working on Windows 11.
In the Windows PE tab, set Platform to x64, and then untick Generate a Lite Touch bootable ISO image. Then, in the Monitoring tab, tick Enable monitoring for deployment share.
Finally, click on Apply > Ok.
2] Add the operating system
Now that we have created the deployment share, follow these steps to add the OS; however, make sure to mount the ISO file before doing so.
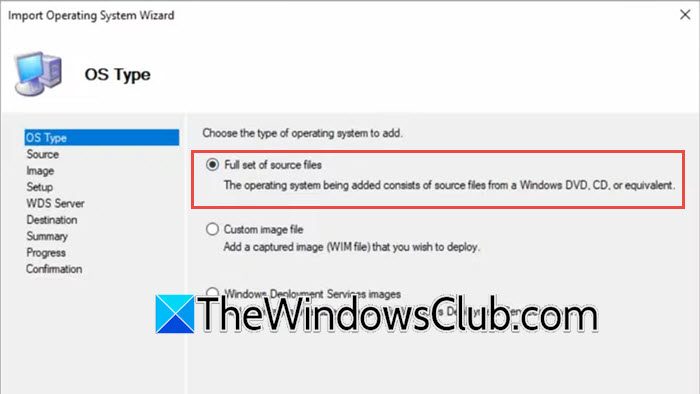
- In the Deployment Workbench, expand the newly created deployment share and right-click on Operating System > Import Operating System.
- Select the Full set of source files and click on Next.
- Click on Browse and select the mounted OS image.
- Keep other settings default and complete the setup.
You need to give this operating system a recognizable name, especially if you have configured many other OSs.
3] Create a new task schedule
We must create a new task scheduler to deploy the captured Windows 11 image. To do so, follow the steps mentioned below.
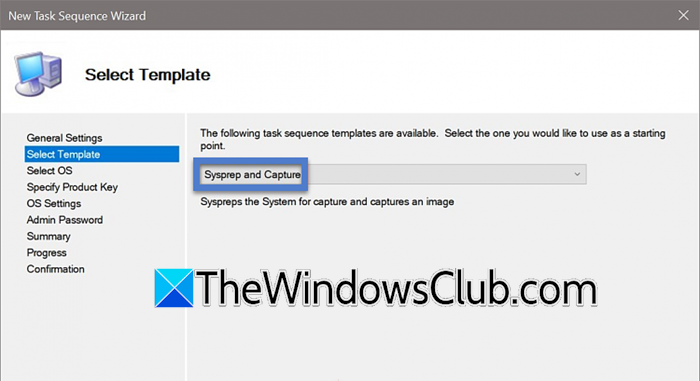
- Go to the Deployment Workbench, expand the newly created deployment share, and right-click on Task Sequence > New Task Sequence.
- Enter Task sequence ID, Task sequence name, and click on Next.
- In the Select Template tab, you need to set Sysprep and Capture and click on Next.
- Once you are on the Select OS tab, select the operating system we created and click on Next.
- Now, traverse through the file, fill in the password, and then, once done, click on Finish.
Once the task is created, let’s go to the next step.
4] Update Deployment Share
After making the changes, we need to update them. To do so, right-click on the MDT Deployment Share and click on Update Deployment Share. In the Options tab, check Completely regenerate the boot images, and click Next. Keep clicking on Next until you finally complete the process.
5] Complete the deployment
")
Last but not least, we can proceed with the deployment. Go to the Windows 11 reference image and ensure that it is attached to the network. Then, follow the steps mentioned below to complete the deployment.
- In Windows 11 reference image, select Run, type: \\192.168.13.22\deploymentshare (enter domain user credentials to access the shared folder on the MDT server).
- Now, go to the Script directory.
- Run the LiteTouch.vbs script.
- Enter the username and password required to access the shared folder.
- Select Capture Windows 11 image in the Windows Deployment Wizard.
- Choose “Capture an image of this reference computer,” confirm the UNC path on the MDT server for saving the WIM file, ensure NTFS read/write permissions, and specify the desired .WIM file name
- After a few minutes, start the Task Sequence.
- Once preparations are complete, Sysprep starts, rebooting the computer into WinPE to capture the system image. During this, Windows enters OOBE mode, and the DISM tool is used to create the image.
- The deployment will take a little while to complete, and once it is, you can find the WIM file in the Captures folder.
Once you have completed these steps, you will have created a custom Windows image file (.WIM file). You can later import this WIM file directly into SCCM, WDS, or MDT to deploy a reference Windows image to the workstations.
Read: How to use Sysprep Tool in Windows
How to capture OS image using MDT?
To capture an OS image using MDT, prepare a reference computer by installing Windows, apps, and custom settings. Create a task sequence for capturing the image in the MDT Deployment Workbench. Run the task sequence on the reference computer, and MDT will use Sysprep to prepare the system, reboot into the WinPE environment, and create a WIM file. This image can then be deployed to other devices.
Read: Sysprep was not able to validate Windows installation
How to capture a sysprep image?
To capture a Sysprep image, prepare the reference computer with installed apps and custom settings. Run the Sysprep tool to generalize the system, placing it in OOBE mode. Boot into the WinPE environment and use the DISM tool or an image-capturing utility to create a system image. Save the captured image as a WIM file, which can later be deployed to other devices using deployment tools like MDT or WDS.

Leave a Reply