Today we are going to talk about the most basic and most used feature in Windows 11/10. Casting a display on devices is one of the features we use the most. But, with growing features, errors and bugs also increase in their count. But if you find that this Cast to Device feature is not working in Windows 11/10, then this post will help you fix the issue.

Users often use the casting feature to watch movies and shows from their small-screen devices to a bigger one. I know that a computer does have a bigger screen, but not as big for an entire family sitting together. Connecting HDMI’s, and VGA’s and using USB Flash Drives. Just cast your Windows 11/10 system to any Smart TV or Projector and you are good to go.
Cast to Device not working in Windows 11/10
There can be multiple reasons why your system is unable to cast anything. These reasons may include low network connectivity, the device not being discoverable, firmware error in displaying the device, etc. But, let’s assume that everything is good with the casting device but still, the Cast to device feature is not working in Windows 11/10. If this is the case with you, you can try the methods mentioned below:
- Check your internet connection
- Turn on Network Discovery
- Update or reinstall the Network driver
- Check for Streaming Options
- Run Network and Internet Troubleshooter
- Change Cast to Device settings in Windows Defender Firewall
- Check Microsoft LLDP Protocol Driver Setting
- Run Hardware Troubleshooter.
You may find more methods on the internet. But today we are going to cover the most basic and effective methods.
1] Check your internet connection
This is the first thing that you should do. Check your internet connection. While casing your computer screen to another external display, such as a Smart TV, your internet connection should be stable. An unstable internet connection causes many issues with the cast-to-device feature on Windows 11/10.
Also, make sure that both your devices are connected to the same network. If both the devices are connected to the same WiFi router but the Cast to-device feature is still not working, check the WiFi band. It is important that both devices use the same WiFi band. For example, if your laptop is connected to the 2.4 GHz WiFi band and your Smart TV is connected to the 5 GHz WiFi band, you will not be able to cast your laptop screen to your Smart TV. In this case, you can switch the WiFi band on your laptop or desktop computer.
2] Turn on Network Discovery
If you are a geek then you may know how networks work. Windows 11/10 keeps all the networks as Private by default. But to cast something you need to Turn On network discovery so that the device is visible.
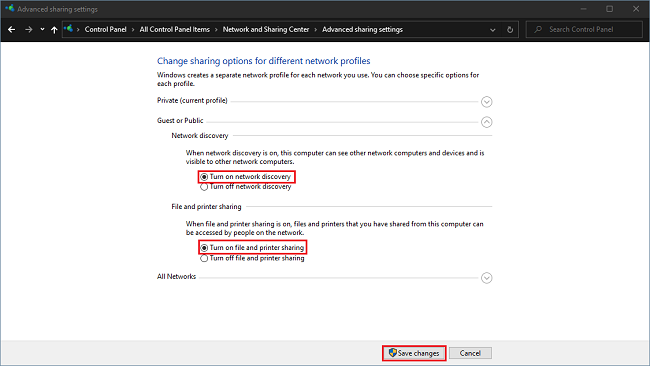
- Press Win + R keys, the Run window will open up.
- Type control and hit Enter. The Control Panel will open up.
- In the Control Panel, select Large icons in the View by mode.
- Now, look for Network and Sharing Center and click on it.
- On the left panel click on Change advanced sharing settings.
- In the Advanced Sharing settings window, enlarge Guest or Public options. In the Network discovery, click on Turn on network discovery.
- Perform Step 5 for File and printer sharing and click on Save Changes.
- Now you can try Cast to Device again.
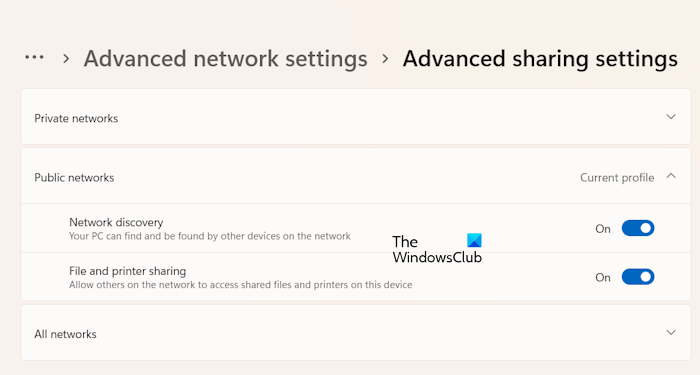
If you are a Windows 11 user, open your system Settings and go to Network & internet > Advanced network settings > Advanced sharing settings. Now, expand the Public networks tab and enable the following two options:
- Network discovery
- File and printer sharing
If the error is still present you can go to the next method.
3] Update or reinstall the Network driver
We often see that errors occur due to outdated or corrupted drivers. There can be multiple ways of updating drivers, from downloading drivers to updating manually. We suggest you reinstall your Network driver and see if it helps. To do so, go through the following instructions:
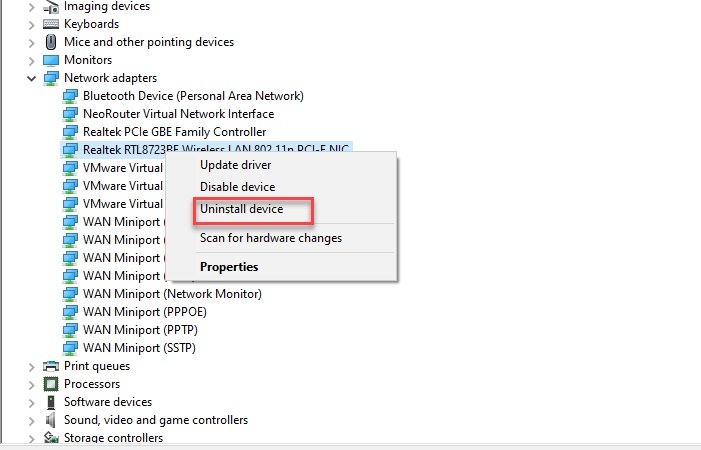
- Open the Device Manager.
- Expand the Network adapters branch.
- Right-click on your Network driver and select Uninstall device.
- Restart your computer or perform a Scan for hardware changes.
When you restart your computer or perform a scan for hardware changes, Windows will automatically install the missing drivers. After reinstalling your Network driver, check if the problem persists.
If this does not work, we suggest you update the Network driver to the latest version by downloading its latest version from the official website of your computer manufacturer. If the latest version of your network driver is available, download it and install it manually after uninstalling the currently installed network driver on your system. When the process is over, try casting your device again. Please make sure that your system is set to the automatic installation of updates. If it’s not then this method will throw an error.
4] Check for Streaming Options
Many times when we want to do something but aren’t able to do it is because enough permissions are not provided. But to be on the safer side make sure that you have the latest drivers installed in your system.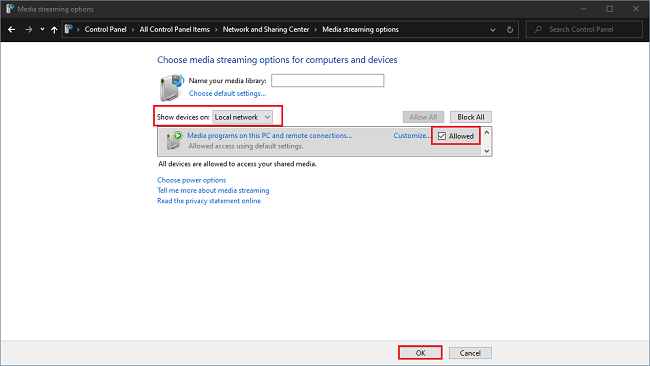
- Press Win + R keys. The Run window will open up.
- Type control and hit enter. The Control Panel will open up.
- In Control Panel look for Network and Sharing Center and click on it.
- On the left panel, click on Media streaming options.
- If the media streaming is disabled then you need to turn it on. Click on Turn on media streaming.
- Make sure that your device is visible on the local network. Allow the media sharing on devices and click on OK.
As soon as these changes are made restart your system once and you are good to go.
5] Run Network and Internet Troubleshooter
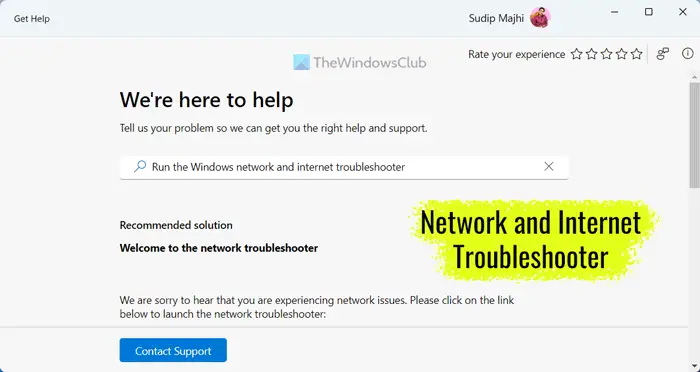
Network issues are the main cause of this problem. Therefore, we suggest you run the Network and Internet Troubleshooter and see if it helps. In the latest version of Windows 11, you can run the Network and Internet Troubleshooter via the Get Help app.
6] Change Cast to Device settings in Windows Defender Firewall
There are times when the connection is interrupted due to a defending firewall. It is possible that the firewall you are using for safety purposes is interrupting in between.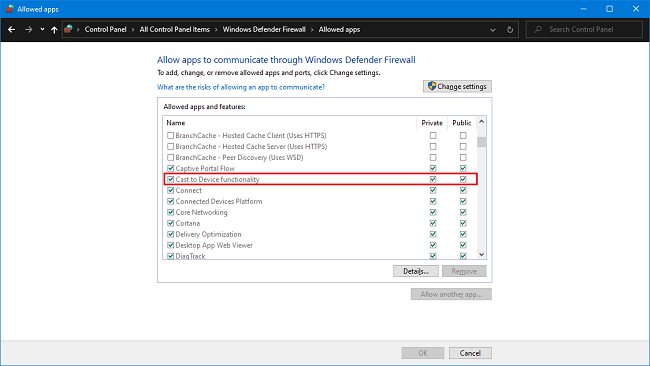
- Press Win + R keys. The Run window will open up.
- Type control and hit enter.
- In the Control Panel, select Large icons in the View by mode.
- Now, look for Windows Defender Firewall and click on it.
- On the left panel, click on Allow an app or feature through Windows Defender Firewall.
- Search for Cast to Device functionality in the list of Allowed apps and features.
- Make sure that Private and Public, both the checkboxes are checked. If not then click on Change settings and then check both the checkboxes.
- Click on OK and you are good to go.
This method makes sure that the Cast to Device functionality is enabled in Private as well as Public networks. In short, it is the best way to check for any permission issues if a firewall is enabled.
If you are using a third-party antivirus, might be its Firewall is blocking the Cast feature in Windows 11. You can check this by disabling your third-party antivirus and its firewall. If this resolves the issue, you need to contact the support of your antivirus vendor to address this issue. If you are using a free antivirus, you can switch to another one.
7] Check Microsoft LLDP Protocol Driver Setting
Now, the last resort for you is to check the network adapter settings. If your network adapter drivers are updated and the firewall is allowing you to cast your device, then now is the time to check the adapter settings. Sometimes the settings may get changed because of multiple adapter options available on your system. The basic reason behind it is using Wi-Fi as well as Ethernet for connecting to the networks.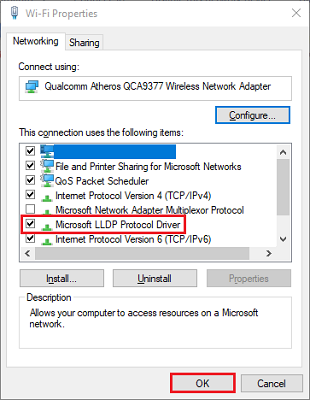
- Click on Windows Search and type Control Panel.
- Select the best match from the search results to open the Control Panel.
- In the Control Panel window, make sure that the View by mode is set to Large icons.
- Now, click on the Network and Sharing Center.
- On the left panel click on Change adapter settings.
- Now right-click on the adapter you are connected to and click on Properties.
- In the list of items used by your connections, check if the Microsoft LLDP Protocol Driver is checked or not. If not then click on the checkbox and click on OK.
Restart your system after these settings are done. It will definitely solve your problem. If any of the methods fail to solve your problem, make sure that you revert the changes made to the Network and Sharing options.
8] Run Hardware Troubleshooter
Run the Hardware Troubleshooter and see if it helps you. Microsoft deprecated the MSDT-based troubleshooters for Windows 11 version 22H2 and later. Therefore, if you are using the latest build of Windows 11, this troubleshooter might not work. Other users of Windows can still use this troubleshooter.
Let us know in the comments below which of the methods worked for you.
Why is my cast to device not working?
There can be many reasons why the cast-to-device feature is not working on your Windows 11/10 computer. Some of these reasons include network connection issues, both the devices being connected to different networks or different bands of the same network, outdated or corrupted network card drivers, etc.
How do I enable casting on my laptop?
Casting is enabled by default. If you want to cast your laptop screen to your Smart TV or another supported device, press the Win + K keys on your laptop and then select the required display.
PS: Cast Media to device is not working on Edge? Enable this flag!
Leave a Reply