Devices like Microsoft Surface allows optimization of power management by configuring its brightness setting. Let’s quickly walk you through the process of configuring or changing the default brightness value for the Surface device.
Surface Brightness Control lets you change default brightness in Surface
Tablets or convertibles are not only suitable for Office jobs. They find some utility in kiosk scenarios too. In this scenario, the usage of a device or equipment is severely restricted for some purposes. For example, the device may be configured to simply run a single app in full screen while keeping others hidden from the end user. This helps in reducing the thermal load and lower the overall carbon footprint for the deployed devices, in this case, Microsoft Surface.
To configure Surface brightness control, you’ll need to:
- Download Surface_Brightess_Control msi tool
- Configure its values via Registry entries
1] Surface_Brightess_Control msi tool

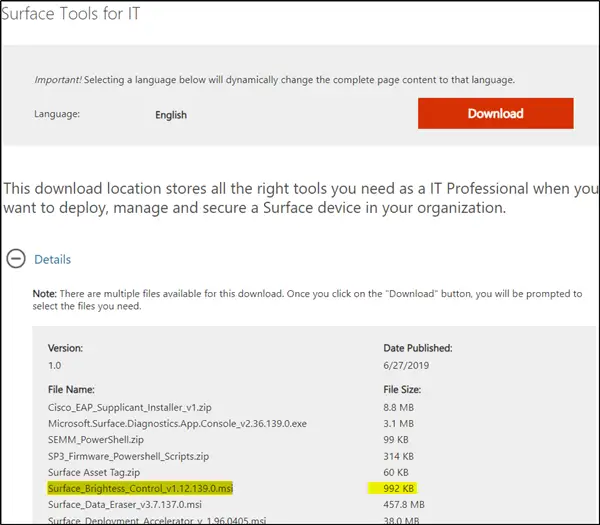
The tool is available for download with Surface Tools for IT. When installed on the target device, the tool automatically dims the screen when not in use and includes the following configuration options:
- Period of inactivity before dimming the display.
- Brightness level when dimmed.
- Maximum brightness level when in use.
The file name, currently, is visible as Surface_Brightess_Control_v1.12.139.0.msi and size is approximately 992 KB.
2] Configure values via Registry entries
Launch the ‘Run’ dialog box. Input text ‘Regedit’ in the empty field and hit ‘Enter’.

Then, navigate to the following path –
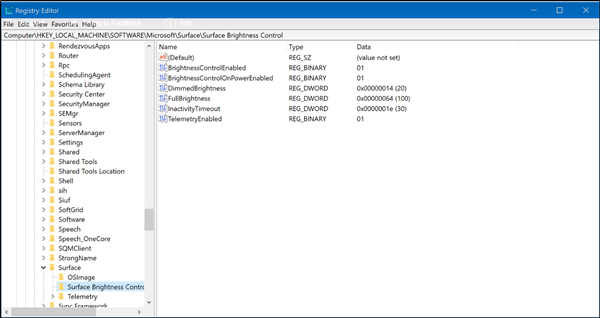
Computer\HKEY_LOCAL_MACHINE\SOFTWARE\Microsoft\Surface\Surface Brightness Control\
Configure any one of the following options, depending on your requirements:
- Brightness Control Enabled – It lets a user turn Surface Brightness Control on or off. For example, to disable Surface Brightness Control, the value for this entry should be set to ’00’. To do this, double-click the entry in the right pane and in the ‘Edit String’ box that appears enter the ‘Value Data’ as ’00’. If you do not configure this setting, Surface Brightness Control will be on.
- Brightness Control On Power Enabled – It turns off Surface Brightness Control when the device is directly connected to power. To disable Surface Brightness Control when power is plugged in, set the value to ‘00‘. If you do not configure this setting, Surface Brightness Control is on.
- Full Brightness– This setting lets define the maximum brightness range for the device (0-100). If not configured, the maximum brightness range for this setting remains set at 100 percent.
- Inactivity Timeout – It lets a user define or specify the period of inactivity before dimming the device. If left untouched, the inactivity timeout is automatically set to 30 seconds, following which the device screen is dimmed.
Thus, using the above methods, you can adjust default brightness value and optimize power management of your Microsoft Surface device. You can get the details and download the Surface Brightness Control msi file from Microsoft.
How do I change the default brightness on Windows?
To change the default brightness on Windows 11, you need to open the Windows Settings panel first. Then, go to the System > Display and select the Brightness option. Next, find the slider and move it to the right or left as per your requirements.
How do I stop my Surface Pro from changing brightness?
To stop your Surface Pro from changing brightness automatically, you need to disable the adaptive brightness setting. For that, open the Windows Settings and go to System > Display. After that, select the Brightness option and find the Help improve battery by optimizing the content shown and brightness option. Next, you need to remove the tick from the corresponding checkbox.
That’s all! I hope this guide helped you.