Microsoft Office, a few years back, changed the font size and style to Calibri. While it was a good decision, there are always some users who do not like the defaults and need a change. They like to choose a font that works best for them. If you are one of those users who desire to change the default Office font and select one that better suits your needs, then this post will interest you.
Change default font in Microsoft Office applications
In this tutorial, we’ll show you to change the default font in-
- Microsoft Office Word
- Microsoft Office Excel
- Microsoft Office PowerPoint
If the preset default font in Microsoft Office applications bothers you, scroll down to read about things to try.
1] Change the default font in Word

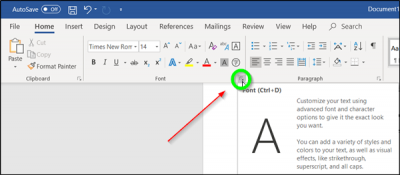
Launch the Microsoft Word application, click ‘Home’ tab, and then click the Dialog Box Launcher arrow in the Font group.
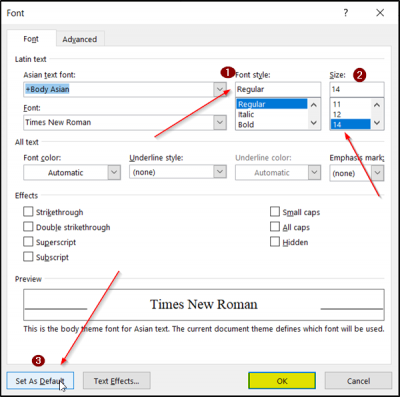
Here, click the font you want to use, then, under ‘Size’, click the size you want to use for body text.

Later, hit the ‘Set As Default’ button.

Now, from the dialog box that appears next, click ‘All documents based on the Normal template’ and hit the ‘OK’ button twice.
TIP: Word font keeps changing back? Here’s how to fix the issue.
2] Change the default font in Excel

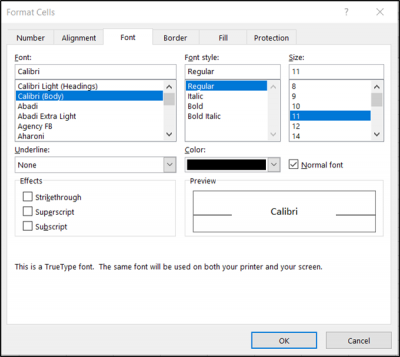
If you would like to change the default font for Excel Cells, open Excel sheet, switch to ‘Home’ tab and select Dialog Box Launcher arrow in the Font group.
After that, switch to ‘Font’ tab, select Font, Font Style, Font Size, and hit the ‘Ok button.
Read: How to change default System Font in Windows.
3] Change the default font in PowerPoint

The procedure for changing the default font in Microsoft Office PowerPoint remains the same as seen in Microsoft Word.
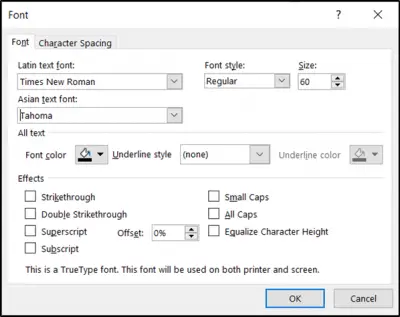
Launch the PowerPoint application, choose ‘Home’ tab, and select the Dialog Box Launcher arrow in the Font group.
Next, select the desired font, its size, and style, and hit the ‘OK’ button.
This is how, in a few simple steps, you change the default font in Microsoft Office applications.
Leave a Reply