PC users can enable and use Nearby Sharing on their Windows 11 or Windows 10 computer – and if Nearby sharing is not working on your device, you can fix the issue. In this post, we will show you how to change the default Save Location for Nearby Sharing in Windows 11/10.
Change default Save Location for Nearby Sharing
Essentially, by using Bluetooth or Wi-Fi, the Nearby sharing feature in Windows 11/10 allows PC users to share documents, photos, links to websites, and more with nearby devices. By default, Nearby sharing saves files you receive to your Downloads folder on your computer.
We can change the default Save Location for Nearby Sharing in Windows 11/10 in 2 quick and easy ways. We’ll explore this topic under the methods outlined below in this section as follows:
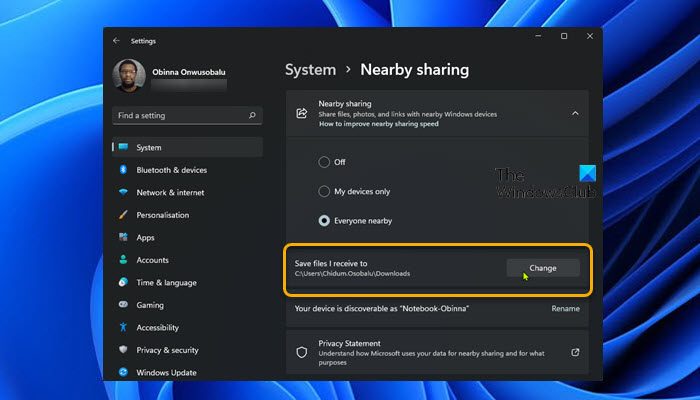
1] Change default Save Location for Nearby Sharing via Settings app

To change default Save Location for Nearby Sharing via Settings app in Windows 11/10, do the following:
- Press Windows key + I to open Settings app.
- On the left pane, click System.
- Click on Nearby sharing on the right pane.
- Next, click on the Change button (will be disabled and grayed out if nearby sharing is mot enabled) for Save files I receive to.
- Now, navigate to and select the folder you want Nearby sharing to save to by default.
- Click/tap on Select Folder.
- Exit Settings app when done.
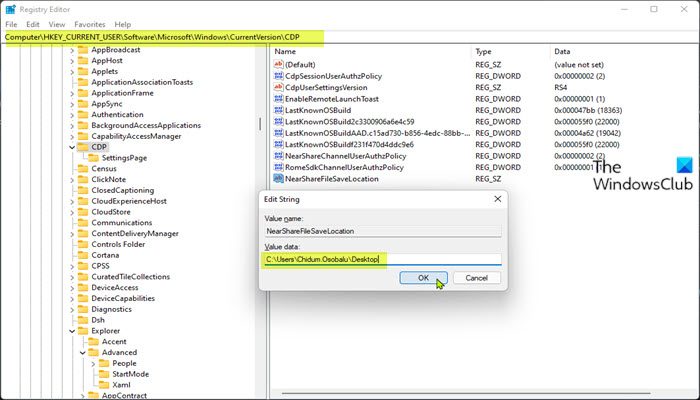
2] Change default Save Location for Nearby Sharing via Registry Editor

To change default Save Location for Nearby Sharing via Registry Editor in Windows 11/10, do the following:
Since this is a registry operation, it is recommended that you back up the registry or create a system restore point as necessary precautionary measures. Once done, you can proceed as follows:
- Press Windows key + R to invoke the Run dialog.
- In the Run dialog box, type regedit and hit Enter to open Registry Editor.
- Navigate or jump to the registry key path below:
HKEY_CURRENT_USER\Software\Microsoft\Windows\CurrentVersion\CDP
- At the location, on the right pane, double-click the NearShareFileSaveLocation string value to edit its properties.
If the string value is not present, right-click on the blank space on the right pane and then select New > String Value to create the registry key and then rename the key as NearShareFileSaveLocation and hit Enter.
- Now, double-click on the new entry to edit its properties.
- In the Value data field, type the full path of the folder (ex: C:\Users\UserName\FolderName) you want Nearby sharing to save to by default.
Note: Make sure to replace the UserName and FolderName placeholder with your actual username and the folder name.
- Click OK or hit Enter to save the change.
- Exit Registry Editor.
That’s it on how to change default Save Location for Nearby Sharing in Windows 11/10!
Related post: Turn On or Off Shared Experiences in Windows 11/10
How do I change my storage location for Nearby Share?
To change your storage location for Nearby Share or to change Nearby sharing transfers folder location on your Windows device, follow these instructions:
- Open Settings.
- Click on System.
- Click on Shared experiences.
- Under “Nearby sharing,” click the Change button and select an alternate location to receive files.
How do I change the default Bluetooth location in Windows 10?
To change the default Bluetooth location in Windows 11/10, all you need to do is just send a file to your device, and after you must have received the file, in the “Save the receiving file” dialog, there is a location box showing the received file – you can simply change the location by using browse to your preferred location.
How do I automatically receive Bluetooth files in Windows 10?
There’s no known way to receive Bluetooth files on your Windows 11/10 computer automatically. Whenever someone sends you a file, it will take your permission, and then the file can be downloaded on your PC. However, you can create a desktop shortcut to open the Bluetooth File Transfer Wizard using the fsquirt file to achieve the same effect.
Leave a Reply