When you connect speakers, headphones, Bluetooth headset, or other audio devices to your PC, you can select which device you want to use by default. In this post, we will show you how to change default Sound Output Device in Windows 11 and Windows 10. Using this tutorial, you can easily switch between Headphones and Speakers in Windows 11/10.
How to Change Default Sound Output Device in Windows 11/10
There are four different ways using which you can change the default sound output device on Windows 11/10.
- In the Taskbar Corner Overflow
- In the Settings app
- In the Control Panel
- In the Game bar
Let’s get into the details of every way you can change the default sound output device.
Easily switch between Headphones and Speakers
1] In the Taskbar Corner Overflow
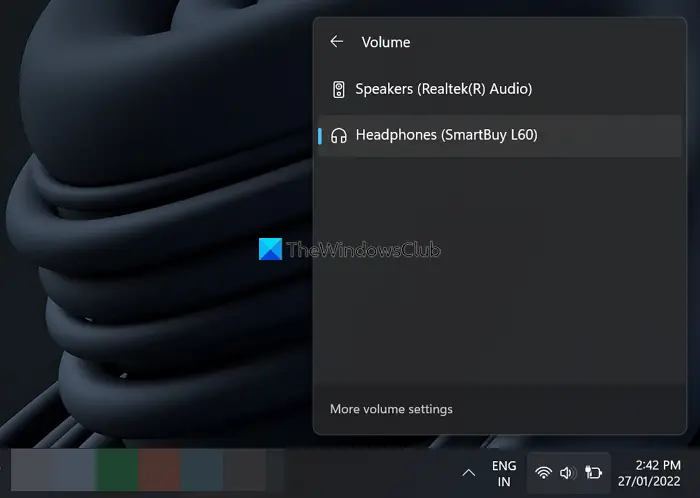
To change the default sound output device,
- Click on the Taskbar Corner Overflow icons
- Then, click on the arrow beside the Volume rocker on the panel
- You will see different audio output devices available. Click on the device you want to make it default.
2] In the Settings app
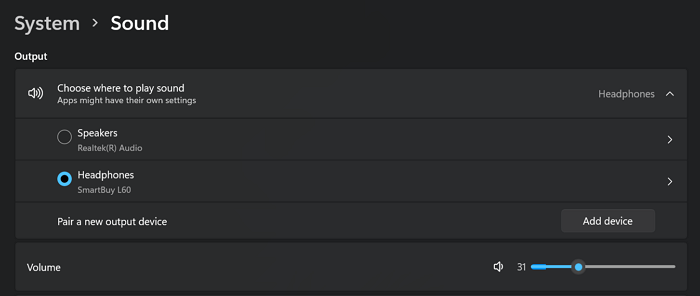
To change the default audio output device in the Settings app,
- Open Settings app
- Then, click on the Sound tab in the Settings window
- You will see the list of available output devices under the Output panel
- Click on the radio button beside the device you want to set it to default.
3] In the Control Panel
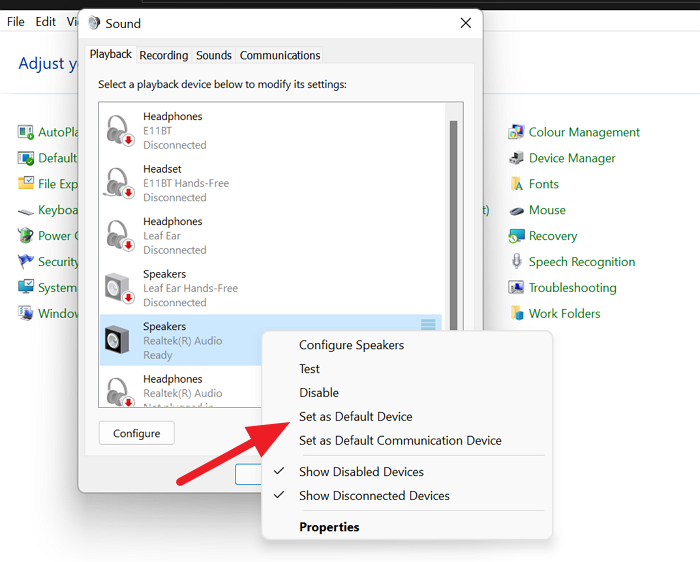
To change the default audio output device in the Control Panel,
- Open Control Panel from the Start menu
- Change the view to Small icons in the Control Panel
- Then, click on Sound
- It opens a Sound pop-up window. You will see the list of available sound output devices under the Playback tab
- Right-click on the device you want to set as the default output device and select Set as Default Device.
- Then, click on the OK button to apply the change
4] In the Game bar
To change the default audio output device in the Game bar,
- Open Game bar using Win+G shortcut
- Click on the Speaker button on the Game bar
- It will open an Audio widget. Click on the device under the Windows Default Device
- You will see the list of available devices. Then, click on the device you want to make the default audio output device.
How to set Audio device as default in Windows 10
We can change default Sound Output Device in Windows 10 in 4 quick and easy ways. We’ll explore this topic under the methods outlined below in this section:
- Via Volume icon on Taskbar
- Via Settings app
- Via Control Panel
- Via Game Bar
Let’s take a look at the description of the step-by-step process in relation to each of the method.
1] Change Default Sound Output Device via Volume icon on Taskbar
![]()
To change Default Sound Output Device via Volume icon on Taskbar in Windows 10, do the following:
- Click on the Volume icon on the taskbar notification area.
- Click on the chevron (upward pointing arrow head) above the master volume control.
Note: You will not see an expansion arrow if you do not have multiple audio playback devices.
- Click the playback device you want to use from the menu. Windows will then switch to it.
2] Change Default Sound Output Device via Settings app
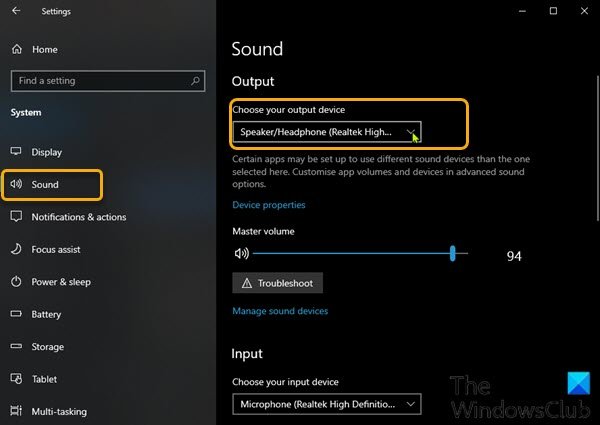
To change Default Sound Output Device via Settings app in Windows 10, do the following:
- Press the Windows key + I to open Settings.
- Tap or click System.
- Click Sound on the left pane.
- On the right pane, under Choose your output device section, click the drop-down and select the output device you want.
Note: You will not be able to choose if you do not have multiple audio playback devices.
- Exit Settings when done.
3] Set Audio device as default via Control Panel
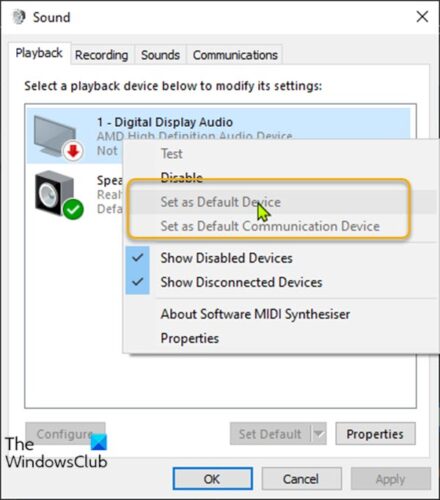
To change Default Sound Output Device via Control Panel in Windows 10, do the following:
- Press Windows key + R to invoke the Run dialog.
- In the Run dialog box, copy and paste the command below and hit Enter to open Sound settings.
rundll32.exe shell32.dll,Control_RunDLL mmsys.cpl,,0
- Click the Playback tab.
To set the default playback/sound output device, do one of the actions below:
- Right-click the playback device, and click on Set a Default Device.
- Select a playback device, and either:
Click on Set Default to set for both “Default Device” and “Default Communications Device”.
Click on the drop menu arrow to the right of Set Default, and click on Default Device.
Click on the drop menu arrow to the right of Set Default, and click on Default Communication Device. This will not be the “Default Device”.
- Click OK when done.
- Exit Sound settings panel.
4] Change Default Sound Output Device via Game Bar
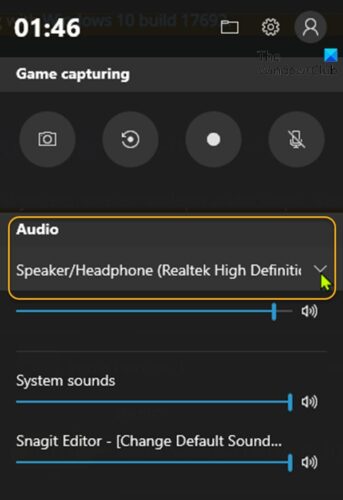
To change Default Sound Output Device via Game Bar in Windows 10, do the following:
- Press Windows key + G to open Game Bar.
- Select the default audio output device you want.
Note: You will not be able to choose if you do not have multiple audio output devices.
- Exit Game Bar when done.
These are the different ways using which you can change the default audio output device on Windows 11/10.
Related read: No Audio on computer; Sound is missing or not working on Windows.
How do I change the default audio output in Windows 10?
On Windows 11/10, you can change the default audio output device in four different ways: from the Settings app, Taskbar Corner Overflow or System tray, the Control Panel, and the Game bar.
Read: How to change Default Sound Input Device in Windows
How do I switch between headphones and speakers in Windows 11?
You can switch between headphones and speakers in Windows 11 from the Taskbar Corner Overflow. You need to click on Taskbar Corner Overflow and then click on the arrow button beside the volume rocker. You will see the list of the available audio output devices. Click on the device you want to switch to.