In this article, we will show you how to change DHCP Lease Time in Windows 11/10. When you connect your device to the internet, your Internet Service Provider assigns an IP address to it. This is a dynamic IP address which means it will remain active for a particular time period. After this time, the IP address expires and your device gets a new IP address.
The DHCP (Dynamic Host Configuration Protocol) server on your network handles the task of assigning a new IP address after a particular time. The time period up to which an IP address remains active is called DHCP Lease Time. By default, the DHCP Lease Time is 24 hours.
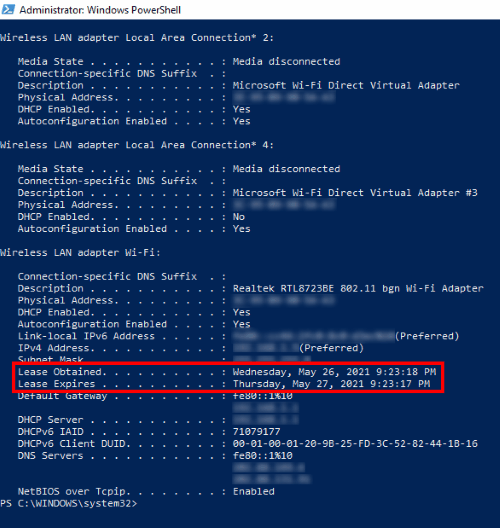
You can easily view the DHCP Lease Time for your computer by using the Windows PowerShell or the Command Prompt. To do so, launch either Windows PowerShell or Command Prompt as an administrator and type ipconfig /all. After that press Enter. Wait till the command gets executed. After the execution of the command, scroll down to view the DHCP Lease Time of your computer.

You will see the following two pieces of information:
- The time when the Lease was obtained from the DHCP server.
- The time when the Lease will expire.
How to change DHCP Lease Time on Windows 11/10
To change the DHCP Lease Time, you have to log into your router settings. Generally, the address to land on the login page of the router is either http://192.168.1.1 or http://192.168.0.1.
Type any one of these addresses in the address bar of your web browser and press Enter. If you get an error, type another address.

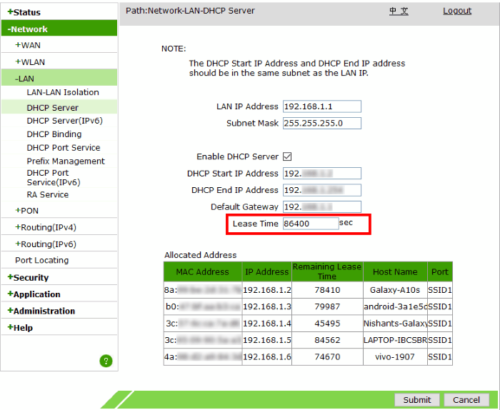
On the login page, you have to enter the username and password. After signing into your account, look for the DHCP Server settings of your router. In my case, the DHCP Server settings were located under the LAN settings of my router.
If you cannot find the DHCP Server settings, please refer to your user manual. The Lease Time is available in the DHCP Server settings. Enter the value in the box adjacent to the Lease Time and click on the Save or Submit button to save the settings.
Hope this helps.
Related posts:
Leave a Reply