If you want to change the DNS server using Command Prompt or Windows PowerShell, this tutorial will be handy. Instead of opening the Network Connections window, you can follow this step-by-step guide and make the change using Command Prompt or PowerShell.
Changing the DNS settings is relatively easy – however, if the Control Panel is not opening on your computer due to some reason, you may face a problem. That is when you can use this guide to get the job done. You should note that this tutorial will be helping you to change the Preferred DNS server and Alternate DNS server only.
How to change DNS server using Command Prompt
To change the DNS server using Command Prompt, follow these steps-
- Search for cmd in the Taskbar search box.
- Click Run as administrator option.
- Use the netsh command to show all internet sources.
- Note down the Interface Name.
- Enter the command to change the server addresses.
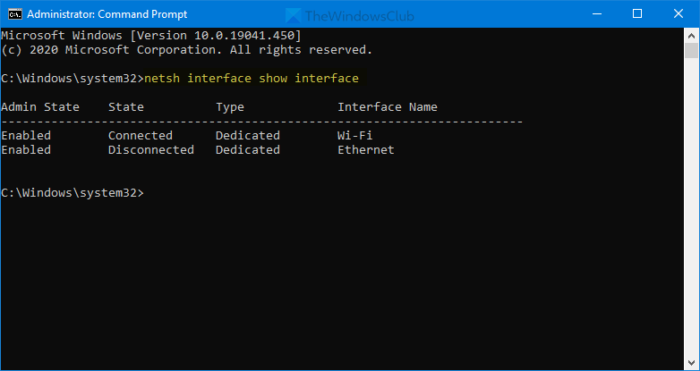
At first, you will need to open Command Prompt with administrator privilege. For that, you can search for cmd in the Taskbar search box, and click the Run as administrator option. After opening it, you require to obtain the Interface Name or the internet source name. To get that, enter the following command-
netsh interface show interface
It shows all the names of the previously connected internet sources on your screen. Note down the name of the interface to which you are connected at this moment.

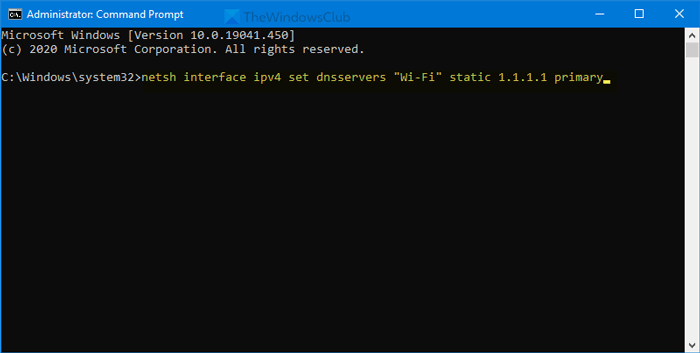
Following that, execute these commands-
For IPv4 DNS users:
netsh interface ipv4 set dnsservers "Interface Name" static preferred-DNS-address primary
netsh interface ipv4 add dnsservers "Interface Name" alternate-DNS-address index=2

For IPv6 DNS users:
netsh interface ipv6 set dnsservers "Interface Name" static preferred-DNS-address primary
netsh interface ipv6 add dnsservers "Interface Name" alternate-DNS-address index=2
Don’t forget to replace preferred-DNS-address and alternate-DNS-address with desired DNS server addresses.
How to change DNS server using PowerShell
To change the DNS server using PowerShell, follow these steps-
- Search for powershell in the Taskbar search box.
- Click the Run as Administrator option.
- Enter the
Get-DnsClientServerAddresscommand to show InterfaceAlias. - Enter the command to change DNS server addresses.
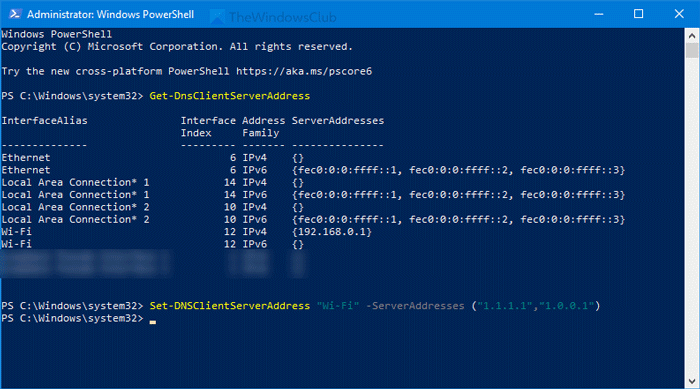
At first, you need to open an elevated Windows PowerShell window. For that, you can search for powershell and click the Run as Administrator option. Next, enter the following command and note down the InterfaceAlias name.
Get-DnsClientServerAddress
After that, enter the following command to change IPv4 and IPv6 addresses.
Set-DNSClientServerAddress "InterfaceAlias" –ServerAddresses ("preferred-DNS-address", "alternate-DNS-address")
It requires you to change three things before hitting the Enter button:
- InterfaceAlias,
- Preferred-DNS-address,
- Alternate-DNS-address.

Before pressing the Enter button, it would look like this-
Set-DNSClientServerAddress "Wi-Fi" –ServerAddresses ("1.1.1.1","1.0.0.1")
After making these changes, you might have to flush the DNS cache.
How to find DNS servers used in Windows 11?
- Open Windows Settings
- Go to Network & Internet
- Open the Properties for the connected Network
- Click on the network connection that you want to know the DNS server details for
- The details of the IPv4 DNS Servers and IPv6 DNS server addresses used by this network will be shown.
How do I know if my DNS is working HTTPS?
Cloudflare offers a webpage that can check this setting. When you visit the page, click on Check my browser, and it will reveal any missing security measures. If you do not want to use
TIP: Read more about some of the best DNS server providers – Comodo Secure DNS, OpenDNS, Google Public DNS, Yandex Secure DNS, Cloudflare DNS, Angel DNS, etc.
Leave a Reply