Virtual Desktops on Windows 11/10 are widely used by people to group and decentralize their computer deskwork. The application allows you to run more than one desktop interface on a single computer, for you to be able to manage multiple tasks at the same time on a single computer setup.
It is very easy to create a virtual desktop and group together related browser windows, and once you get the hang of it, it really gives a boost to your productivity. Managing multiple workflows will not seem as tedious a task as it used to. The one complaint people have had with this feature is its uncomfortable keyboard shortcut. The default keyboard shortcut to switch between virtual desktops is Ctrl + WinKey + Left or the Right Arrow key.
The problem with this shortcut key is that it requires you to use both your hands, which makes it unintuitive and not something that people generally prefer. Lucky for you, Windows allows you to make changes to almost everything it has to offer, including the keyboard shortcut to switch between virtual desktops. So today, we will be showing you how you can change the keyboard shortcut for Virtual Desktop on Windows 11/10. This process will show you how you can change the shortcut keys to switch between virtual desktops using AutoHotKey.
Change Virtual Desktop shortcut in Windows 11/10
The process that you have to follow is very simple and takes just a couple of minutes. Since there isn’t a built-in setting to modify the keyboard shortcut of this utility, you will have to download and install AutoHotKey. Follow the steps below after the installation is complete.
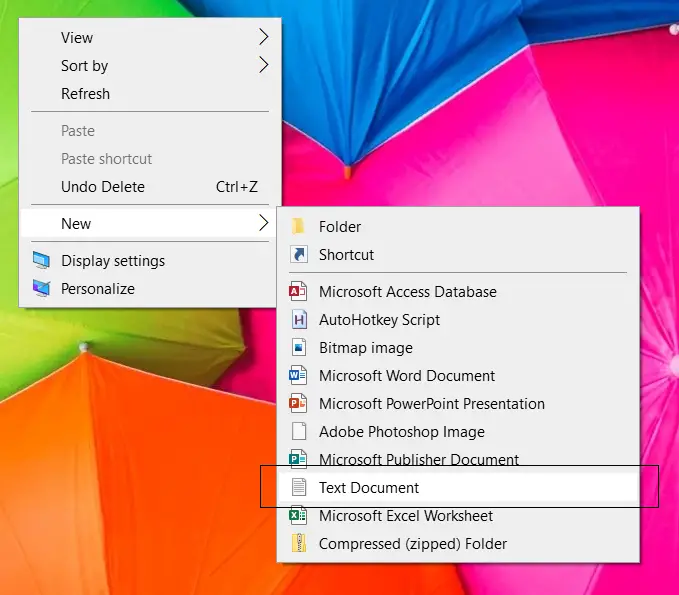
Visit your desktop screen, right-click on an empty section of the desktop, and from the New options that appear, create a text document.

Name this file ‘Change VD shortcut.ahk’. You can name the document whatever you want but you just have to make sure that the file extension is .ahk (for AutoHotKey), and not .txt (as is the case with text files). It may be possible that this file extension isn’t appearing on your computer or that you aren’t able to change it, in which case you will have to enable file extensions on your computer. Save this file on your desktop for convenience.
Right-click on this file and select the ‘Edit Script’ option. The default editing interface for such files, Notepad, will open.
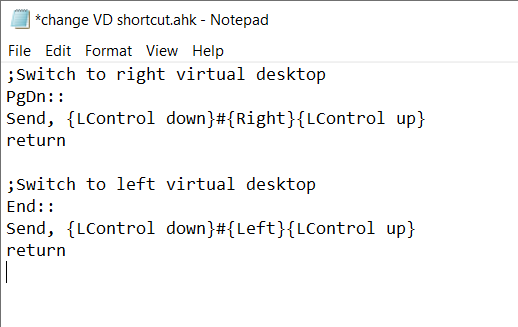
Paste the following code in the empty file. Doing so will swap the virtual desktop shortcut from ‘Ctrl’ + WinKey + Left/Right Arrow key to Page Down + End Keys button.
;Switch to right virtual desktop
PgDn::
Send, {LControl down}#{Right}{LControl up}
return

;Switch to left virtual desktop
End::
Send, {LControl down}#{Left}{LControl up}
return

It is not necessary for you too to have Page Down and End as the shortcut keys to switch over from one virtual desktop to another, although it is recommended for you to select keys that are both, rarely used and lined up close to one another.
You can modify the code by changing PgDn and End in the code above with your preferred keys and it will work just fine, as long as the keys you choose are listed among the ones applicable with AutoHotKey. You can check the list by visiting autohotkey.com.
After doing so, save the file and exit Notepad.
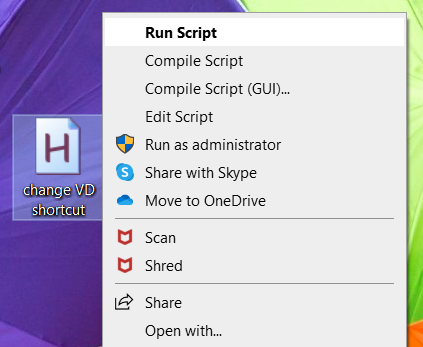
On your desktop, you will find an AutoHotKey script. Double-click on it or right-click and further select ‘Run Script’ to run it.

From there on out, the script will begin to run and you will be able to use the keyboard shortcut of your choice to navigate through virtual desktops on your Windows 10 computer.
You can verify if the script is running or not by checking your System Tray.
We hope that this article was able to help you change the keyboard shortcut for your virtual desktops.
TIP: You can now also use Keyboard Manager PowerToy to remap keyboard shortcuts easily
Leave a Reply