This post explains how to change Mouse Keys speed or acceleration in Windows 11. Both speed and acceleration play an important role in controlling how the pointer moves on screen while using the Mouse Keys feature to perform basic mouse functions. Speed determines how quickly the pointer moves across the screen, and acceleration determines how quickly it reaches its maximum speed once a key is pressed.

In Windows 11, the speed and acceleration settings for Mouse Keys can be customized to suit user preferences. This post will show you how to use these settings to tailor the behavior of the pointer when using the numeric keypad on your keyboard instead of the mouse.
Change Mouse Keys Speed or Acceleration in Windows 11
To change Mouse Keys speed or acceleration in Windows 11, you may follow one of these methods:
- Use Windows Settings
- Use Control Panel
- Use Registry Editor
Let us see this in detail.
1] Use Windows Settings to change Mouse Keys speed or acceleration

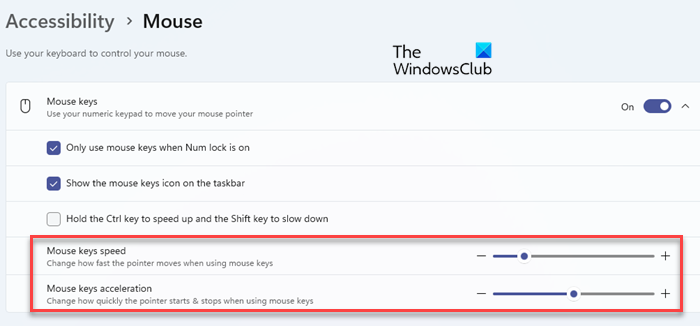
Press Win+I to open the Settings window. Navigate to Accessibility > Mouse. Click the down arrow next to the Mouse keys option to expand the section. You will see two options at the bottom:
- Mouse keys speed
- Mouse keys acceleration
(To access these settings, make sure the Mouse keys feature is enabled on your Windows 11 PC. If the feature is disabled, the settings will be grayed out.)
Use the slider next to the ‘Mouse keys speed’ option to adjust the speed of the mouse pointer. Move it towards the right to increase the speed and towards the left to decrease the speed of the pointer.
Use the slider next to the ‘Mouse keys acceleration’ option to increase or decrease the acceleration of the mouse pointer. Higher values accelerate the pointer faster, while lower values result in smoother movement of the pointer.
Close the Settings app when you’re done with the changes.
2] Use Control Panel to change Mouse Keys speed or acceleration

Type ‘control’ in the Windows Search bar and click Open next to the Control Panel app. Select Category under ‘View by’ dropdown and then navigate to Ease of Access > Ease of Access Center.
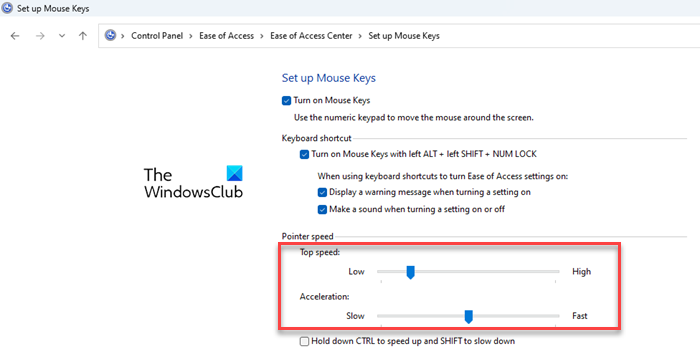
Click Make the mouse easier to use link. Next, click the Set up Mouse Keys link under ‘Control the mouse with the keyboard’ section. You will see two sliders under the Pointer speed section.
Use the Top speed slider to increase or decrease the speed of the mouse pointer (low or high). Use the Acceleration slider to increase or decrease the acceleration of the mouse pointer (slow or fast).
Click Apply and then OK to save changes to the system.
3] Use Registry Editor to change Mouse Keys speed or acceleration

Advanced users can adjust the Mouse Keys’ speed or acceleration on their Windows 11 PC by modifying specific registry keys.
We recommend backing up the Windows registry before making any changes to it to avoid system instability and other potential issues.
Press Win+R, type ‘regedit‘ in the Run dialogue, and press the Enter key. A User Account Control prompt will appear. Click Yes to open the Registry Editor.
Navigate to the following key in the Registry Editor window:
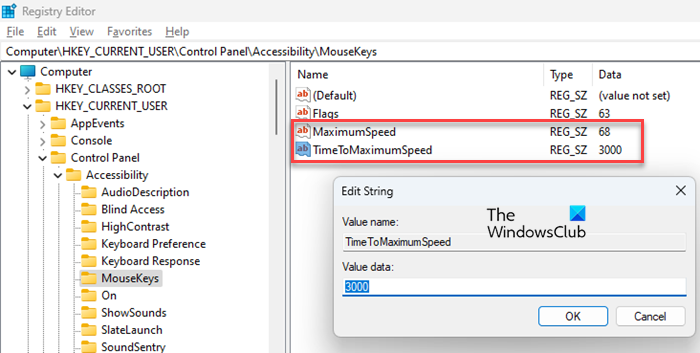
HKEY_CURRENT_USER\Control Panel\Accessibility\MouseKeys
Double-click the TimeToMaximumSpeed string value in the right pane. Edit String dialogue will appear. In the Value data field, enter a value between 100 and 5000 to modify the Mouse Keys acceleration. The value determines the time it takes (in milliseconds) to reach the pointer’s maximum speed.
Next, double-click the MaximumSpeed string value. In the Edit String dialogue, enter a value between 1 and 359 in the ‘Value data’ field to modify the Mouse Keys speed. This value controls the maximum speed of the mouse pointer when Mouse Keys is enabled.
Close the Registry Editor and reboot your PC to apply changes.
That’s all! I hope you find this useful.
Read: Enable or Disable Use Mouse Keys when Num Lock is On in Windows.
How do I access my mouse settings on Windows 11?
Click the Start button and select Settings to open the Settings app. Click the Bluetooth & devices tab in the left panel. Scroll down and click the Mouse option in the right panel. On the ‘Mouse’ screen, you can select the primary mouse button, change cursor speed, modify scrolling options, and adjust other mouse-related settings. You can also type ‘mouse’ in the Windows Search bar to directly open this screen. Alternatively, you can go to the Mouse section in the Control Panel to adjust mouse properties.
How do I control mouse click speed?
Open the Settings app and navigate to Bluetooth & devices > Mouse. Scroll down and click Additional mouse settings under ‘Related settings’. Mouse Properties dialogue will appear. Switch to the Buttons tab and use the slider under the Double-click speed section to adjust the double-click speed of the mouse. Click Apply followed by OK to save changes to the system.
Read Next: Windows 11 Accessibility Settings and Features.
Leave a Reply