In Windows 11/10 the default scroll value for the Mouse wheel is automatically set to 3. If you want to increase or fine-tune the speed of the mouse scrolling to make things easier for you, it should be configured the way you just like it. Let’s see how can you can increase, slow down or change the Mouse Scroll and Cursor Speed in Windows 11/10 via Settings or Registry.

Change Mouse Scroll Speed in Windows 11
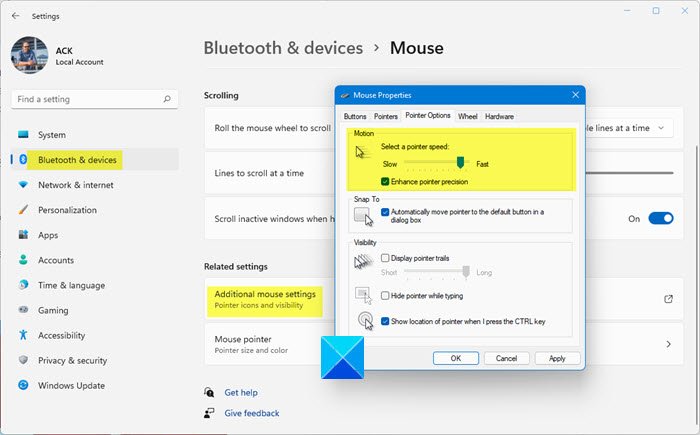
To increase, slow down, or change the Mouse Scroll and Cursor Speed in Windows 11:
- Open Settings
- Open Bluetooth and Device settings
- Click on Additional mouse settings
- Mouse Properties box will open
- Open the Pointer Options tab
- Under Motion, see the Pointer speed using the slider.
- Click Apply and exit.
Similarly, you can do it in Windows 10.
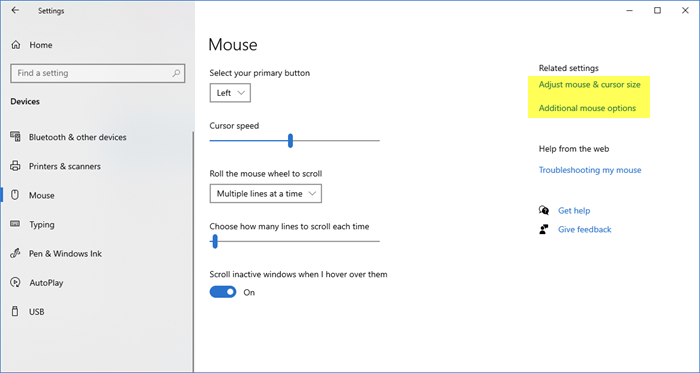
Many advanced mouses and touchpads feature specialized drivers with many additional options that show up under separate tabs in the Mouse Properties window. To configure these settings, you are required to refer to your hardware’s user manual. The other basic features of your mouse can be configured by accessing the Settings app.
First things first, click the Start Menu by clicking the Start button in the bottom left corner of the screen.
Next, click on Settings to open the app. When the Settings app shows up, click on Devices.
Select Mouse from the menu on the left to open up the mouse configuration screen.
You should see a slider. You can use it to change the Cursor speed.
Read: How to change Mouse Double Click Speed in Windows
You can also use the to set how many lines the scroll wheel should skip at a time for every scroll. Simply hold and drag the slider to the number you want.
By default, the value of the slider is already set at “3”. If required, you can fine-tune it to respond at any sensitivity between 1 – 100.
If you want to enter a value of your choice for your scroll wheel’s sensitivity open up the link that reads “Additional mouse options”.
When the mouse dialog pops up, chose the “Wheel” tab adjacent to the pointer options under Mouse Properties window.
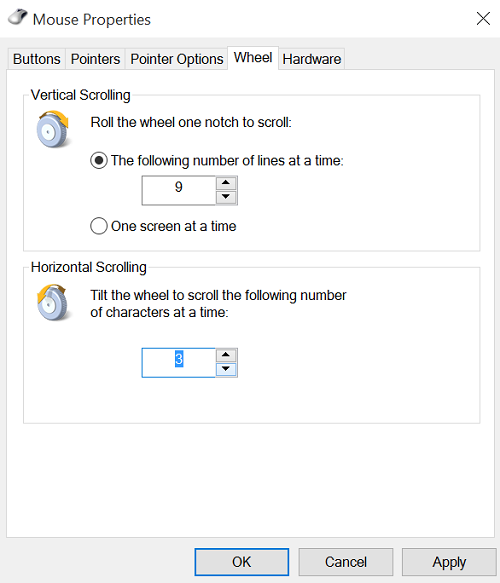
In the box that is displayed, enter the value for the scroll wheel sensitivity you want. In the same box, you’ll find the option to link your scroll wheel to the “One page at a time” function.
Read: Should you turn off Enhance Pointer Precision in Windows?
For every scroll you make, the wheel will skip an entire page of content at once, instead of going through it line by line. The same could also be used to adjust the settings for what’s known as “horizontal scrolling”.
Change Mouse Scroll Speed in Windows 11/10 using Registry Editor
Another option to change mouse scroll speed in Windows 11/10 computer is by using the Registry Editor. This option also lets you roll the mouse wheel to scroll one screen at a time or multiple lines at a time. But first, take a backup of Registry Editor. It is important because if something goes wrong, then Registry backup will be there to restore the Registry. After that, use the following steps:
- Open the Windows Registry
- Access the Desktop key
- Access the WheelScrollLines value
- Change the value data of WheelScrollLines value
- Press the OK button
- Sign out or sign in to your computer.
Now have a look at all these steps in detail.
In the very first step, you are required to open your Windows 11/10 computer Registry. To open it, type regedit in the Search box, and hit the Enter key.
When Windows Registry is opened, access the Desktop key. To access this Registry key, use this path:
HKEY_CURRENT_USER\Control Panel\Desktop
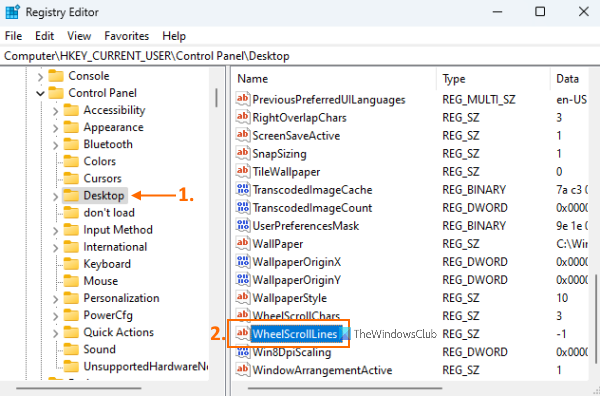
On the right-hand section of this Desktop Registry key, access the WheelScrollLines name String value.
Now you have to change its value data. For that, double-click this WheelScrollLines String value. This will open an Edit String box for this value. In that box, enter any value between 1 to 100 to scroll multiple lines. For example, if you want to scroll 20 lines in a webpage or a document, then add 20 in the Value data field.
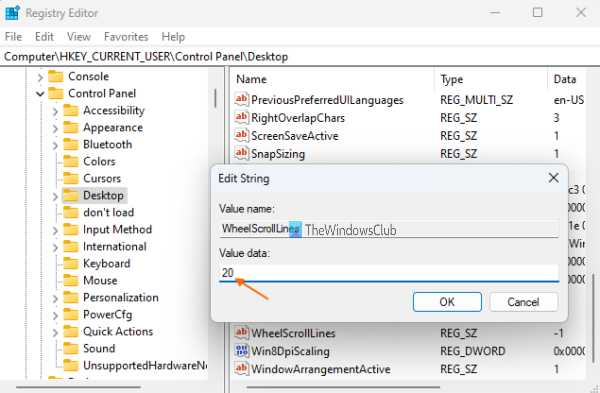
On the other hand, if you want to scroll one screen at a time, then put -1 in the Value data field of WheelScrollLines value.
Press the OK button and then you can close the Registry Editor.
In the final step, you need to sign out or sign in or simply restart your Windows 11/10 computer to save the changes.
If you want to keep the default scroll speed (which is 3) for the mouse wheel using Registry Editor, then follow the above steps, and add 3 in the Value data field of WheelScrollLines String value. Hit the OK button and then restart the computer to successfully apply the changes.
Can you change the scroll wheel speed?
Yes, you can easily change mouse wheel scroll speed in Windows OS. Whether you are using Windows 10 or Windows 11 computer, the Settings app provides the option to change the scrolling speed of the mouse wheel. Apart from that, you can also tweak Windows Registry to set the mouse wheel scrolling speed. Both the options are covered in this post.
How do I change scroll settings in Windows 10?
If you want to change vertical and horizontal scrolling settings for the mouse wheel in Windows 10, then you can do this by accessing the Mouse Properties. If you want, you can also use the Settings app to change the mouse wheel scroll speed, cursor or pointer speed, primary button, and other settings for the mouse.
If you are using Windows 11 computer, then you can use its Settings app to change mouse pointer speed, scrolling settings, primary mouse button, etc. Just access the Mouse section available under the Bluetooth & devices category of the Windows 11 Settings app and adjust the settings as per your needs.
Now read: How to disable Ctrl Scroll zoom in Windows.