In this tutorial, we will see how to change the priority of Network Connections in Windows 11/10 and make them follow the desired connection order. You can make Windows use a Wired connection instead of a Wireless connection.
When you start your laptop, if a wireless connection is available, your Windows laptop will connect to the Wi-Fi connection. Even if you connect to a wired connection, the usage will continue from the Wi-Fi connection. This is because when more than one network connection is available, Windows uses the one with the lowest metric value.
Use Wired connection instead of Wireless in Windows
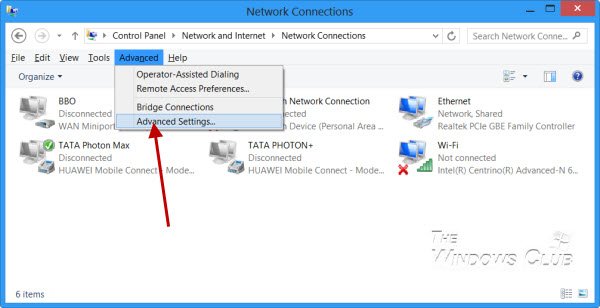
To change the Network Connection Priority, open Control Panel > Network and Internet > Network Connections.
Alternatively, if you are unable to find it, just open Control Panel and type Network Connections in the search box and press Enter. Under Network and Sharing Center, you will see View network connections. Click on it to open the following window.
Now click on the Alt key to make the Menu bar appear.

Click on Advanced Settings. This will open its Properties box.

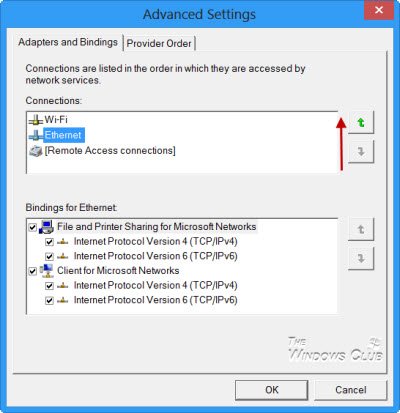
Under the Adapters and Bindings tab, you will see the list of connections and the order in which they are accessed by Network Connections and other related Windows services.
The default is Wi-Fi, Ethernet, and then Remote Access. The Network Connections service manages objects in the Network and Dial-Up Connections folder, where you can view both local area networks and remote connections.
Using the Up and Down arrows, you can change their order and set them according to your priority. When you change the setting as shown above and make Ethernet the first choice, your laptop will use the wired connection first.
Click OK and Exit.
Your Windows PC will now follow this order of priority when detecting available network connections.
Next, we will see how to view and change the priority of Wireless Networks in Windows using CMD.