Windows 11/10, by default, saves screenshots to the Pictures folder. But if you wish, you can change the default save folder location for captured Print Screen image files to any other location by following this tutorial. There are several ways you can take a desktop screenshot on Windows, including using the built-in Snipping Tool, PrtScr keyboard button, or other third-party Screen capture freeware.
Change Print Screen Screenshots folder location

To change the folder where the Windows operating system saves its screenshots, you will have to do the following. Navigate to the following location, where you will see a Screenshots folder:
C:\Users\<username>\Pictures
If you do not see the Screenshots folder, you need to hit Win+PrtScr to take a screenshot first. This screenshot will then be saved in the Screenshots folder, which will be created by Windows to save your screenshots.
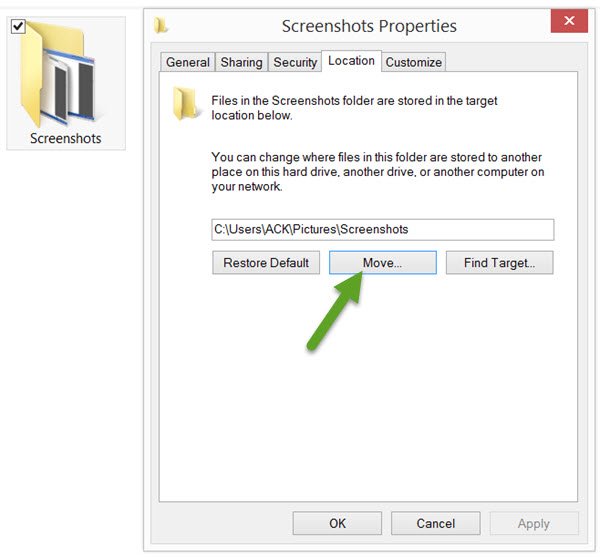
Right-click on the Screenshots folder and select Properties.
Under the Location tab, you will see the target or the folder path where screenshots are saved by default. You can change where files and folders are saved to another location on your computer – including the Desktop, another drive, another computer on your network.
To do this, click on the Move button and navigate to the folder location where you want to save the screenshots via the Select a Destination box that opens up. Select the folder and click Apply.
Once you have done this, your captured screenshots will be saved to this new location.
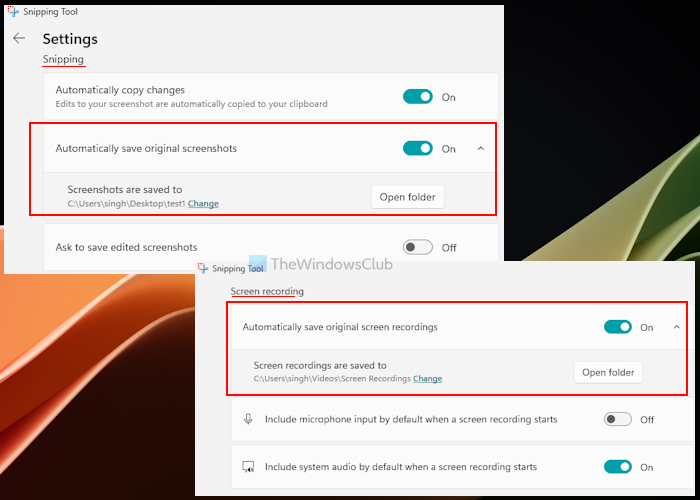
Starting with Snipping Tool version 11.2.408.13.0 and later, there is a dedicated setting to change the default folder to save screenshots as well as screen recordings in the Snipping Tool on Windows 11. Thus, you don’t have to move the default Screenshots folder.
Change default folder to save Screenshots and Screen Recordings in Snipping Tool on Windows 11

Earlier, the default folder to save screenshots for Snipping Tool was the Screenshots folder (%USERPROFILE%\Pictures\Screenshots). To change the default location for storing snips, we have to move the entire Screenshots folder. This might create a problem when you already use the Screenshots folder for other applications and purposes. Here are the steps:
- Open the Snipping Tool
- Click on the See more (three horizontal dots) icon on the top-right corner
- Select the Settings option
- In the Snipping section, expand the Automatically save original screenshots option
- Click on the Change option and select a new folder or destination to save the screenshots
- Under the Screen recording section, expand the Automatically save original screen recordings option
- Select the Change option and choose a new folder to save the Snipping Tool recordings.
Now, whenever you start a snip using the Win+Shift+S hotkey or start a recording from the main interface of Snipping Tool, the new items will be stored automatically in the destination folders set by you. You can also change the folder to save snips whenever needed.
I hope this helps.
Note: if you take screenshots using the Win+PrtScn hotkey, then screenshots will be saved to the default Screenshots folder only regardless of the default folder set by you.
To restore the default folder path, click the Restore Default button and click Apply.
Read: How to restore the Screenshots folder in Windows 11.
This post may interest you if Windows not saving captured Screenshots in the Pictures folder.
Where are Snipping Tool screen recordings saved?
The screen recordings made using the Snipping Tool are stored in the Screen Recordings folder by default. The folder is located at C:\Users\username\Videos\Screen Recordings. Replace the username with the actual user profile name to access the folder. Or else, you can directly paste %USERPROFILE%\Videos\Screen Recordings in the address bar of File Explorer or Run Command box to access the recordings.
Why is my Snipping Tool not saving automatically?
If the automatic saving snips setting is turned off, that can be the reason the Snipping Tool utility is not saving the captured screenshots automatically. Instead, it opens the built-in image annotator that you can use to save the snip. To solve this problem, launch Snipping Tool > See more > Settings. Turn on the Automatically save original screenshots setting and close the Snipping Tool.
If you are looking to change default folder locations for some other Windows folders, maybe some of these posts will be of help to you:
And what if there is no screenshots folder in that location?
I’m not seeing the Location tab.
there is no screenshots folder
There is no screenshots folder you morons
If you do not see the Screenshots folder, you need to hit Win+PrtScr to take a screenshot first.