The Recycle Bin in Windows 11/10 is used to store deleted files. It works as a safety net as it protects the files from getting immediately deleted from the hard drive. Typically, whenever a file is deleted from the system, Windows places it in the Recycle Bin for a definite period, so if you ever need the files back you can use this feature and restore one or multiple files as required. But Recycle Bin will not keep all your deleted files forever!
How to change Recycle Bin Settings in Windows?
To open Recycle Bin Settings right-click on its icon and select Properties. The Recycle Bin Settings will let you change its size, tweak it, change its icons, and more. You make it show or hide the Delete confirmation box or opt to delete files directly without moving there here.
Increase the size of Recycle Bin
Any time you delete a file in Windows, it goes straight to the Recycle Bin. These deleted files sit in the Recycle bin until it reaches their preconfigured maximum size limit (or until the user empties the bin). When the Recycle bin hits its maximum limit, it automatically deletes the oldest files in the bin to make space for new files.
Most of the users never adjust the default settings of the Recycle Bin and let it do its job. But today we will take you through the steps of modifying the recycle bin storage size in Windows 11/10.

Change Recycle Bin Storage Size in Windows 11/10
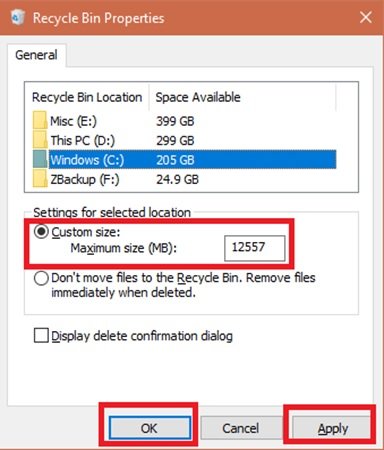
You can adjust the Recycle Bin’s default settings to change the maximum storage size and increase the number of files kept in the bin so that you can restore them if need be. Here are steps you should follow to modify the Recycle Bin storage size In Windows 11/10:
- Locate the ‘Recycle Bin’ on your desktop and right-click on the icon.
- From the drop-down menu select the ‘Properties.’
- Select the ‘Recycle Bin location’ from the options available
- Pick the option you wish to configure.
- Navigate to ‘Settings for selected location’.
- Check the ‘Custom size’ option.
- Now move to the ‘Maximum size (MB)’ field.
- Specify the maximum amount of hard drive space your Recycle Bin can use for storing your deletions.
- Click ‘Apply’ and ‘OK’ to save your changes.
You can set the maximum size in MB (1024 MB = 1 GB) for storage you want.
Done! Now your Recycle Bin can store more (or fewer) files, depending on what you specified.
Do note that the Recycle Bin size calculations are based on the user’s disk quota and not the disk size. In Windows 11/10 the default size is 10% of the first 40GB of quota, and 5% of any quota above which is above 40GB.
Related: This file is too big to recycle, Do you want to permanently delete it?
It is important to note that in case you have multiple hard drives, partitions, or an external hard drive connected to your PC, every single location will have its own Recycle Bin and settings. But even though each drive has its own Recycle Bin folder, the contents of all the folders are combined and displayed in the normal Recycle Bin view. So, you will see all your deleted files in the Recycle Bin, no matter where they come from.
Also, removable drives, like USB flash drives and memory cards, do not have a Recycle Bin. Files, once deleted from removable drives, are permanently deleted.
The Recycle Bin is one feature that most of us ignore, but with a little tweaking, we can make it work the way we want to. Read this blog for more tips and tricks on Recycle Bin.
We hope this guide will help you a lot with the accidental deletion of important files.
Leave a Reply