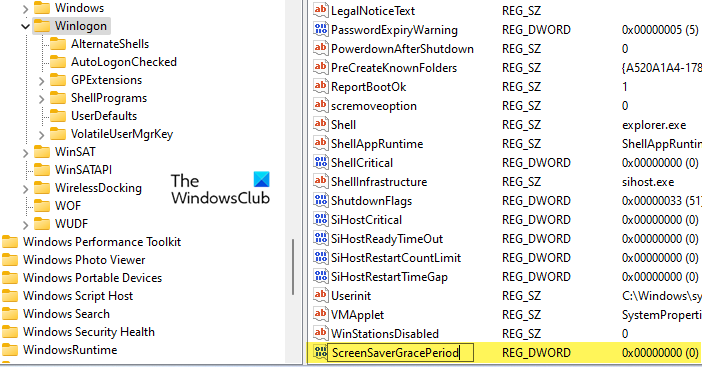
In this post, we will show you how to change the Screen Saver password grace period on a Windows computer. When password protection is enabled for the screensaver in Windows 11/10, it doesn’t lock the user session immediately but takes a 5 seconds delay to show the login screen. This delay, also known as the grace period, is given to allow the user to resume activity on the computer without having to enter the password. For example, if the user is reading something on the computer and the screensaver starts after a specified wait period, the screen saver grace period enables the user to exit the screen saver and return to the desktop by pressing any key or moving the mouse.

If you require, you may change this grace period to the amount you want (in seconds). In this post, we will show you how to change the screen saver password grace period in Windows 11/10.
Change Screen Saver Password Grace Period in Windows 11/10
You may change the password grace period for the screen saver in Windows by tweaking some registry settings. Windows registry is a hierarchical database of configuration settings critical to the applications and services of the Windows operating system. Before you change the Windows Registry, it is important to create a system restore point.
Follow these steps to change the screen saver password grace period using the Registry Editor:

- Open the Registry Editor and navigate to the following path:
HKEY_LOCAL_MACHINE\SOFTWARE\Microsoft\Windows NT\CurrentVersion\Winlogon
- In the right panel, locate the DWORD ScreenSaverGracePeriod and double-click on it to change its value. If you can’t find the DWORD, go to the next step. Else jump to step no.11.
- Right-click anywhere in the empty area of the right panel (of the WinLogon key) and select New > DWORD (32-bit) Value.
- Name the key as ‘ScreenSaverGracePeriod‘ and press the Enter key.
- Double-click on the ScreenSaverGracePeriod DWORD.
- In the Edit DWORD (32-bit) Value window, select Decimal as Base.
- Enter a value between 0 to 2147483 in the Value data field. This value will determine the grace period interval in seconds that you want to set to hold password protection on the screen saver. If you set this value to 0, the password protection will take immediate effect on the screensaver.

Finally, click on the OK button, close the Registry Editor and reboot your PC.
Read: Fix Screen saver settings greyed out in Windows.
This is how you change Screen Saver Password Grace Period in Windows 11/10. To restore the value to default, simply delete the registry key you’ve created following the steps mentioned above.
Notes:
- Make sure you’re signed in as an administrator before you apply this tweak.
- Make sure password protection is enabled for the screen saver.
- Changes you made will be applied to all the user accounts on your system.
Hope you find the above post useful.
How do I turn off the screensaver password in Windows?
Click on the Start button icon and select Settings. Click on the Personalization option on the left panel. Then click on the Lock screen option on the right panel. Click on Screen saver under Related settings. In the Screen Saver Settings window, uncheck the ‘On resume, display logon screen‘ checkbox. Click on the Apply button. Then click on the OK button to exit Screen Saver settings.
Read Next: How to set Photos as a Screensaver in Windows.
Leave a Reply