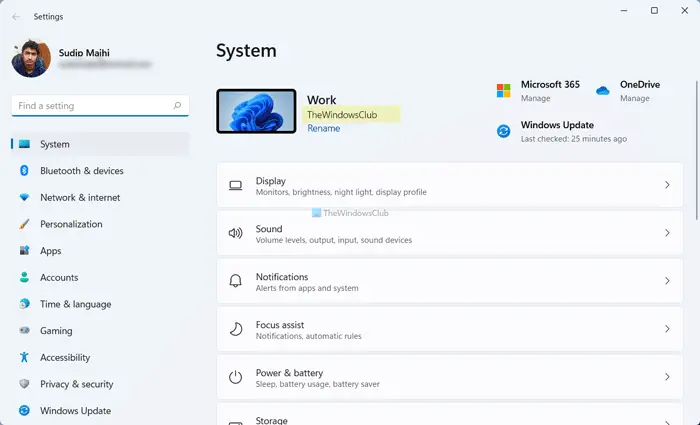
The Windows Settings panel displays an unusual item, System Product Name, under your computer name in Windows 11. However, if you want to change the Windows 11 System Product Name, here is how you can do that. It is possible to change the OEM information using Registry Editor.
By default, your computer manufacturer specifies the name of the system. For example, if you have a Microsoft Surface, it shows the Surface name under your computer name. However, if you have assembled your computer manually, it displays the motherboard name in the Windows Settings panel. If you want to change the system product name, which is visible in the Windows Settings panel, you need to use Registry Editor.
it is recommended to backup all Registry files before getting started with the steps.
How to change System Product Name in Windows 11
To change Windows 11 System Product Name in Windows Settings, follow these steps:
- Press Win+R to open the Run prompt.
- Type regedit and hit the Enter button.
- Click on the Yes option.
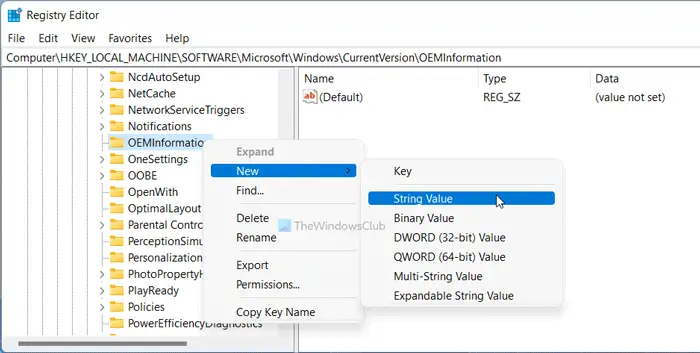
- Navigate to OEMInformation in HKLM.
- Right-click on the OEMInformation > New > String value.
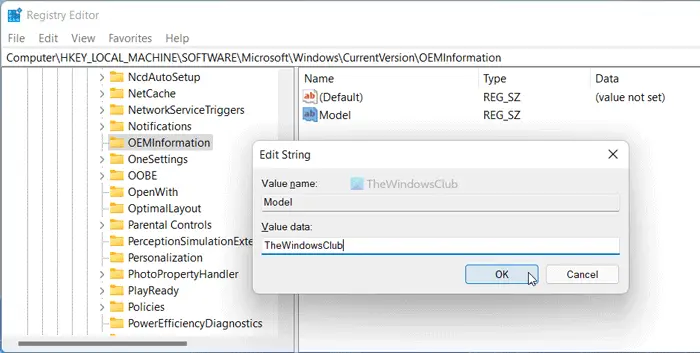
- Name it as Model.
- Double-click on this String Value.
- Set the Value data as the name you want to display.
- Click the OK button.
- Restart the Windows Settings panel.
To learn more about these steps, continue reading.
At first, you need to open the Registry Editor on your computer. For that, you can press Win+R to open the Run dialog. Then, type regedit in the empty box, and press the Enter button. Then, if the UAC prompt appears, click on the Yes button.
Once the Registry Editor is opened on your computer, navigate to the following path:
HKEY_LOCAL_MACHINE\SOFTWARE\Microsoft\Windows\CurrentVersion\OEMInformation
In the OEMInformation key, you can find a String Value named Model. However, if you cannot find the mentioned key, you need to create it manually. For that, right-click on the OEMInformation and select New > String Value.

Then, name it as Model. Next, you need to change the Value data of the Model String Value. To do so, double-click on it and set the Value data as the name you want to display under your computer name.

Once done, click the OK button and restart the Windows Settings panel.

In case you want to display the default name, you need to delete the String Value you created earlier. For that, right-click on the Model String Value and select the Delete option from the context menu. Then, click on the Yes button.
Can I Rename my laptop in Windows 11?
Yes, you can easily rename your laptop or desktop in Windows 11 OS. For this, open the Settings app, and access the About page in the System category. There you will see Rename this PC button on the top-right part. Press that button and a box will open. Enter the new name in the given text field. You can use letters, hyphens, and numbers for a name. Press the Next button and restart your system.
How do I change my OEM information in Windows 11/10?
If you want to change or add OEM information in Windows 11/10, then access the OEMInformation Registry key. The path is:
HKEY_LOCAL_MACHINE\SOFTWARE\Microsoft\Windows\CurrentVersion\OEMInformation
Now you can create different String values and rename them to Manufacturer, Model, SupportHours, SupportURL, SupportPhone, etc. After that, double-click on each String value one by one and add the relevant information in the Value data field. Press OK to save the changes.
Leave a Reply