In order to save your work while using any of the Microsoft Office apps, Microsoft has introduced a feature that will autosave your work periodically. This is named as Auto-save or Auto-recover. So, if your machine just crashes or your Office app crashes, you won’t lose much of your work.
However, many users are really fast at creating and editing documents. They tend to make a big list of modifications even before the Office App auto-saves their work in the background. So, if the system crashes before the autosave takes place, this big list of modifications will just go away and cannot be recovered. Hence, some people would like to modify this period for Autosave.
Today, we will discuss doing it on Word, PowerPoint, Excel and other productivity apps that come with the Office Suite from Microsoft. This post will show you how to turn on and increase, decrease or change the Auto-save time interval in Office apps like Word, Excel, PowerPoint, etc. You can also disable this auto-save feature if you wish to.
Change Autosave interval on Office apps

To co change the Auto-save time interval in Office, open the Office app whose autosave interval you wish to change. For walkthrough purposes, we will use Word as an example.
- After Word is open, click on File in the main menu ribbon.
- Next, click on Options in Word.
- Now, a new window will pop up.
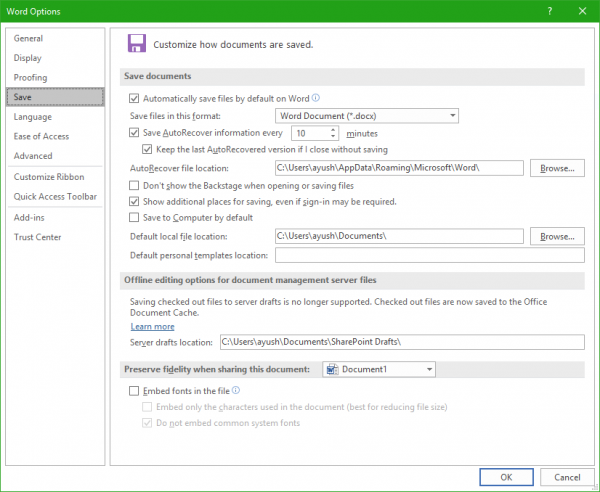
- On the left column tab, select the menu labeled as Save.
- And then on the right side, under the Save documents section, you will notice a checkbox option that says Save AutoRecover information every _ minutes. Make sure that checkbox is checked.
- There you can select the period of Autosave in minutes as per your wish.
- Click on OK on the bottom right portion of the window to save your changes.
Also, if you wish that Word should not automatically save your documents, just uncheck the box beside the option that says Save AutoRecover information every _ minutes and then hit OK.
This procedure is the same for all the apps in the Office Suite for Windows.
We tested this tutorial working with Word, Excel, PowerPoint and Access. Hence, we are pretty sure that it will work just fine with other applications of the Office suite like Project, Visio, and more.
How to turn on or off Auto Save in Word, Excel?
To turn off or disable Auto Save in Word, Excel or any Office program:
- Open the Office document
- Click on File in the main menu ribbon.
- Next, click on Options in Word.
- Now, a new window will pop up.
- On the left column tab, select the menu labeled as Save.
- And then on the right side, under the Save documents section, you will notice a checkbox option that says Save AutoRecover information every _ minutes.
- Uncheck this checkbox and click on Apply to turn off AutoRecover or Auto Save,.
How to adjust the AutoRecover time option?
To adjust the Auto-save or Auto-recover time option, open the Office file and do the following:
- Click the ‘File’ tab.
- From the ‘File’ section showing up select ‘Options’.
- Next, under ‘Word Options’ dialog box’s menu list, choose ‘Save’.
- Scroll down until you find ‘Save documents’ section.
- There, ‘Save AutoRecover information every…‘ option should be visible to you.
- You will find by default the ‘Save AutoRecover information every…‘ checkbox is checked.
- If you want to change the time interval, just use the Up-Down arrows to change the default time and set the new time limit.
Hope this helps.
How do I change my AutoSave settings in Office 365?
To change AutoSave settings in Microsoft 365, open any Microsoft 365 app and go to File > Options > Save. From there, adjust AutoRecover settings according to your preferences. Note that AutoSave is only available for files stored in OneDrive. This ensures you can manage your document saving preferences effectively.
How do we set a time interval to save the changes automatically?
To set a time interval for automatically saving changes, navigate to the application’s settings or preferences. Locate the “Auto-save” option and choose your desired time interval from the dropdown menu. Confirm your selection to ensure changes are saved automatically at the specified intervals, reducing the risk of data loss.
Leave a Reply