You can, if you wish, choose to change the default location of the search index in Windows 11/10/8/7. It is, by default, stored in the C:\ProgramData\Microsoft\Search\Data folder, which is a hidden system folder. You can show hidden files and folders in your Windows 11/10 PC and then access that folder.
Read: What is Search Indexing and how does it affect searching in Windows 11/10?
Change location of Search Index
To change the default Search Index Location in Windows 11/10, do the following:
- Open Control Panel
- Change the View by mode
- Click on Indexing Options
- Click on the Advanced button
- Under the Index location, click on the Select new button
- In the Browse for folder box, select your new location
- Click OK and exit.
Let us see these steps in detail.
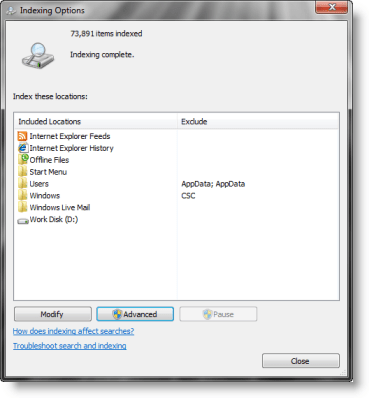
Open the Control Panel window and then change the View by mode to Small icons or Large icons. After that, click on the Indexing Options.
Alternatively, you can also use the Search box of Windows 11/10, type indexing options, and hit the Enter key.
This will open the Indexing Options window. There, click on the Advanced button.

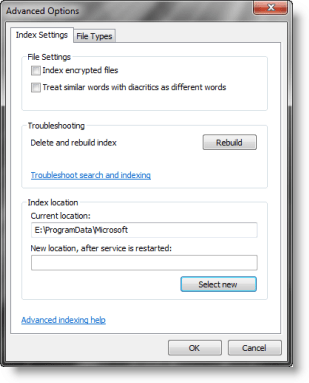
An Advanced Options box will open with the Index Settings tab.

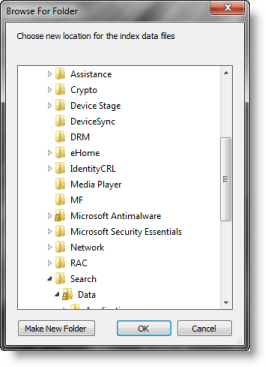
In the Index location section, press the Select new button. Choose the folder where you want to store the search index file in. Click on the OK button.

This operation will restart Windows Search Service, and indexing will take place afresh and be saved at this new location.
Change the location of the Search Index using Registry Editor in Windows 11/10

You can also use Windows 11/10 Registry Editor to change the location of the Search Index. Before doing that, you should backup Registry, just in case. Now follow these steps:
- Type regedit in the Search box and press the Enter key
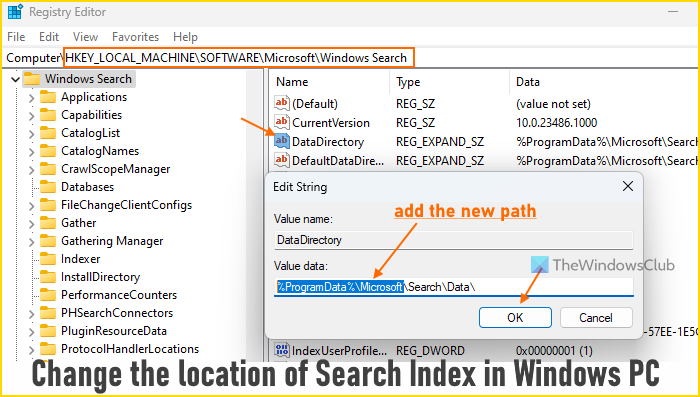
- In the Registry Editor window, access the Windows Search Registry key using the following path:
HKEY_LOCAL_MACHINE\SOFTWARE\Microsoft\Windows Search
- On the right-hand section, double-click on the DataDirectory String value. This is the value that contains the path of the search index location
- An Edit String box will pop up. In its Value data field, add the new path where you want to store the index, and at the end of that path, add \Search\Data\
- Press the OK button
- Restart the Windows Search service.
How do I fix Search Index in Windows 11?
If you face problems using the Search Index of Windows 11 like the Search Failed to Initialize, Search Indexer stopped working, etc., then you should delete and rebuild the index. In addition, you can also reset the Windows Search service, check LocalState folder permissions, and reset Windows Search settings to default to fix the problem.
How do I change Search Settings in Windows 11?
Open the Settings app > Privacy & security > Searching Windows, and then you can change or configure search indexing options and settings for Windows 11 search. You can change Find my files to Classic or Enhanced, add excluded folders, etc. It also lets you access Advanced indexing options to select File Types to include in the search, add a new file type or extension to the search list, and more.
Want more? Check out these Windows Search Indexer tips.