If installed Google Chrome extensions are not working on Windows 11/10 PC, follow these tips to eliminate this problem. Whether a single extension or multiple extensions are not working on your computer, you can fix the issue with this guide.
Normally, to enable Chrome extensions in Windows, open Google Chrome, click the three dots in the top-right corner, choose ‘More tools,’ then ‘Extensions.’ Toggle the switch on for the desired extension. If it’s not installed, visit the Chrome Web Store, find the extension, and click ‘Add to Chrome.’
If Google Chrome is not working on Windows, it could be due to conflicting software or system glitches. Ensure you have the latest Chrome update installed, and try closing other running programs. If issues persist, rebooting your computer can resolve many problems. For unresolved cases, reinstalling Chrome may be necessary to restore functionality.
Chrome extensions not working on Windows 11/10
If extensions are not working on the Google Chrome browser, we suggest several suggestions that are sure to fix the problem for you:
- Reset experimental features
- Create a new profile
- Scan PC with antivirus
- End process using Task Manager
- Reinstall extension
- Clear browsing data
- Sign out of Google account
- Install Google Chrome updates
Chrome may block extensions if they are not sourced from the Chrome Web Store or are considered a security risk. This safeguard protects your browsing data. Always download extensions from official sources to ensure compatibility and safety for a secure browsing experience.
1] Reset experimental features
Google Chrome offers some experimental features or Chrome Flags that allow users to try out our upcoming or beta features. However, if you have recently enabled a Chrome Flag and extensions stopped working after that, it is recommended that you reset it. It doesn’t matter whether you enabled one or multiple Chrome Flags; it is mandatory to revert the change so that you can find the cause of this issue.

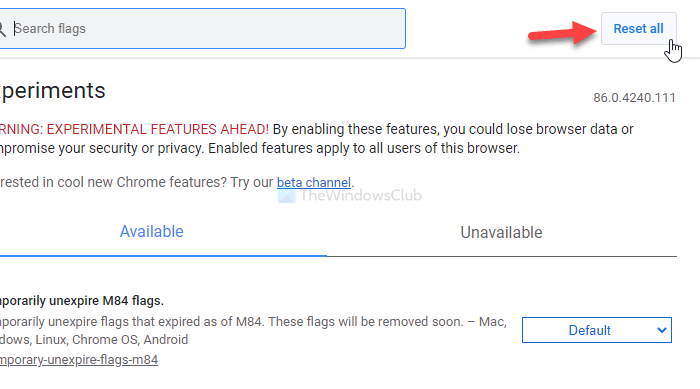
If you have enabled multiple Chrome Flags and you do not remember them all, it is better to use the Reset all option. To use it, enter chrome://flags in the address bar and hit the Enter button. After that, click on the Reset all button, and relaunch your browser.
2] Create a new profile
If the existing Chrome profile has some internal conflict, you will get this problem on your computer. Therefore, it is recommended to create a new Google Chrome profile, sign in to it, and install and use an extension.
Fix: Failed to load extension error in Google Chrome
3] Scan the PC with an antivirus
Google Chrome stores the extension data in a local drive. If malware or adware attacked your PC earlier and extensions stopped working after that, there is a chance that the respective folder has some issues. At times, files and folders get altered by malware as well as adware.
It is recommended to scan your PC with an antivirus and adware removal tool. There are many free antivirus programs available. Apart from that, you can download Ultra Adware Killer or AdwCleaner, etc. and scan your PC with them.
4] End process using Task Manager
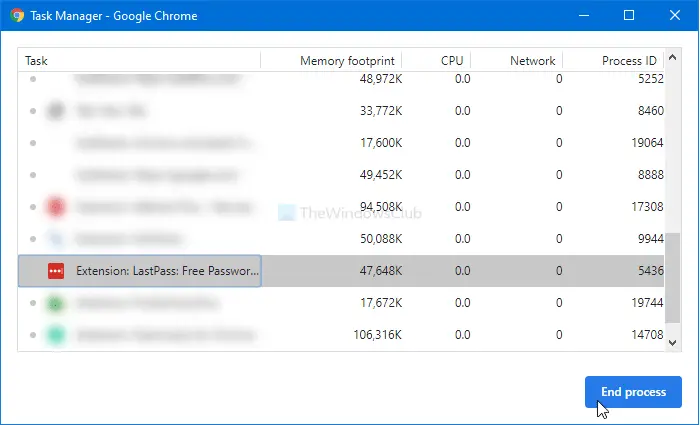
Sometimes, a restart solves all the issues, and you can follow the same method to resolve this problem. However, you don’t have to open the Windows Task Manager. Instead, you can open the Google Chrome Task Manager. For that, click the three-dotted icon, and select More tools > Task manager. Alternatively, press Shift+Esc to open the same panel. Now, find out the extension that is not working, select it, and click the End process button.

Following that, disable the extension from the Extensions window, restart your browser, and re-enable the extension.
5] Reinstall extension
If an extension is very outdated, there is a chance that it won’t work with the latest version of Google Chrome. If you have downloaded an extension from the Chrome Web Store, it doesn’t happen frequently. However, if you have sideloaded an extension in the Chrome browser, and it hasn’t got any update for a very long time, this issue may appear on your computer. There is a straightforward solution to this problem. If the developers have already released an update, install it immediately. For that, you need to uninstall the existing instance first.
To do so, click the three-dotted icon, and select More tools > Extensions. Following that, click the Remove button, and confirm it by clicking the same button again.
6] Clear browser data
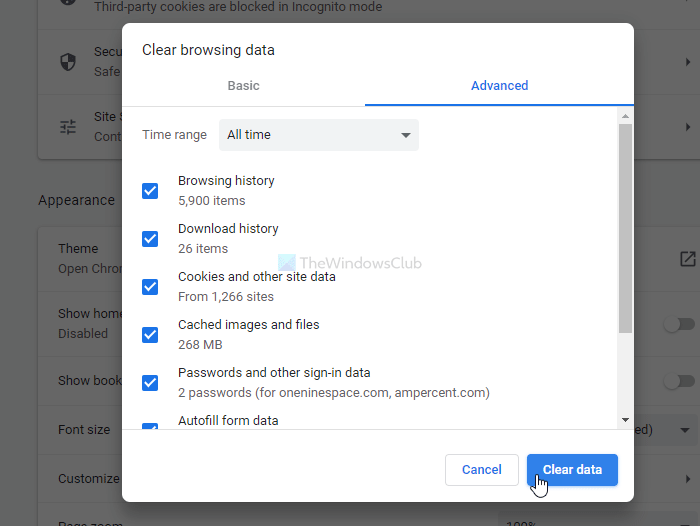
It is often suggested to clear the browser data or history so that the extensions synchronize with your browser correctly. To do that, click the three-dotted icon, and select the Settings option. Following that, switch to the Privacy and security tab and click the Clear browsing data option.
After that, switch to the Advanced tab, select All time from the Time range drop-down list, make a tick in each checkbox, and click the Clear data button.

Restart your browser and check if the extension is working or not.
7] Sign out of Google account
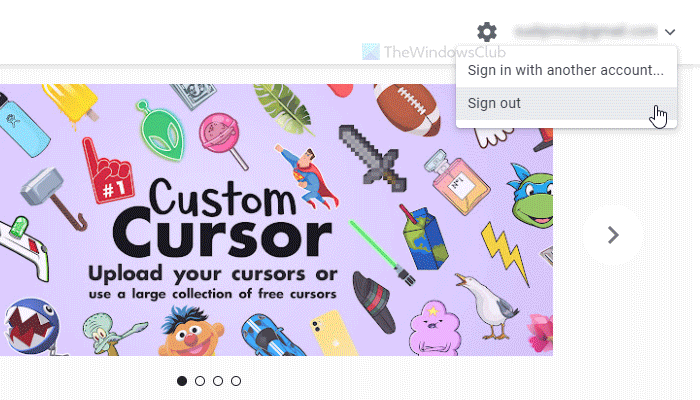
If Google Chrome has some issues with Google account synchronization, there is a chance of getting such an error. For that, you will have to sign out of your Google account. There are several ways to do that. First, you can open a new tab page, click on your profile picture, and select the Sign out option.

Second, you can visit the official website of Chrome Web Store, click on your email ID, and select Sign out.
8] Install Google Chrome updates
Sometimes, all these problems happen due to a bug. If you have a very old build of Google Chrome, some of the latest extensions may not be compatible with it. Therefore, updating your browser to the newest version is the simplest solution.
That’s all!
Leave a Reply