In this post, we will see how to clear the Display cache on a Windows 11/10 PC. The Windows Display Cache contains all the data related to your computer display. It helps the computer to remember what mode and resolution to use when a particular display output is detected. This helps avoid the hassle of manually applying all the settings once a particular display output has been connected. But sometimes this causes a cascade of issues – if the display output is not working properly. In this case, you should reset or clear your Display cache and see if that helps.

Clear Display cache in Windows 11/10
To do this, you will have to open the Registry Editor. But before you do this, we recommend that you create a system restore point first or backup your Registry.
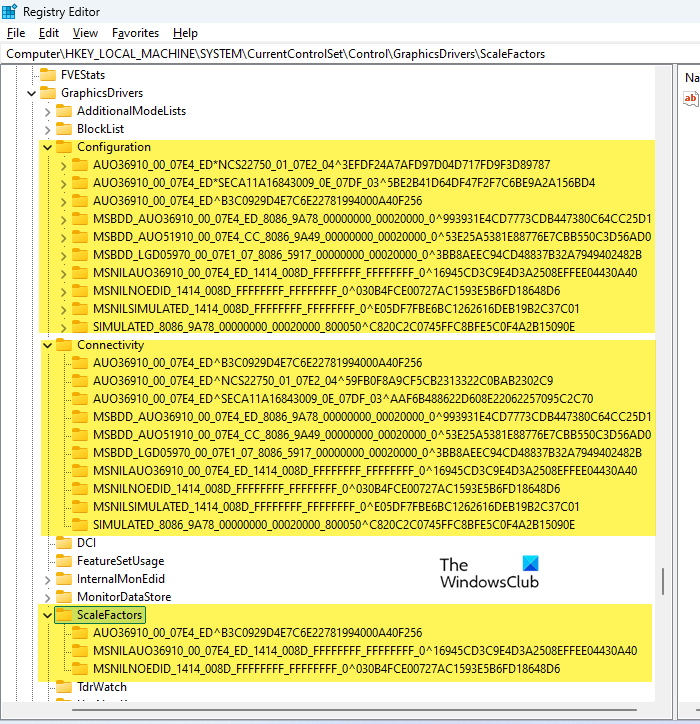
Having done that, navigate to the following location:
HKEY_LOCAL_MACHINE\SYSTEM\CurrentControlSet\Control\GraphicsDrivers
Delete all the subkeys under the following folders:
- Configuration
- Connectivity
- ScaleFactors

The subkeys named with random alphanumeric characters represent different display configurations. Select Yes when you see the box asking for delete confirmation.
Restart your computer and your display configuration and settings will be reset to Windows defaults.
What we did here was to force Windows 11/10 to forget the monitors and their respective settings stored on the computer. So, the next time you connect to an external display, it will be treated as a newly connected display, and you will begin with the default and optimal values to work again.
This fix can be very useful when you connect to an external display, and find that the output is not to your satisfaction.
If you find that the results are not to your satisfaction, you can always use the created restore point to restore your computer.
A bunch of posts on this website that will help you reset other functions or software:
Reset Windows PC | Reset all Local Group Policy settings | Reset Surface Pro devices | Reset Windows password | Reset Touchpad settings | Reset WinHTTP Proxy Settings | Reset WMI Repository | Reset Data Usage.
How do I reset my Display settings?
To reset the display settings on your Windows 11/10 PC, right-click anywhere in the empty space of your desktop and select Display settings from the context menu. The Settings window will appear. Under Scale and layout, set the scaling to 100% (Recommended). Under Display resolution, select the recommended resolution for your display. If you’ve changed color settings, go to Control Panel > Color Management > Advanced tab and click Change system defaults. In the new window, go to the Advanced tab and click Reset. Next, press Win + Ctrl + Shift + B to reset the graphics driver.
How to fix Monitor display?
Ensure all cables (HDMI/DisplayPort/VGA/DVI) are securely connected to both the monitor and the computer and that the graphics card is properly seated in its slot. Try power cycling your PC. Turn off your monitor and computer, unplug the monitor from the power source for a few minutes, then reconnect and power everything back on. Use the monitor’s on-screen display (OSD) menu to select the correct input and reset settings to default. Boot into Safe Mode to see if the issue persists. If the display works in Safe Mode, it might be a driver or software issue.
Read Next: How to clear the Cache in Windows.
Leave a Reply