Live Tiles in Windows 10 can take your old boring display to a new level, by displaying live data from apps on their tiles. They give you a glimpse of data and sometimes enough information that you don’t need to open the app. For example, the Weather app Live Tile can show you the temperature on the tile without actually opening the Weather app. Similarly, the Mail application can show you the number of unread emails without actually opening the Mail app.
Reset Live Tiles cache in Windows 10
Live Tiles have always been helpful, though they can sometimes show older data or not show data at all. So, you may want to reset the Live Tiles cache and have them load fresh data every time. This can be done by tweaking registry settings a bit. Thus, make Windows clear the Live Tile cache on every Log-on so that every time you start Windows, Live Tiles load up fresh data from the Internet.
Clear Live Tile notifications on every shutdown
Using Registry Editor
This can be done by tweaking the Registry settings. When you do this, Windows 10 will delete the Live Tile cache and load fresh data from the Internet after you start your computer.

Step 1: Make sure you are logged in as an administrator and you have access to the registry.
Step 2: Press ‘Win + R’, type “regedit” and hit enter.
Step 3: Now in the Registry Editor, navigate to the following path:
HKEY_CURRENT_USER\SOFTWARE\Policies\Microsoft\Windows\
If you want to make system-wide changes and not for the current user you can navigate to:
HKEY_LOCAL_MACHINE\SOFTWARE\Policies\Microsoft\Windows\Explorer
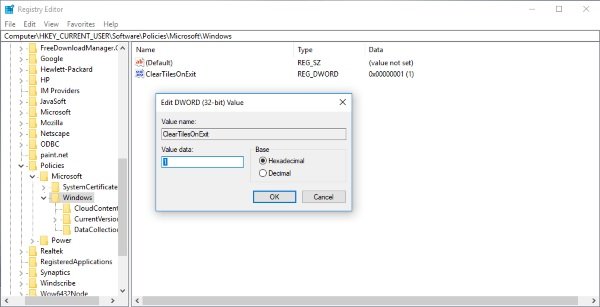
Step 4: Right click the ‘Windows’ folder, select ‘New’ and then choose ‘DWORD (32-bit) Value’ to create a new registry value.
Step 5: Rename the value to “ClearTilesOnExit”. Double-click it and set its value to ‘1’.
Step 6: Close the registry editor and restart your computer for the changes to take effect.
So, these steps were required to clear Live Tile notifications on every Windows start-up. You can revert back the changes by restoring a registry backup. Or you can just delete the value we created in the above steps.
Using Group Policy Editor
Follow these steps to change settings through GPEDIT.
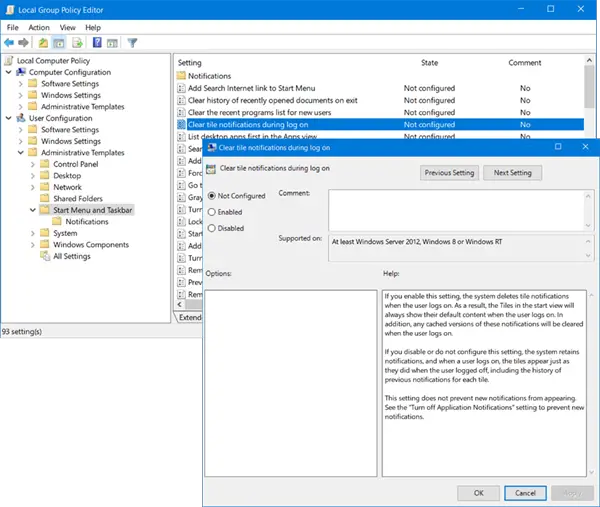
Step 1: Press ‘Win + R’ and type gpedit.msc. Hit Enter and navigate to User Configuration > Administrative Templates > Start Menu and Taskbar
Step 2: Now in the right pane, double-click on Clear tile notifications during log on, and in the Settings box which opens, click on Enabled > Apply. You will now see only the latest fresh notifications on the tile.
 Changing this setting does not prevent new notifications from appearing. But the tiles will start with their default content and will display no notifications. The tiles will start showing notifications once you are connected back to the internet.
You may not notice any considerable changes in the system even after you’ve made the registry or group policy changes. Remember that making these changes won’t stop tiles from loading the data and displaying it. It will only make the apps clear the previously loaded data and start with the default content.
How to Turn Live Tile off in Windows 10?
If you want to stop a Live Tile completely, you must do so manually. Right-click a Live Tile you want to stop, go to ‘More’, and then select “Turn Live Tile off”. That particular Live Tile will be completely disabled and not show any data on the tile.
Leave a Reply