Caches, which improve CPU performance significantly, are introduced to GPUs to improve application or game performance even further. Although cache over time takes up a considerable amount of storage space on your drive, its primary function is to improve performance — but sometimes things don’t work quite right with your graphics-intensive apps, or games — and for that, or some other reason, you may want to clear the NVIDIA, AMD, or AutoCAD graphics cache — in this post, we will show you how to perform the task.

The Windows Display Cache is not the same as the graphics cache for NVIDIA, AMD, or AutoCAD. Generally, in computing, a cache is a set of temporary files used by a program or the operating system. Sometimes, the cache in Windows can slow down your PC, or cause other problems. So, you should occasionally clear the Cache on your Windows 11/10 computer, to help your system run faster and reclaim disk space.
In gaming, the graphics cache is a cache file on your local hard drive that stores graphical data (for example planets, maps, locations, places visited, and such) so that it doesn’t have to be generated as often. As it relates to gaming, there’s a setting in the Control Panel of the AMD and NVIDIA GPU called the Shader Cache – which saves all interactions and textures that occur during gameplay in memory so that when you encounter a similar situation in the future, the system does not have to load all of this information all over again, reducing stuttering caused by such heavy graphical usage. Essentially, Shader Cache allows for faster loading times in games and reduced CPU usage by compiling and storing frequently used game shaders, rather than regenerating them each time they are needed.
Read: How to restart Graphics Driver in Windows.
Is resetting Shader Cache good?
Primarily, using a shader lets you take advantage of the processing power of the graphics card processing unit (GPU) instead of relying solely on the system CPU. When you reset or delete the Shader Cache, all stored Shader Cache files will be deleted. Deleting the Shader Cache can help you free up a little disk space, but you may find that it’s not enough. So, if you just want to free up the C:\ drive, then you can consider extending the C partition without deleting files/folders using the built-in Disk Management Tool and Diskpart or any of the free Disk & Partition Manager software for Windows 11/10.
Similarly, in computer software like AutoCAD, the graphics cache files are created and maintained to optimize performance and increase the regeneration speed of objects with complex geometry such as 3D solids, non-mesh surfaces, and regions. With time, the graphics/shader cache grows in size — a larger cache takes up more space on your hard drive but allows for more ‘reusable’ data to be stored, which, for one reason or another, at some point, you may want to clear the graphics cache on your PC as described below.
How to clear AutoCAD graphics cache
To clear the AutoCAD graphics cache in Windows, all you need do is to set the upper limit in Megabytes (Mbs) for all drawing file entries in the product graphics cache for the CACHEMAXFILES or CACHEMAXTOTALSIZE system variable in Windows Registry.
To do this, simply open regedit (before you modify the registry, it is recommended that you back up the registry or create a system restore point as necessary precautionary measures), then search for the registry key. Once found, double-click the key and then change the value per your requirement.
The default value is 1024 and the valid range is from 0 to 65535 megabytes. What happens is when the upper limit is reached, the oldest file entries in the graphics cache are automatically deleted – setting either of the variables to 0 which will automatically clean the GraphicsCache folder when closing AutoCAD, disables caching entirely, and deletes any files in the folder that are currently not in use by an open drawing file. The current upper limit of the graphics cache size is 32,767 megabytes but it may be increased in a future release.
Alternatively, you can navigate to the GraphicsCache folder and delete the cache files (persist between drawing sessions) at the location below. The exact locations vary based on country, product, and version.
C:\Users\<username>\AppData\Local\Autodesk\AutoCAD 2018\R22.0\<language code like "enu">\GraphicsCache
How do I reduce graphics in AutoCAD?
Generally, hardware acceleration improves graphics performance and productivity which helps overall performance, not just with 3D work in AutoCAD. However, you can toggle hardware acceleration on and off if you’re experiencing unexpected problems with specific video cards and drivers. One of the several ways to toggle hardware acceleration in AutoCAD-based products is to enter the GRAPHICSCONFIG command and click the Hardware Configuration button.
Read: How to convert DXF to GCode in Windows
How to clear NVIDIA graphics Shader Cache

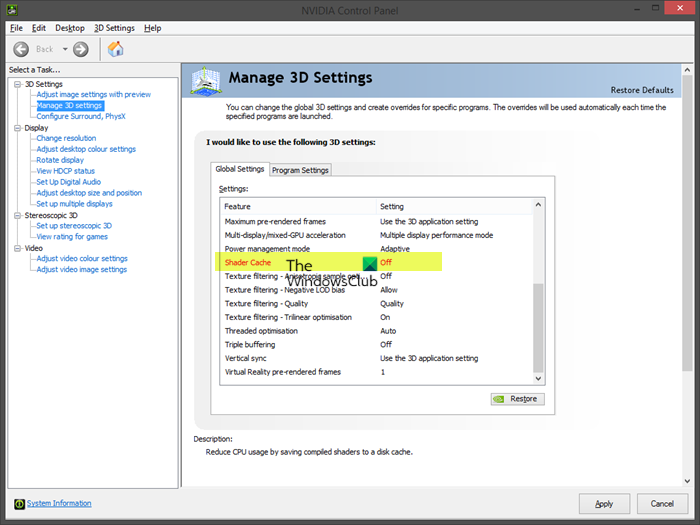
To clear the NVIDIA graphics Shader Cache in Windows, follow these steps:
-
Open the NVIDIA control panel.
-
Go to Manage 3D Settings.
-
Turn off Shader Cache.
-
Save and apply changes.
-
Reboot your PC.
- After the PC boots, open the Run dialog box or File Explorer.
- Type the environment variable below into the Run dialog box or the File Explorer address bar and hit Enter.
%USERPROFILE%\AppData\Local\Temp
- At the location, find and open the NVIDIA folder.
- In the folder, find and open both the DXCache and the GLCache folder and delete all the items in the folders.
- Next, go back to the Temp folder.
- Now, at that location, find and open the NVIDIA Corporation folder.
- In the folder, find and open the NV_Cache folder and delete the contents of the folder.
- Exit File Explorer.
- Now, go back to the NVIDIA control panel and turn on Shader Cache.
- Restart PC.
Read: NVIDIA Image Scaling not showing or working in Windows
How to clear AMD graphics Shader Cache

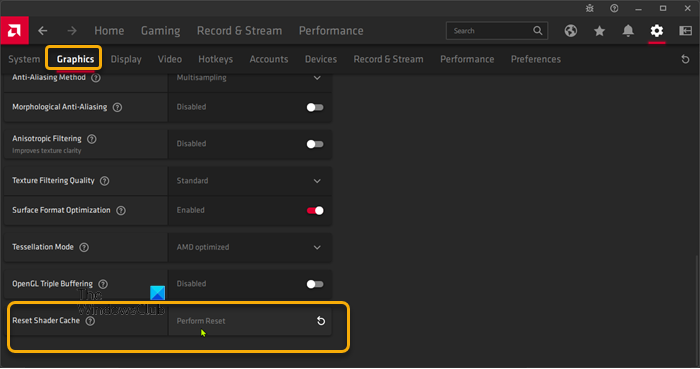
To clear the AMD graphics Shader Cache in Windows, follow these steps:
- Open the AMD Radeon Software installed on your PC.
- Click on the cogwheel or gear icon (Settings menu) in the corner of the program.
- Click the Graphics tab.
- Expand Advanced.
- Scroll down to the Reset Shader Cache option.
- Click on Perform Reset.
- Exit AMD Radeon Software when done.
Read: How to enable AMD FreeSync
That’s it!