Hyper-V is Microsoft’s virtualization platform, which facilitates creating and managing virtual machines running on Windows. Clipboard integration helps in seamless copying and pasting of files and texts between both systems. However, users might encounter situations wherein the Clipboard fails to function in Hyper-V. In this article, we aim to explore the reasons behind the same and look at the possible solutions that can help resolve the issue.
![Clipboard does not work in Hyper-V [Fix] Clipboard does not work in Hyper-V](https://www.thewindowsclub.com/wp-content/uploads/2023/11/Clipboard-does-not-work-in-Hyper-V.jpg)
Clipboard does not work in Hyper-V – Possible Causes
- Issue with Integration Services: Clipboard problems can occur from improper installation or configuration of Integration Services, outdated Integration Services causing compatibility issues, and disabled clipboard settings in the Hyper-V configuration, impacting its functionality.
- Network and connectivity issues: Since data transfer between the systems happens through the network, issues related to network connectivity or associated restrictions can contribute to the cause.
- Hyper-V version compatibility: An outdated version of Hyper-V can also contribute significantly to the error. Incompatibility can affect clipboard integration, thereby causing it to malfunction.
Fix Clipboard does not work in Hyper-V
Based on the causes, here is the list of suggestions you can try to fix the problem:
- Check Integration Services
- Clipboard settings checks
- Check and ensure similar Hyper-V versions on guest and host
- Review Group Policy Settings Redirection Services
- Review Group Policy Settings Drive Redirection Services
You will need an administrator account to execute the suggested solutions.
1] Check Integration Services
To check if the integration services are running or not,
- Open the Hyper-V Manager
- Right-click on Virtual Machine and select Settings from the center pane
- Select Integration Services under Management
- Ensure that the checkbox beside all the service names is checked. A check beside the service names indicates that the services are currently running.
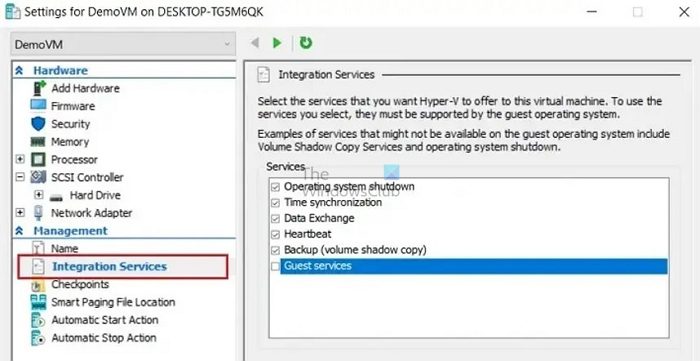
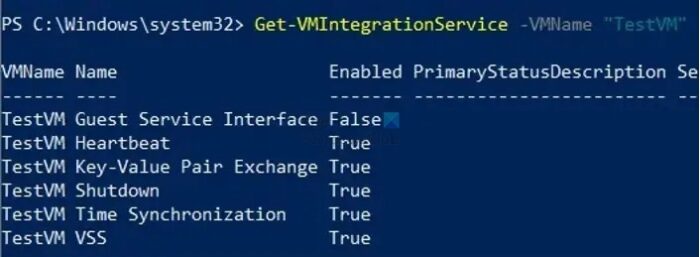
Alternatively, the status of the Integration services can be checked from the Windows PowerShell by entering the below-mentioned command:
Get-VMIntegrationService -VMName "DemoVM"
2] Clipboard settings checks
To ensure that the clipboard setting is configured correctly,
- Open the Hyper-V Manager and select the host computer
- Click on Hyper-V settings
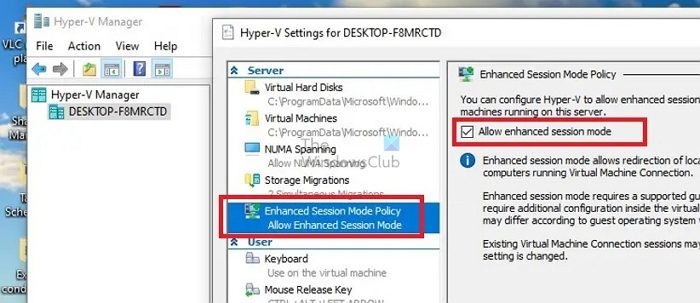
- Select Enhanced Session Mode Policy under Server
- Check on the Allow Session Mode check box on the right pane
Read: Hyper-V Stuck in Starting State
3] Check and ensure similar Hyper-V versions on guest and host
To check the version of the Hyper-V installed on the guest and the host system,
- Open Hyper-V Manager
- Click Help
- Select About Hyper-V Manager
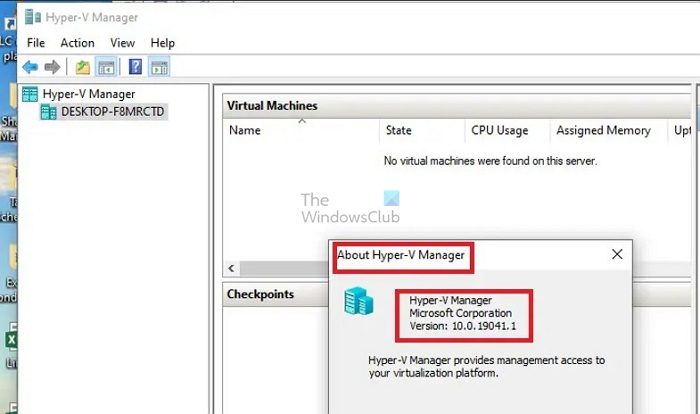
The installed version of the Hyper-V will be displayed on the dialogue box that appears. The exact process can be executed on the guest and the host machines. To update the Hyper-V,
- From the Hyper-V Manager, shut down the VM.
- Select Action > Upgrade Configuration Version in the Hyper-V Manager window to update the Hyper-V version. If the option doesn’t appear under Action, the latest version is supposedly installed on the system.
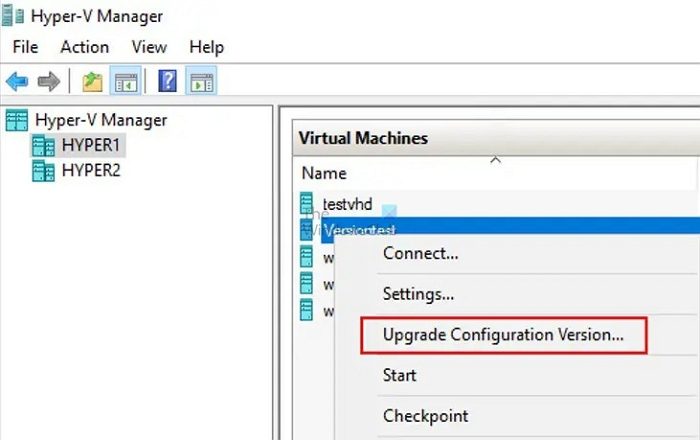
Alternatively, the update can also be initiated and executed from the Windows PowerShell through the below-mentioned command:
Update-VMVersion -VMName "VM1"
where VM1 is the name of the Virtual Machine
4] Review Group Policy Settings Drive Redirection Services
To ensure that files are successfully copied between the host and the guest systems, the Do Not Allow Drive Redirection Group Policy needs to be disabled by following the below-mentioned steps:
- Type gpedit.msc in the Run dialogue box to open the Group Policy Editor
- Navigate to Computer Configuration\Administrative Templates\Windows Components\Remote Desktop Services\Remote Desktop Session Host\Device and Resource Redirection
- Double-click on Do Not Allow Drive Redirection and set to either Disabled or Not Configured
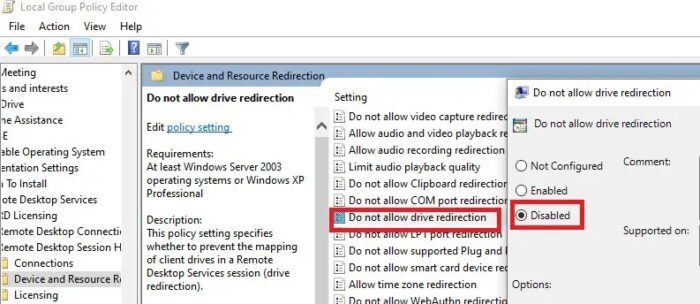
When set to Enabled, the Do Not Allow Drive Redirection policy restricts sharing the data stored in the local drives for either the host or the guest system to ensure enhanced security. Hence, disabling the said policy can allow users to share files or text seamlessly between both systems.
5] Restarting the Hyper-V services
Restarting the Hyper-V services can serve quite a few purposes in pursuit of resolving the error mentioned above. Restarting the services, in general, refreshes them by clearing temporary inconsistencies by initiating a reset of the components involved. To do so,
- Open the Services Window by entering services.msc in the Run dialogue box.
- Locate the services starting with Hyper-V and right-click on each to select the Restart option. The list of Hyper-V services that need to be restarted are:
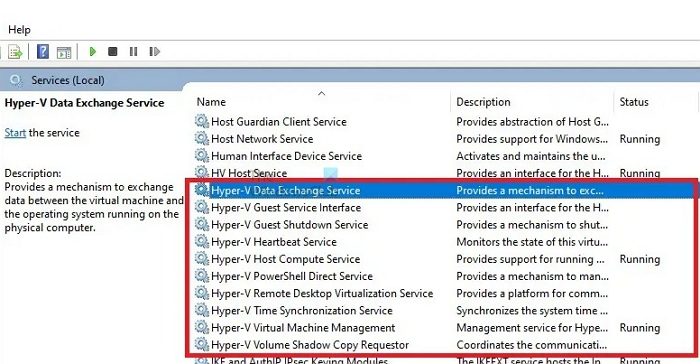
-
- Hyper-V Data Exchange Service
- Hyper -V Guest Shutdown Service
- Hyper-V Heartbeat Service
- Hyper-V Host Compute Service
- Hyper -V PowerShell Direct Service
- Hyper-V Time Synchronization Service
- Hyper-V Virtual Machine Management
- Hyper-V Volume Shadow Copy Requestor
Read: Hyper V Audio not working in Windows
Conclusion
Resolving the error mentioned above involves reconfiguring the Hyper-V settings concerning its services or related Group Policies. However, caution is advised while making the changes, especially while editing the Group Policies, since incorrect settings changes may destabilize the system.
Why is my clipboard not working in the Remote Desktop?
To connect to your server using the Remote Desktop Protocol (RDP) client, you need to open the RDP client and navigate to the Local Resources tab. Once there, ensure that you have selected the Clipboard option to enable copy and paste functionality, and select the Drives option to enable access to your local drives. Click OK to confirm your selections, and the connection to your server will be established.
How do I copy and paste a file into Hyper-V?
Once you have established a remote desktop session, you can open My Computer or This PC by going to Windows Explorer on the remote machine. You should see the mapped drive from your local computer displayed, which will be labeled as something like “G on SERVER22-MDC” in the screenshot. From there, simply browse the specific files you want to copy and transfer them over to the Hyper-V host.
Leave a Reply