Xbox Cloud gaming allows users to play Xbox Game Pass games on different devices. It is a great feature because it allows users to play games instantly without downloading and installing them on their devices. Hence, Xbox Cloud gaming also saves storage space. The games that support the Cloud gaming feature show a cloud icon in the Xbox Game Pass games library. Because it is a great feature, many gamers use this feature to play games online. What if the Xbox Cloud gaming stops working? In this article, we will see what you can do if the Cloud gaming is not working on Xbox app on your Windows 11/10 PC.

There could be various reasons why Xbox Cloud gaming is not working on PC. A background app might be interfering with the Xbox app or your user profile on Windows 11/10 might have been corrupted. In some cases, Xbox Gaming Services can also cause issues, hence, uninstalling and reinstalling the Gaming Services can help. Sometimes, the issues are region specific.
Cloud gaming is not working on Xbox app on Windows 11/10
If the Xbox Cloud gaming is not working on Xbox app on your Windows 11/10 computer, use the following fixes to resolve the issue.
- Update the Xbox app
- Create a new user profile
- Change your region and add a preferred language
- Uninstall and reinstall the Gaming Services
- Disable all startup apps
- Repair or reset the Xbox app
- Uninstall and reinstall the Xbox app
Let’s see all these fixes in detail.
1] Update the Xbox app
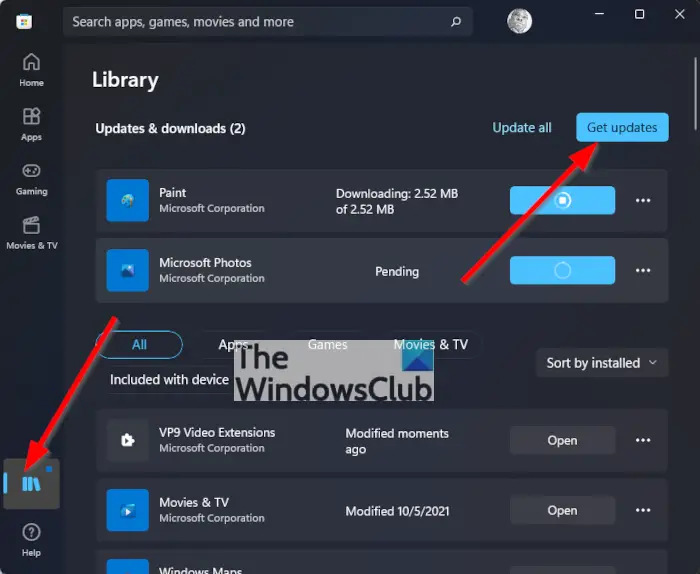
The first thing that you should do is check for updates for the Xbox app. Installing the latest updates fix several issues. The following steps will help you:

- Open Microsoft Store
- Go to Library.
- Click on the Get updates button.
After that, Microsoft Store will start updating the apps for which the updates are available.
2] Create a new user profile
If updating the Xbox app does not help, or if the update is not available for the Xbox app, try other fixes. Create a new user profile on Windows 11/10. You can do so via Windows 11/10 Settings. Now, log in to your new user profile and check if you can use Xbox Cloud gaming.
3] Change your region and add a preferred language

A lot of affected users reported that the issue disappeared after changing their region in Windows 11/10 Settings. You should also try this. Open Windows 11/10 Settings and change your country or region and see if it helps. According to the users, changing their region to France resolved their issue. First, change your location to France and see if it helps. If not, you have to use the hit-and-trial method. Hence, this fix will consume your time.
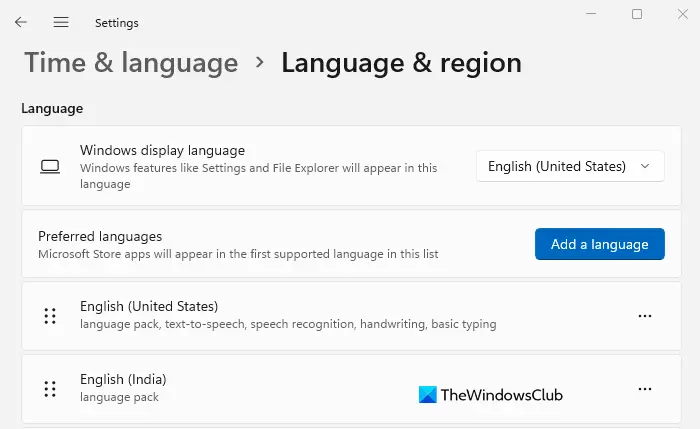
Also, add another language to your preferred languages list on Windows 11/10. Open Windows 11/10 Settings and go to “Time & language > Language & region.” Now, click on the Add a language button to add another language. Adding any of the following languages resolved the issue of many users:
English (United States), English (Ireland), English (United Kingdom), English (Australia), Russian, Spanish (Spain), and French (France).
After adding any of the above languages to your preferred languages list, move it to the top by dragging it.
4] Uninstall and reinstall the Gaming Services
If you don’t have Gaming Services installed on your system, open Microsoft Store and install it from there. After that, see if the issue is fixed. If the Gaming Services is already installed, uninstall and reinstall it.
Open Windows PowerShell as administrator, copy the following command and paste it into the PowerShell admin window. After that, hit Enter.
get-appxpackage Microsoft.GamingServices | remove-AppxPackage -allusers
When the above command is executed successfully, copy the following command and paste it into the same PowerShell admin window. Press Enter.
start ms-windows-store://pdp/?productid=9MWPM2CQNLHN
The above command will open the Gaming Services app in Microsoft Store from where you can download and install it.
Related: We were unable to turn on your console – Xbox error.
5] Disable all startup apps
If the issue still persists, any third-party startup app may be responsible for the problem. We suggest you disable all startup apps and restart your computer. You can use different applications on Windows 11/10 to disable startup apps but using the Task Manager is the easiest method.
After restarting the computer, see if you can use the Gaming Services or not. Some users said that the issue was occurring due to Steam Client running in the background. If you want to identify the problematic startup app, follow the steps written below:
- Open the Task Manager and go to the Startup apps tab.
- Disable any one of the enabled startup apps.
- Restart your computer and see if the issue persists.
Repeat the above steps until you find the conflicting startup app.
6] Repair or reset the Xbox app
Windows 11/10 has a feature that lets users repair the app they are experiencing issues with. You can use this feature if an app is not working properly on your system. Follow the steps written below:
- Open Windows 11/10 Settings.
- Go to “Apps > Installed apps.”
- Scroll down and locate the Xbox app.
- Once you find it, click on the three horizontal dots and select Advanced options.
- Scroll down and locate the Reset section.
- Click Repair.
Wait till the repair process gets completed. After that, check if the issue persists. If yes, Reset the Xbox app. This time, you have to click Reset in place of Repair. Resetting the Xbox app will delete all your locally saved data. Hence, back up all your saved games to the cloud before performing this action.
7] Uninstall and reinstall the Xbox app
If none of the above fixes helped you, uninstall and reinstall the Xbox app.
This should help.
Read next: Fix Xbox Payment Error Code 80169D3.
Leave a Reply