If you want to use the command-line version of Microsoft Support and Recovery Assistant (SaRA) on a Windows 11/10 computer, here is how you can do that. It is suitable for remote diagnostics of problems related to Microsoft Office. Here is how you can download and set up SaRA on Windows 11/10 computer.

There could be times when you want to provide support to a remote computer related to Microsoft 365 apps. If using downloading the Microsoft Support and Recovery Assistant is not possible due to some reasons, you can use the command-line version to get the job done.
How to use command-line version of Microsoft Support and Recovery Assistant
To use command-line version of Microsoft Support and Recovery Assistant, follow these steps:
- Download SaRA from the official website.
- Extract the DONE folder.
- Search for cmd in the Taskbar search box and click on Run as administrator.
- Click the Yes button.
- Use cd command to navigate to the DONE folder.
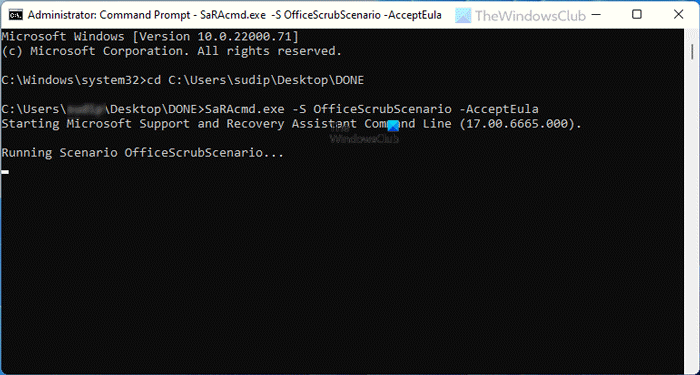
- Enter a command like:
SaRAcmd.exe -S OfficeScrubScenario -AcceptEula
To learn more about these steps, continue reading.
At first, you have to download Microsoft Support and Recovery Assistant from the official website. After downloading, extract the DONE folder and keep it somewhere else.
Next, you have to open Command Prompt as administrator. For that, search for cmd in the Taskbar search box, click on the Run as administrator option and select the Yes option.
Following that, you have to navigate to the DONE folder. Let’s say you have that folder on your desktop. For that, enter the following command:
cd C:\Users\username\Desktop\DONE
Now, you can enter commands to use the command-line version of Microsoft Support and Recovery Assistant. The following commands are available to use:
SaRAcmd.exe -S OfficeScrubScenario -AcceptEula

In the above command, -S is a switch that denotes the type of diagnostics/scenario you want to perform or go through. There are other switches such as -AcceptEula, -DisplayEULA, -Help, and -?.
Depending upon the issue, SaRA will decide what to do next. As per the taken action, it may show various messages in the Command Prompt window, and some of them are like these:
An Offline scan was performed because Outlook is either not running or it is running elevated (as Administrator). See <filename> in %localappdata%\saralogs\UploadLogs.
A Full scan was performed. See <filename> in %localappdata%\saralogs\UploadLogs.
And so on.
The best thing about this tool is that you do not have to choose the action. Microsoft Support and Recovery Assistant automatically choose the action on its own.
What is Microsoft Support and Recovery Assistant?
Microsoft Support and Recovery Assistant is a diagnostic and troubleshooting tool, allowing you to perform various tests to find out issues regarding Microsoft 365, Outlook, etc. It is possible to run the app as well as use it as a command-line tool.
Why does Microsoft Support and Recovery Assistant take so long?
At times, there could be multiple problems that Microsoft Support and Recovery Assistant needs to fix in order to provide you a better user experience. While fixing more than one problem, SaRA could take more than usual time on your computer.
How does SaRA tool work?
Microsoft Support and Recovery Assistant or SaRA runs a scan on your computer to identify the error related to Outlook, Microsoft 365 apps, etc. If it finds anything significant, it takes numerous troubleshooting actions to get rid of the problem. At times, you might have to open SaRA with administrator privilege to perform the task it is supposed to do.
How do I run Microsoft Support and Recovery Assistant?
There are two methods to run Microsoft Support and Recovery Assistant on Windows 10 or Windows 11 computer – use the GUI mode or command-line tool. To learn more about the GUI mode of Microsoft Support and Recovery Assistant, you can follow this tutorial. To learn more about the command-line method, this article is for you.
This is how you can run or use the command-line version of Microsoft Support and Recovery Assistant. If you like, you can download it from docs.microsoft.com.