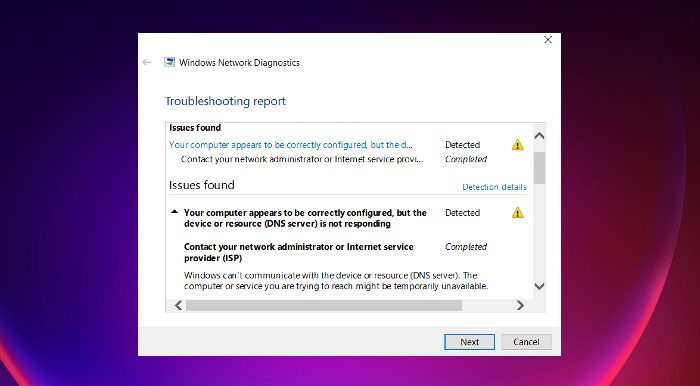
In this post, we are going to talk about what you can do if you come across the error, Your computer appears to be correctly configured but the web proxy is not responding. when you run the Network Diagnostic Troubleshooter in Windows 11/10. The error message indicates that there is some issue with the DNS server of your system that is not allowing you to access the internet.
What causes the Web proxy is not responding error?
Similar to any other DNS-related issue, this error message also has very few culprits. So, here are all the main reasons for triggering the problem.
- The very first reason is an outdated network driver. If you haven’t downloaded the latest driver update, you will face different DNS-related issues.
- Misconfigured DNS and IP address is another major reason behind the problem.
- A huge amount of DNS can also cause the problem.
Your computer appears to be correctly configured but the web proxy is not responding
Here are all the effective workarounds to get rid of the Your computer appears to be correctly configured but the web proxy is not responding error.
- Clear the DNS Cache
- Change the IPv4 Settings
- Change the DNS Settings
- Download the Latest Network Driver Update
- Change the Power Settings
- Run Network reset.
Now, let’s check out all these in detail.
1] Clear the DNS Cache
One of the most effective workaround to get rid of any internet-related issues is to clear the DNS cache. Most of the internet-related problems including the one you are currently facing are caused due to corrupted local DNS cache. So, here’s how to flush DNS cache in Windows 11/10.
- Open command prompt in administrator mode.
- Type ipconfig /flushdns and press the enter key.
- You will see – Windows IP Configuration. Successfully flushed the DNS Resolver Cache.
Now, exit the command prompt window. That’s it. The DNS cache has been reset. Check if you are still facing the problem.
2] Change the IPv4 Settings
The next thing you can try is to change the IPv4 settings. Many users shared that changing the IPv4 settings to automatic has solved the problem for them. So, you can also perform the same and check if it makes any difference. Here are the steps you need to follow.
- Tap on the windows icon to open the Start Menu.
- In the search bar, type View network connections and press enter.
- Right-click on the connected network and choose the Properties option.
- Under the “This connection uses the following items”, locate Internet Protocol Version 4 (TCP/ IPv4).
- Tap on Internet Protocol Version 4 (TCP/IPv4) and choose the Properties option.
- Select the bullet icon present before Obtain an IP address automatically. And, select the bullet icon present before Obtain DNS server address automatically.
- Click on OK to save the changes.
- Now, select Internet Protocol Version 6 (TCP/ IPv6), and click on Properties.
- Again, select the bullet icon present before Obtain an IP address automatically, and Obtain DNS server address automatically.
- Checkmark to Validate settings upon exit option.
That’s it. Now reboot the system and check if the problem is fixed or not.
Related: Your computer appears to be correctly configured, but the device or resource is not responding
3] Change the DNS Settings
If you have previously changed the DNS settings on your own, it’s no surprise you are facing the mentioned issue. However, if the problem is occurring on the default DNS settings, then you will have to change the DNS address to fix the problem. As of now, Google and Cloudflare Public DNS are two of the best DNS server you can try. So, here’s what you need to do to connect to either of these servers.
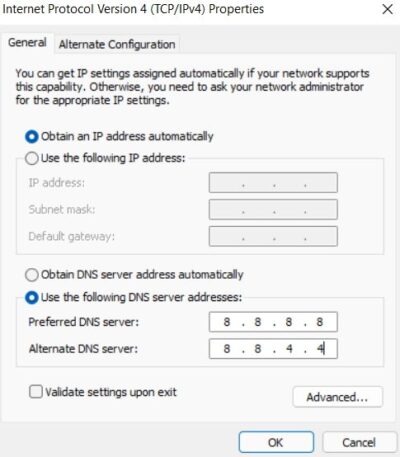
Note: The below-mentioned steps will only be helpful if you are connected with an IPv4 network.
- Tap on the windows icon to open the Start Menu
- In the search bar, type View network connections and press enter.
- Right click on the connected network and choose the Properties option.
- Choose Internet Protocol Version 4 (TCP /IPv4) and click on Properties.
- Choose the Use the following DNS server addresses option.
- Now, to connect with the Google public DNS server, enter 8.8.8.8 in the Preferred DNS Server section, and 8.8.4.4 in the Alternate DNS Server section.
- Alternatively, to connect with Cloudsfare’s public DNS server, enter 1.1.1.1 in the Preferred DNS server section, and enter 1.0.0.1 in the Alternate DNS server.
- Lastly, click on OK to save the settings.
If you connected with an IPv6 network, follow the below steps.
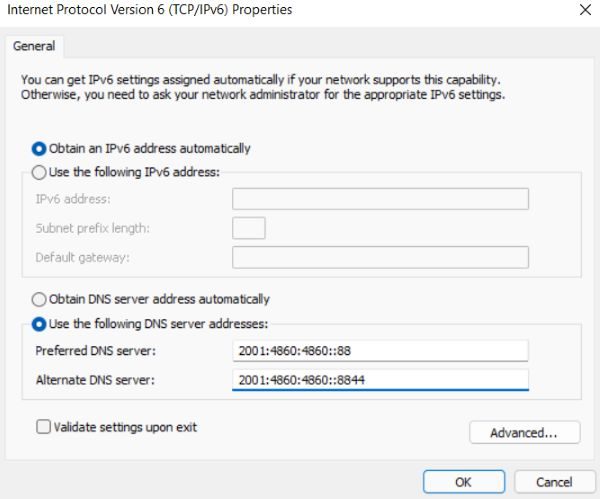
- Follow the above steps to open the Properties window of the connected network.
- Choose Internet Protocol Version 6, followed by selecting Properties.
- Choose the Use the following DNS server addresses option.
- Now, to connect with the Google public DNS server, enter 2001:4860:4860::88 in the Preferred DNS Server section, and 2001:4860:4860::8844 in the Alternate DNS Server section.
- Alternatively, to connect with the Cloudsfare’s public DNS server, enter 2606:4700:4700::1111 in the Preferred DNS server section, and enter 2606:4700:4700::1001 in the Alternate DNS server.
- Click on OK to save the settings.
That’s it. Check if the problem is fixed or not.
Read: How to install WiFi drivers for Windows
4] Download the Latest Network Driver Update
As mentioned, an outdated network driver is another major reason behind the issue. So, update the Network driver to fix the problem.
The best way would be via the Windows Driver & Optional Updates feature.
Once the update process is complete, check if the problem is fixed or not.
Related: Windows could not find a driver for your Network Adapter
5] Change the Power Settings
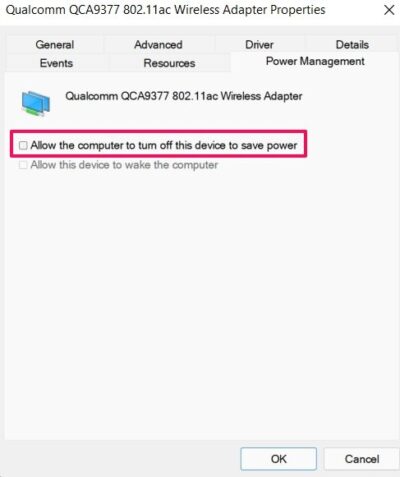
The last thing you can try out is to change the power settings. As it turns out, changing the power settings will allow the adapter to access the full power anytime. Here’s how to change the power settings.
- Press Win + R keys. This will open the Run command box.
- Type
devmgmt.mscand click OK. Device Manager will appear on your screen. - In the Device Manager, expand the Network adapters node.
- Right click on the connected network adapter, and choose the Properties option.
- Click on the Power Management tab.
- Uncheck the, “Allow the computer to turn off this device to save power” option.
6] Run Network reset
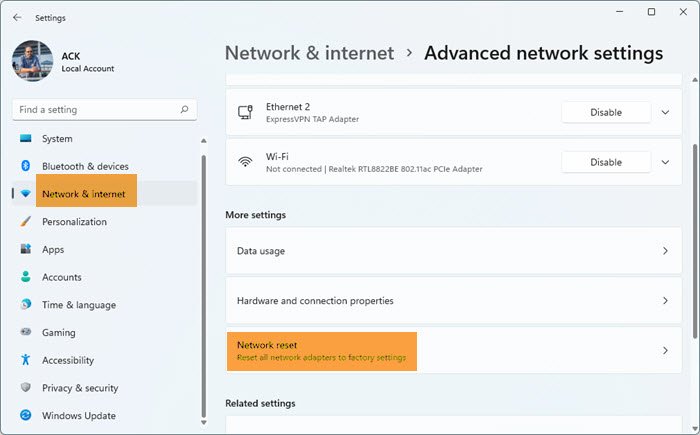
If nothing helps, run Network reset and see if that helps you.
- Open Windows Settings
- Click open Network and internet settings
- On the right, scroll down till you see Advanced network settings and then click on it
- Again scroll down on the next screen till you see More settings
- Here click on Network reset
- On the next screen, click on the Reset now button and wait for the process to complete.
- Restart your computer.
What do I do if my DNS server is not responding Windows 10?
It’s very easy to fix the issue if your DNS server is not responding in Windows 10. As a solution, you can change the DNS server, download the latest network driver update, turn off the firewall and antivirus, and use the Netsh command. Rebooting the system in safe mode can also fix the issue.
Read Next: Windows can’t communicate with the device or resource (Primary DNS Server).
Leave a Reply