If your Windows 11 PC freezes while in use, but the mouse still moves then this post will be able to help you. This is a problem faced by some Windows 11 users where they have noticed that while using the PC, the screen freezes, hence not allowing them to use any part of the files and folders even though the mouse cursor on the screen can move. The causes for such an issue could be any, such as an errant graphics driver, a malfunctioning mouse driver, a defective mouse, or an interfering third-party process.

Windows 11 freezes but Mouse still moves
If you face such an issue where your Windows 11 PC freezes but the mouse is still moving, then try the following solutions :
- Restart Explorer
- Update Display Drivers
- Reinstall Mouse Driver
- Update BIOS
- Troubleshoot in Clean Boot State
Before you begin, use another mouse with this PC and see if all works fine or not, so that you will know if the issue is with your PC or mouse.
1] Restart Explorer
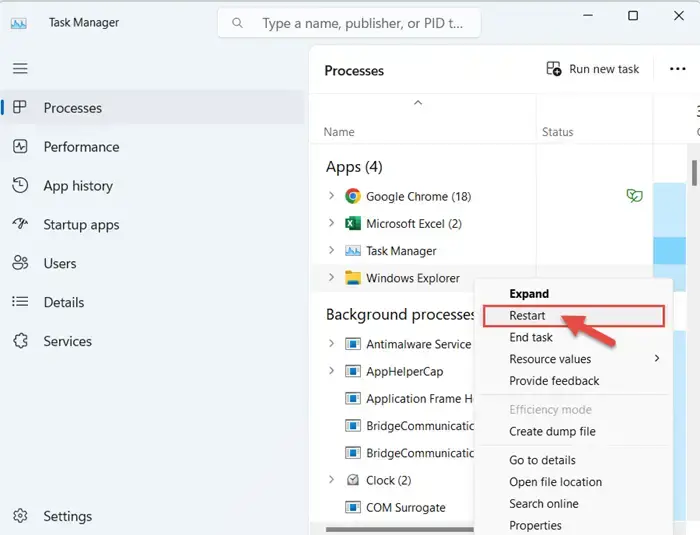
Press CTRL+SHIFT+ESC to open the Task Manager. Then under Processes, right-click on Windows Explorer and click on ‘Restart‘.
If this does not help, try restarting your PC and disconnecting/reconnecting your mouse and see.
Read: Windows computer freezes, hangs or crashes randomly
2] Update Display Drivers
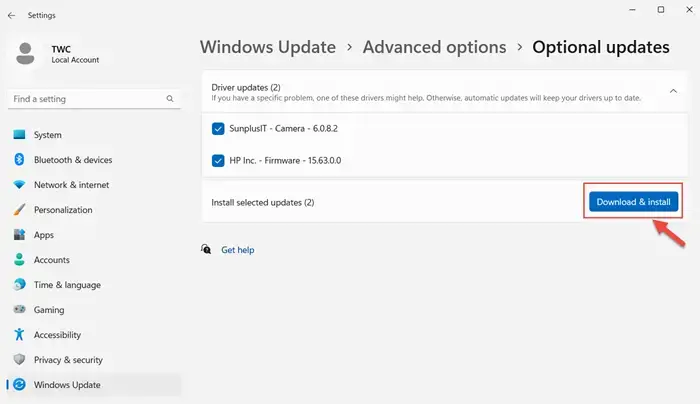
You can update your computer display drivers by using Windows Update. It is recommended to do so using Windows Update to ensure the safety of your Windows 11 PC.
Go to Start > Settings > Windows Update > Advanced Options > Optional Updates. Here, you will find the Driver Updates which you can download and install.
3] Reinstall Mouse Driver
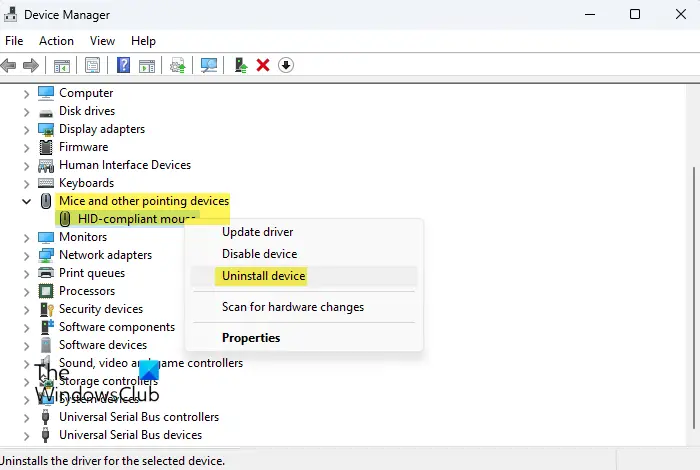
To uninstall the Mouse Driver on your Window 11 PC, open Device Manager > Mice and other pointing devices. Select the mouse (device) you want to update > Driver > Uninstall Device. Your Windows 11 mouse driver will get uninstalled.
Restart your computer and allow it to download and install the latest driver for your mouse automatically.
Read: Mouse freezes or is stuck on screen in Windows
4] Update BIOS
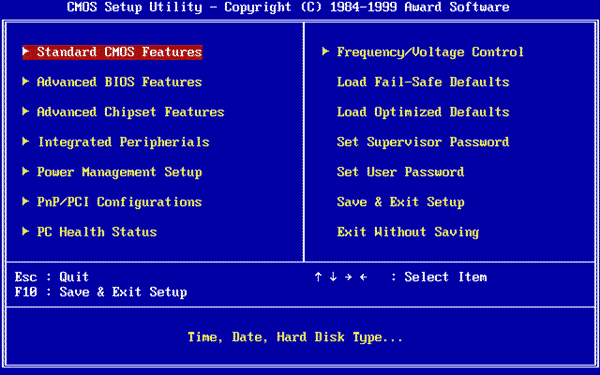
Try updating your Windows 11 BIOS (Basic Input/ Output System). To do so, identify your motherboard. You will need the manufacturer and model details of your motherboard. Then, check if there are any BIOS updates for your motherboard and download and save it to your Windows 11 computer.
It is very important to have the backup of all your important files, documents, photos, etc. Enter the BIOS setup after you have rebooted your Windows 11 PC. In the BIOS setup, go to ‘Update’ or ‘Tools’, and select ‘Update BIOS’. Now, install the update and once it is complete, restart your computer.
All OEM manufacturers have utilities that help you easily update BIOS, firmware, and drivers. Search for yours and download it from the official site only. This is the safest way to update the BIOS.
- If you own a Dell laptop, you can head over to Dell.com or use Dell Update Utility.
- ASUS users can download the MyASUS BIOS update utility from the ASUS support site.
- ACER users can go here. Enter your Serial Number/SNID or search for your product by Model, select BIOS/Firmware, and click the Download link for the file you want to download.
- Lenovo users can use the Lenovo System Update Tool.
- HP users can use the bundled HP Support Assistant.
Read: Mouse stuck in corner of screen in Windows
5] Troubleshoot in Clean Boot State
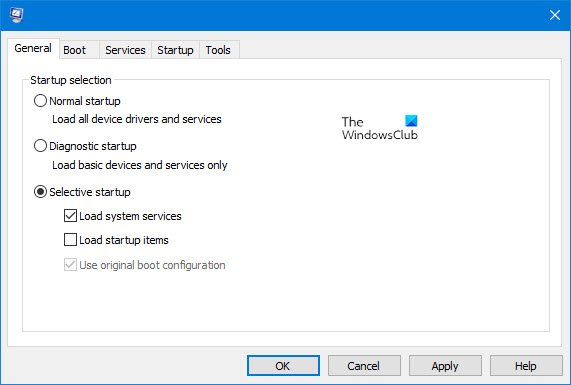
You can perform a Clean Boot in Windows to resolve this issue on your PC. Make sure you are signed in as the Administrator on your computer.
Go to ‘Search’ and type ‘msconfig’. Select ‘System Configuration’ > Services > Hide all Microsoft services > Disable all > Apply. Next, on the ‘Startup’ tab of System Configuration, click on ‘Open Task Manager’. Under the ‘Startup’ tab, for each Enabled Startup item, select all the items and then click on Disable. Close the Task Manager and restart the computer.
To perform clean-boot troubleshooting, you must take a number of actions, and then restart the computer after each action. You may need to manually disable one item after another to try and pinpoint the one that is causing the problem. Once you have identified the offender, you can consider removing or disabling it.
With the help of these fixes and solutions, the problem where your Windows 11 computer freezes while the mouse moves, can be easily resolved.
Why does my mouse still move when I freeze Windows 11?
When your Windows 11 PC freezes but the mouse still moves, it could possibly be due to GPU driver issues. Also, after creating a backup, check if your BIOS settings are properly configured. If the problem still persists, consider resetting Windows 11 to its default settings as a last resort solution.
Why is my screen frozen but I can move my mouse?
To fix the issue of screen freeze while still being able to move the mouse, you can try logging out by pressing CTRL+ALT+DEL on your keyboard. Once the blue screen appears, click on Sign out and then Sign back in. This method could help unfreeze your computer and restore normal functionality.
How do I fix a frozen computer in Windows 11?
To fix a frozen computer in Windows 11, go to Process tab > select the Windows X product > click Restart. This will help troubleshoot and resolve freezing problems on Windows 11.