Does your Windows 11/10 computer screen look washed out or display a fading monitor screen? If yes, then this article might help you fix it. Some users have complained that the color of their computer screen or monitor faded out suddenly. Yet others have said that the issue occurred after a Windows Update.

Computer screen looks washed out or fading monitor screen
If this issue occurs in your system, it will show you one of the following symptoms:
- The brightness level of your display will mess up, causing everything to be bright thus making the text difficult to read
- Everything on the screen becomes blurry, and color fades out.
Monitor discoloration in computer
This problem occurs either due to hardware failure or software issues. If you have an old display, the issue might be caused by hardware failure. In addition, incorrect display settings in Windows 11/10 can also give the appearance of a faded screen. Therefore, before trying the troubleshooting methods described below in this article, we suggest you connect your display with another computer (if available). This will let you know whether your display is working fine or not.
The users who are experiencing this problem can try the following solutions in order to get rid of this issue:
- Update your display driver
- Roll Back your display driver
- Uninstall the monitor drivers
- Disable HDR
- Remove the Color Profile for the problematic display
- Turn off Color Filters.
Let’s check these solutions in detail.
How to fix Monitor color problem in Windows
1] Update your display driver
The most common cause of this problem is corrupt display drivers. Therefore, we suggest you update your display driver and see if it helps. There are multiple ways to update drivers including display drivers too. For example, you can access the Windows Update section and check if any driver updates are present under Optional updates. If yes, access the Optional updates section, select display driver update (if available), and install it.
Related: Fix Screen Tearing issues
2] Roll Back your display driver
If the issue is occurring after a certain Windows Update, you can try rolling back your display driver. Here are the steps:
- Type device manager in Windows 11/10 search box
- Press the Enter key to launch the Device Manager window
- Expand the Display adapters section
- Right-click on your display driver and select the Properties option
- Select the Driver tab
- Check if the Roll Back Driver button in your display driver properties is clickable or not. If yes, click on that button to roll back your display driver
- Restart your computer.
Now, check if it brings any changes.
Related: White dots appearing all over the screen.
3] Uninstall the monitor drivers
Some users were able to fix the issue by uninstalling and reinstalling the monitor drivers. You can also try this solution and see if it helps. The steps to uninstall and re-install the monitor drivers are as follows:
- Type device manager in the Search box
- Hit the Enter key to open the Device Manager window
- Expand the Monitors section
- Right-click on your monitor driver
- Select the Uninstall device option
- A small Uninstall Device box will pop up. Press the Uninstall button in that box
- After uninstalling the Monitor drivers, restart your computer.
On the restart, Windows will automatically detect the hardware changes and re-install the missing drivers.
Related: Screen goes black when Scrolling with Mouse.
4] Disable HDR
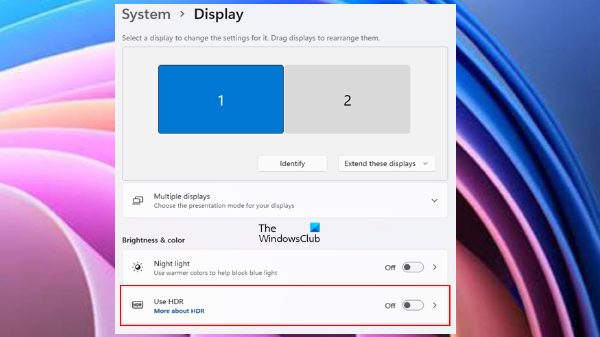
You might be experiencing the issue if the HDR (High Dynamic Range) option is enabled but your display is not compatible with it. In such a case, turning off the HDR can help you fix this issue. The following instructions will help you disable HDR in Windows 11 and Windows 10 separately.
Windows 11

Windows 11 users have to follow the below-listed instructions:
- Press Win+I hotkey to open the Settings app
- Click on the System category from the left section
- Access the Display page
- If you have connected multiple displays to your PC, select the HDR capable display from the displays shown at the top
- After selecting the display, turn off the button next to the Use HDR option.
Windows 10

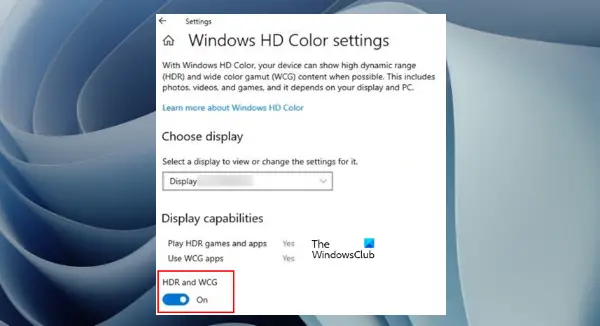
If you are using Windows 10 computer, follow the below-listed instructions to disable or turn off HDR:
- Open the Settings app using Win+I hotkey
- Select the System category
- Go to the Display page using the left section
- Click on the Windows HD Color settings link available on the right side
- If you have connected more than one display with your computer, select the HDR capable display from the drop-down menu available under the Choose display section
- Turn off the HDR and WCG button.
Related: Windows computer screen brightness flickering or flashing.
5] Remove the Color Profile for the problematic display
If you are still experiencing the same issue, try removing the Color Profile for the problematic display and see if it works. To do so, follow the steps given below:
- Type control panel in the Search box
- Press the Enter key to open the Control Panel window
- Switch the View by mode to Large icons or Small icons
- Click on the Color Management option
- Access the Devices tab
- Select the problematic display from the drop-down menu available at the top part
- Now, select the color profile available for the selected display
- Click on the Remove button
- Click the OK button and close the Color Management window. In the same way, remove any other profile(s) for the same display
- Restart your computer.
This might fix the issue.
Read: Computer Monitor has a Yellow tint on screen.
6] Turn off the Color Filters
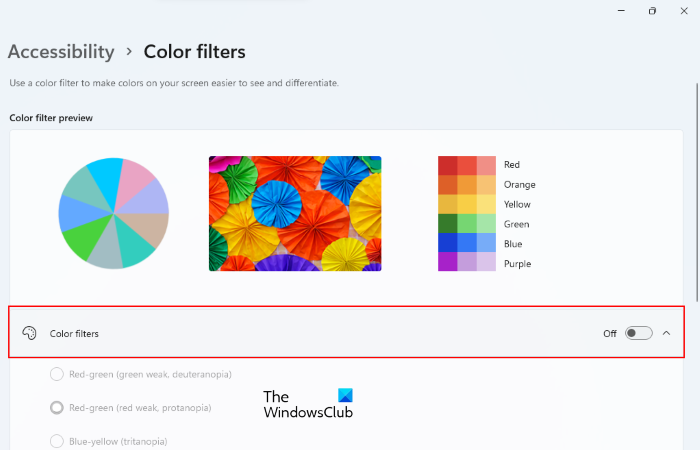
Check if you have enabled the Color Filters under the Settings app of your Windows 11/10 computer. If yes, consider turning it off. The steps to disable or turn off color filters differ in Windows 11 and Windows 10 operating systems. We have explained the process for both operating systems separately.
Windows 11

Turn off color filters in Windows 11 computer using the following steps:
- Use Win+I hotkey to open Windows 11 Settings app
- Select the Accessibility category from the left section
- Access the Color filters page from the right section
- Turn off the button available next to the Color filters option.
Windows 10

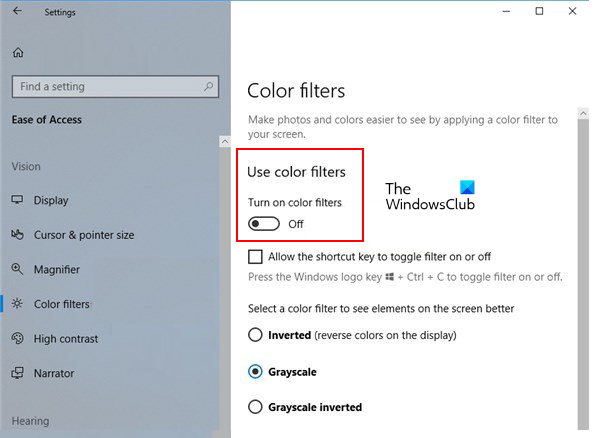
The steps to disable color filters in Windows 10 are as follows:
- Open Windows 10 Settings app using Win+I hotkey
- Click on the Ease of Access category
- Access the Color Filters page
- Turn the button off under the Use color filters section present on the right section.
This should help!
Read: How to clear the Display cache in Windows.
How do you fix distortion and discoloration on a computer screen?
If your computer screen looks distorted or shows a discoloration effect, then you can try the following solutions to fix the problem:
- Update, reinstall or roll back your display driver
- Reset GPU settings to default
- Turn off the Color Filters.
Magnets can also cause display distortion. Some devices, like speakers, have magnets. Therefore, if you have placed speakers near your display screen, turn them off and see if it fixes the problem.
I hope something will help.