If you are working on your laptop and have to move away for a while, you should put it to sleep ideally. This way you can pick up your work from where you left it, also, it saves electricity and your laptop’s battery. However, if you have to leave your PC for a long duration, it’s not advisable to put it to sleep, in that case, you can schedule a sleep timer shutdown.

Well, in today’s post, we will learn about how you can set a Windows sleep timer to shut down your computer automatically after a certain period. but first, let’s talk about what is sleep mode on Windows 11 PC.
What is Sleep mode in Windows 11 PC
Putting your PC into Sleep mode is similar to pausing a playing DVD. When you put your PC into sleep mode, all the actions happening on your computer stop and move to your RAM, which means your system memory. Your computer is still on but it uses less power in this state. Your work will be resumed once you touch or move your cursor. So, if you are moving away for a longer duration keeping your PC to sleep, it’s better to schedule a sleep timer shutdown. You can read about the different System Sleep States here.
How to set up Windows Sleep Timer Shutdown
You can create a Windows Sleep timer shutdown in your Windows 11/10 PC using the Command Prompt or by creating a Desktop shortcut as follows.
1] Using Command Prompt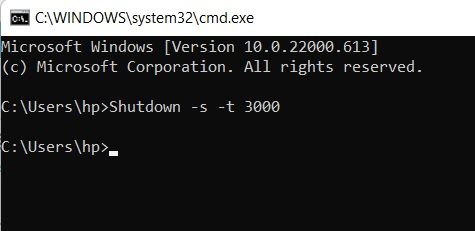
- Press Win+R to run the dialog box and type CMD to run Command Prompt.
- Type in the command,
Shutdown -s -t 3000and hit Enter. - Here, -s is giving the command to shut down and -t is the number of seconds, you want it to wait.
- Of course, you can change the timings as per your own requirements.
2] Create a Desktop Shortcut
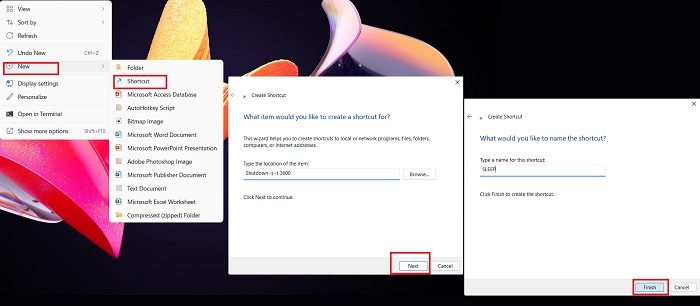
This method is for someone who wants to use this sleep timer shut down regularly. You can do this simply by creating a desktop shortcut without even opening the Command Prompt.
- This is again a very simple and quick way of creating a sleep timer for your Windows 11 PC.
- Go to your Desktop and right-click anywhere.
- Select New–>Shortcut.
- This will open a new window, type in the command, “Shutdown -s -t 3600″ and click on Next.
- Give the shortcut a name and click on Finish.
- You will get a shortcut on your Desktop as shown in the screenshot below.

You can cancel this sleep shutdown command anytime you want.
- Go to the Desktop and right-click.
- Select New -> Shortcut
- Type in the command below-
- Shutdown -a
- Type the name for this shortcut and click on Finish.
Related tip: If you are using a laptop, make sure to thoroughly understand the Pros and Cons of each Power plan, and then change the Sleep settings.
3] Create Windows Sleep Timer Shutdown using Run Command in Windows 11/10
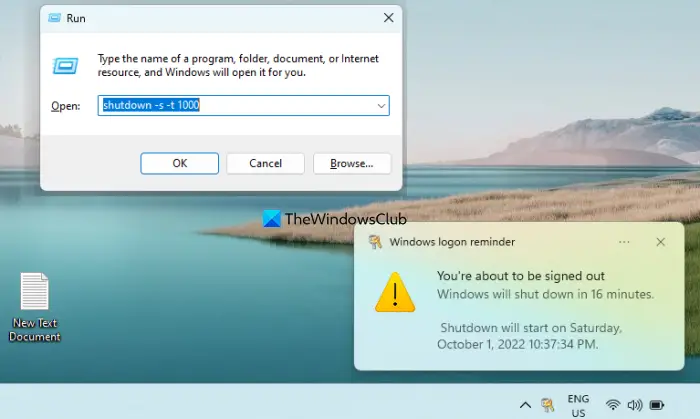
You can also use the Run Command box to create a sleep timer shutdown for your Windows 11/10 computer. These are the steps:
- Press Win+R hotkey. This will open the Run Command box
- Type
shutdown -s -t -1000command. While the s parameter is for shutdown and the t parameter is for the timer. You can change 1000 with any other value you want to set the timer - Press the OK button or use the Enter key.
You will get a desktop notification or Windows logon reminder (like visible in the screenshot above) that You’re about to be signed out and your Windows will shut down at the time set by you.
In case you changed your mind and want to cancel the shutdown, then open the Run Command box, type shutdown -a command, and hit the OK button.
4] Schedule Windows Shutdown using Task Scheduler in Windows 11/10
You can also follow a manual process and schedule shutdown using Task Scheduler in Windows 11/10. For this, you need to create a new basic task in Task Scheduler, give it a name, set the date and time for the task to trigger, and set the shutdown command. Once the task is scheduled, it will automatically trigger at the scheduled time and shut down your system.
5] Use a third-party tool like SleepTimer Ultimate or Sleep Timer
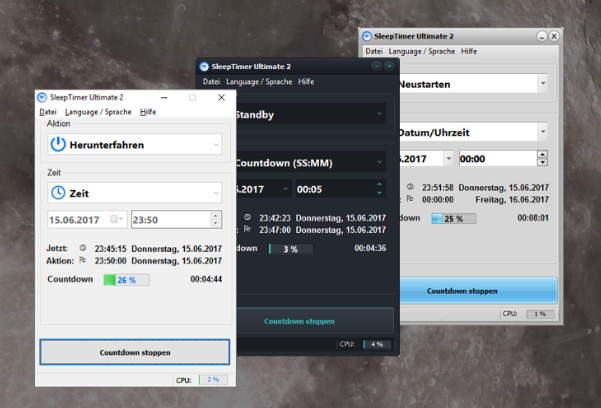
SleepTimer Ultimate is a free sleep timer program that allows you to shut down, restart, power off, Lock screen, Log out, Hibernate, Standby, Wake up, Start computers, etc.
You can also use other free shutdown scheduler tools or computer shutdown timer software to create a Windows sleep timer shutdown without any hassle. Simple Shutdown Timer, Windows Reboot, Adios Shutdown Timer, Sleep Timer, etc., are some good options to use. These tools let you set a timer in hours, minutes, and seconds to shut down or restart the system.
How do I change Sleep settings on Windows 11?
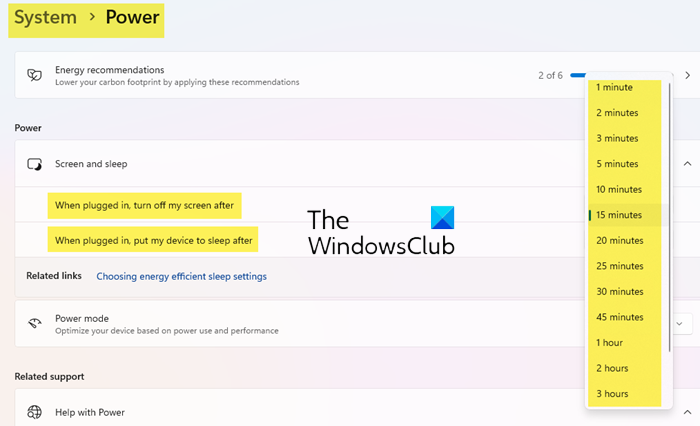
To change Power & sleep settings in Windows 11 do the following:
- Press Win+I key together to open the settings.
- Click the System entry under the side panel on the left.
- Switch to the right and scroll down to Power & battery option.
- Expand the menu and go to the Screen and sleep heading under Power section.
Here, you can choose how long you want the computer to wait before going to sleep. You can also change Sleep Timeout using PowerCFG command line.
How do I set a shutdown timer in Windows 11/10?
If you want to set a shutdown timer in your Windows 11/10 computer, then you can do it using Task Scheduler, Command Prompt, Run Command box, third-party tools, etc. All these options are covered in this post. Check these options and use any option you want to schedule a shutdown timer in Windows 11/10.
Does Windows 11 have a sleep timer?
You have to do that manually in Windows 11. Go to Settings > Power & Battery and customize your sleep settings. Alternatively, you can use the shortcut ALT+F4 and select the Sleep option from the menu.
Where is the Sleep button in Windows 11
Click on the Start, go to the power button in the bottom right corner, select Sleep and you are done. Also, you can press Alt+F4 and select the Sleep option from the menu.
Leave a Reply