The problem of sudden reboots to force Window 11/10 updates on a PC has been minimized by Active Hours. The feature keeps a record of hours during which a system remains active and prevents the installation of updates during such hours. For instance, when a restart is necessary to finish installing an update, Active Hours delays the update and allows you to focus on your work. If you have read about this feature but haven’t used it yet, check this post.
Enable & use Active Hours in Windows 11/10
You can configure Active Hours in Windows 10 in three ways. The first method is for general users, while the rest of the two are for consumers who know about Group Policy and Registry:
- Via Windows Settings
- By configuring the Turn off auto-restart for updates during active hours Group Policy setting
- By changing the values of ActiveHoursStart & ActiveHoursEnd Registry keys.
Let us take a look at the procedures involved in each case.
1] Configure Active Hours via Windows 11 Settings
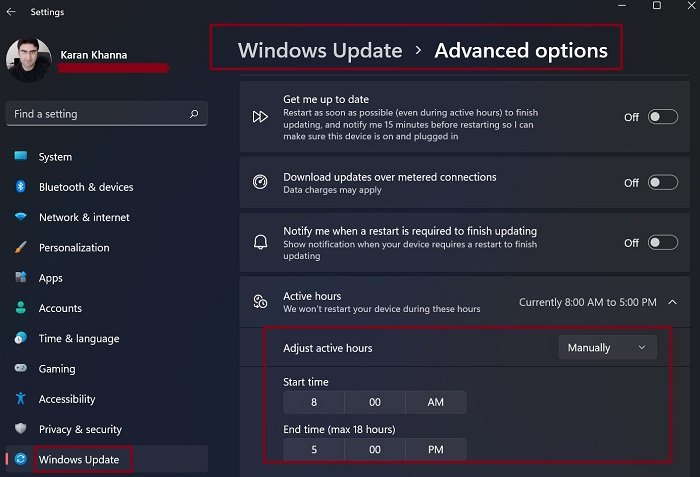
Windows 11 has been very focused on making the more common options in the Windows Settings menu easier to access. One case was with the Windows Updates. They were given a separate menu of their own. If you wish to configure and use Active Hours in Windows 11, then the procedure is as follows:
- Right-click on the Start button and select Settings.
- Go to the Windows Updates tab on the list on the left-hand side.
- In the right-pane, click on Advanced options.
- In the Advanced options menu, scroll down to the option for Active hours.
- Change the drop-down associated with Adjust Active hours to Manually.
- Now you will be able to change the Active hours as per your wish.
Configure Active Hours in Windows 10 Settings
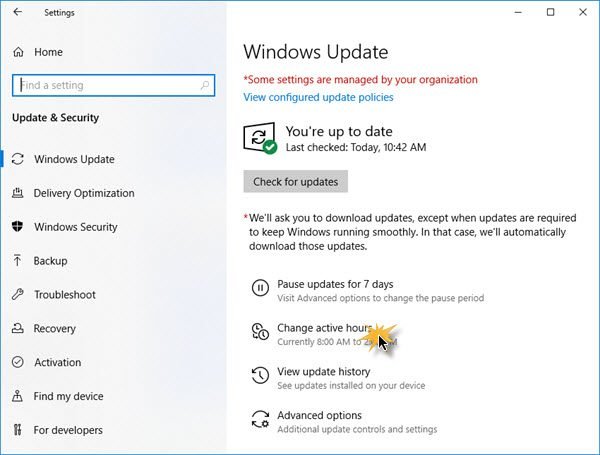
Open Settings > Update & Security >Windows Update.
Click on Change Active Hours.
In the next panel which opens, click on Change, and a small window will pop up.
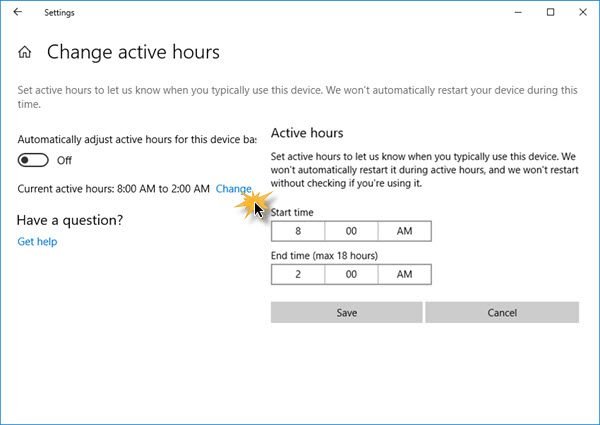
Here, you can choose a time ( ‘Start time’ and ‘End time’ ) during which restarts should not occur.
Save, and exit.
Those who are new to this, here is a bit more on Active Hours you should know.
The values entered indicates the hours during which your system is in use, i.e., ACTIVE. It’s essential for your active hour’s interval period. It can be anything between 1 and 18 hours since you can’t go above 18 hours.
- There is no option to configure different active hours on different days.
- You can’t specify different active hours for weekdays and weekends.
I wish the options were flexible. End users do take a break in between, and update during that time could save time. However, Windows 10 does offer an option to override Active Hours.
Go to Settings > Update & Security > Windows Update > Advanced Options. Here, you can set a custom restart time when your device will restart to install updates. However, this is a one-time setting only.
If you want more information see our post how to prevent Windows Update automatic restart.
2] Configure Active Hours using Group Policy
Available for Windows 10 Pro, Educational or Enterprise versions, it is used by computers mostly in Business or through remote access. Type gpedit.msc in the RUN prompt, and hit Enter. Then navigate to:
Local Computer Policy > Computer Configuration > Administrative Templates > Windows Components > Windows Updates.
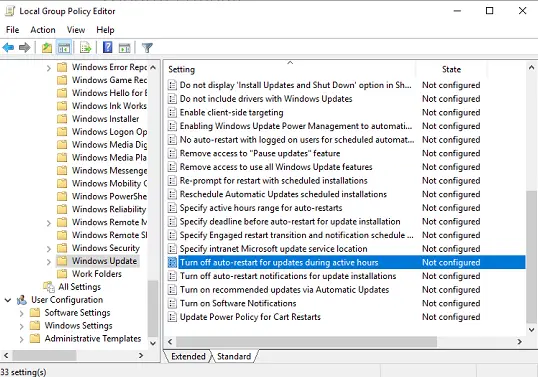
Look for a policy which says, “Turn off auto-restart for updates during active hours.” Double click on open, and then Enable it. Here you can choose active hours just like in the previous section. It works without a problem except when these two policies don’t override:
- No Auto-restart with logged on users for scheduled automatic updates installations.
- Always automatically restart at the scheduled time.
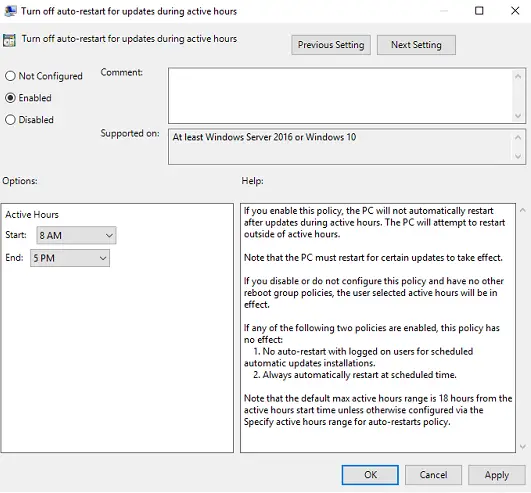
Group Policy allows you to configure a lower range of active hours, such as less than 18 hours.
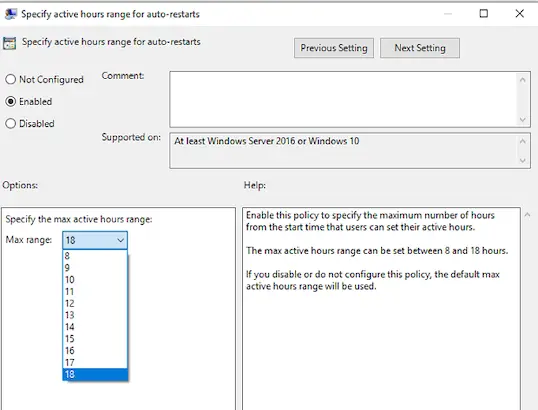
Look for a policy option which says “Specify Active hours range for auto -restarts. The minimum is 8 hours.”
3] Configure Active Hours via Registry Settings
You can configure & change Active Hours it via the Registry. Type regedit in Run prompt, and hit Enter to open the Registry Editor.
Navigate to:
HKEY_LOCAL_MACHINE\SOFTWARE\Microsoft\WindowsUpdate\UX\Settings
Here you have few keys which you can choose to change
-
- ActiveHoursStart
- ActiveHoursEnd
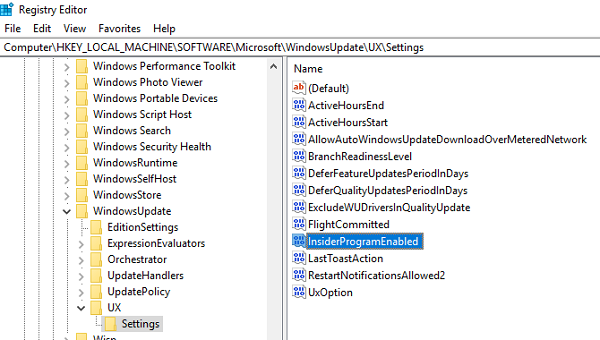
Since there are no extra settings available like Group Policy, changing via Registry doesn’t make sense for the same computer. However, you can also change remote computer’s Active hour’s settings via the registry.
Unless you want to change active hours duration, the available Windows 10 Settings are perfect for end-consumers. The Group Policy and Registry methods should be used when you want to change settings remotely or when in a business environment. IT admins can change a lot of things without the end-user knowing anything about it.
Why should you not allow Windows to select Active hours?
You should not allow Windows to select Active hours. Though Windows may be very smart, it is still a machine. The Active hours it selects might not be the best option for you. This is especially true when your work hours change frequently.
Windows 11 will start updating without your knowledge unless you have set the settings accordingly. So, managing these settings for Active hours is suggested before it catches you at the wrong time.
Will Windows Updates slow down my computer?
Windows Updates can slow down your computer because they are a very heavy process. However, if your system has fewer applications or the hardware is high-end, Windows Updates may pass through smoothly even while you work.
TIP: You can also automatically adjust Active Hours in Windows.
Leave a Reply