Setting up a Domain Controller (DC) in a Windows server is crucial in managing a secure and centralized network. A Domain Controller handles authentication, enforces security policies, and enables users and device management across an Active Directory Domain. In this guide, we walk through each step of configuring a Domain Controller, from installing Active Active Directory Domain Services (ADDS) to verifying its functionality, ensuring a smooth setup for centralized network control.
What is a Domain Controller in Windows Server?
A Domain Controller (DC) in Windows Server is a server that responds to security authentication requests within a Windows domain. It plays a crucial role in managing network security and user access. It not only validates user credentials when they log into the network, but also helps you allocate resources based on the requirements.
How to configure domain controller in Windows server step by step
If you want to configure Domain Controller (DC) on Windows Server, follow the steps mentioned below:
- Ensure that prerequisites are met
- Install the Active Directory Domain Services (ADDS)
- Promote the server to a Domain controller
- Verify the Domain Controller Configuration
Let’s get started with the guide.
1] Ensure that prerequisites are met
Before installing and configuring a Domain controller on a Windows server, users need first to check off some basic prerequisites. This includes ensuring that the Windows server is installed, along with configuring a static IP Address for the server. After meeting these demands, we are now moving on to installing the Active Directory Domain Services.
2] Install the Active Directory Domain Services (ADDS)

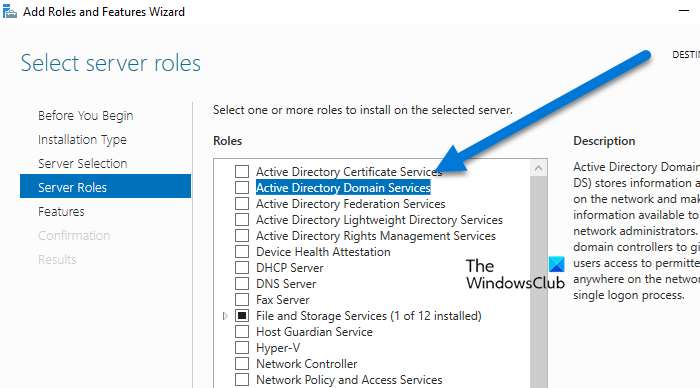
After meeting the prerequisites, the first step in configuring the domain controller is to install the Active Directory Domain Services. There are three primary ways to install ADDS on a Windows server: via the Server Manager, Windows Powershell, or Command-Line. In this guide, we will use the first option to install ADDS, and here’s how to do it.
- To begin with, sign in to the Windows server with an account with administrator privileges.
- In the Server Manager console, Navigate to the Dashboard > Manage, click the Add Roles and Features option, and then the Next button.
- Click on Role-based or feature-based installation, then Select a server from the server pool option, select a host to which we will add the services, and click the Next button.
- Check the Active Directory Domain Services box, and on the next page, click the Add Features button > Next.
- Since the default features are already selected, click the Next button twice and lastly, click the Install button.
Allow some time for the system to install the features, and move to the next step once done.
3] Promote the server to a Domain controller

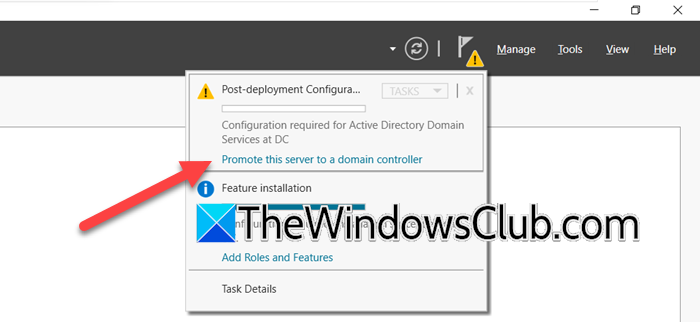
Once the ADDS Roles and features are installed, the next step is to promote the server to a domain controller. Here’s how to proceed.
- After installation, click on the notification with a link reading, ‘Promote this server to a domain controller’, and choose the Add a new forest option as the deployment type.
- To set up a new domain, enter a Root Domain Name, hit the Next button, and select the Functional Level for Forest and Domain. Since this is the first DC, check the DNS server, and Global Catalog, leaving the Read-only Domain controller unchecked, and then enter a password for Directory Services Restore Mode.
- Hit the Next button, verify the NetBIOS name > Next, and set the path for the database, log files, and SYSVOL.
- Finally, review the configuration and click the Next and Install buttons.
The server will restart after completing the installation.
4] Verify the Domain Controller Configuration
After the server reboots, log in using the domain credentials, and then verify that Active Directory is functioning well. Users can run the DCDIAG Command or launch Server Manager, and navigate to Tools > Active Directory Users and Computers. Next, run nslookup on the domain name to verify DNS functionality.
Users can also configure Group Policies (PGOs) to enforce settings across the domain. To access this, go to Tools > Group Policy Management, and right-click on the domain, or an Organizational unit to create or edit a GPO for centralized management.
The domain controller is now ready to manage users, computers, and other domain resources.
Read: How to backup and restore Active Directory in Windows Server
How do I assign a domain to a Windows server?
To assign a domain to a Windows server, users must go to the Server Manager, install the Active Directory Domain Services, and then promote the server to a domain controller. Then they need to create a new domain or use the existing one, and reboot the server to apply changes. The detailed version of the whole procedure is mentioned above.
Read: How to install and configure Direct Access on Windows Server
What is the difference between Active Directory and Domain Controller?
Active Directory is a service developed by Microsoft that stores and organizes information about network resources, such as users, computers, and groups enabling centralized management and security. A Domain Controller, on the other hand, is a server that hosts an Active directory and manages network authentication. Essentially, AD is the system, and the DC is the server that runs it, making them closely interconnected.
Also Read: Install and configure DNS on Windows Server.