If you manage an organization’s IT infrastructure, configuring NTP is essential to ensure proper and accurate time synchronization, which enables event logging, network security, and other computer operations. In this post, we will discuss how to configure an NTP Server on a Windows Server.
Configure NTP Server on Windows Server
Network Time Protocol (NTP) is a highly scalable internet protocol that helps determine the most accurate time information and synchronizes the time settings on a computer system.
In order to configure NTP Server on Windows Server, you can use the Windows Registry or PowerShell.
1] Configure the NTP Server using Registry Editor
First, we will see how you can configure the NTP Server with the Registry Editor. We are going to configure the Windows Registry, which is a hierarchical database used to set up your computer’s settings. To do so, you can follow the steps mentioned below.
- Take a backup of your registry.
- Then, we will enable NtpServer using the registry key and configure Win32Time’s AnnounceFlags.
- Next up, we need to restart the NTP Server.
- Finally, we will open the appropriate UDP port in Firewall.
To open the Registry Editor, we can open Run, type “regedit”, and click on Ok. Once the UAC prompts, click on Yes to continue. Now, we will take a backup of the registry that will be used if you want to revert back to the previous state in case something goes wrong. To do so, in Registry Editor, go to File > Import, go to the location where you want to store the import, and save it.

After taking the import, navigate to the following location in the Registry Editor.
Computer\HKEY_LOCAL_MACHINE\SYSTEM\CurrentControlSet\Services\W32Time\TimeProviders\NtpServer
Look for the value called Enabled, double-click on it, and set its Value data to 1. This will enable the NTP protocol on your server.

Once done, we need to go to the following location.
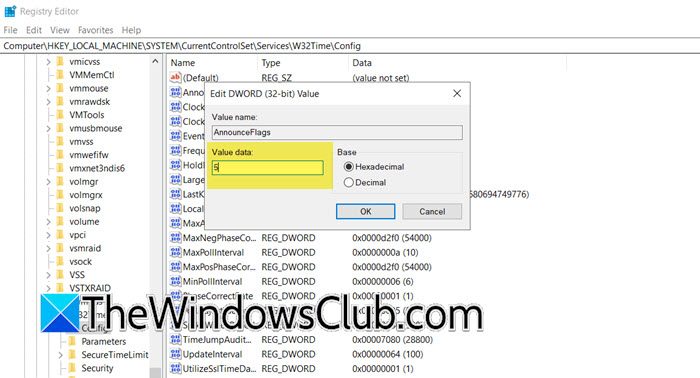
Computer\HKEY_LOCAL_MACHINE\SYSTEM\CurrentControlSet\Services\W32Time\Config
You need to look for AnnounceFlags, double-click on it, and set its Value data to 5.
Next, we need to restart the NTP Server, which can be done just by restarting the Time service. So, hit Win + S, search for Services, and open the utility. Now, scroll down and search for Windows Time service, right-click on it, and select Restart. Wait for the service to restart and we can move to our final step.

Finally, we are going to open the UDP Port 123 as it is used for the Network Time Protocol (NTP). To do so, you can follow the steps mentioned below.
- Open Run by Win + R, type “wf.msc”, and hit Enter to open the Windows Defender Firewall with Advanced Security utility.
- Click on Inbound Rules > New Rule.
- Select Port and click on Next.
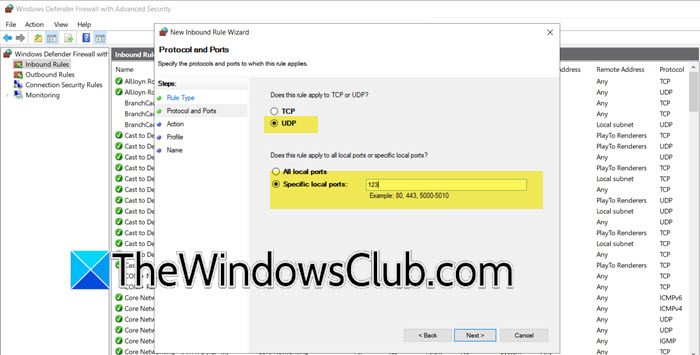
- Next up, you need to select the UDP checkbox and in the Specific local port field, enter 123; click on Next.
- Select Allow the connection and click on Next.
- You need to select the profile where this rule is supposed to be applied; Domain, Private, or Public. Click on Next.
- Give a name of your choice along with the description and click on Next.
This will open the UDP Port 123 which will allow the NTP traffic to pass.
That’s how you can configure an NTP Server on a Windows Server.
2] Configure the NTP Server using PowerShell

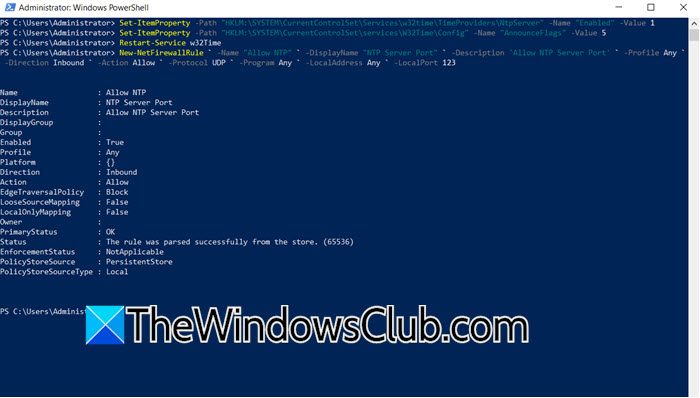
The aforementioned method allows you to configure the NTP server using the GUI, but we have a CLI-based method as well. Here, we require you to open PowerShell on your machine and then run the following commands.
- In order to enable the Registry key for NTP Server, you need to run the following command.
Set-ItemProperty -Path "HKLM:\SYSTEM\CurrentControlSet\Services\w32time\TimeProviders\NtpServer" -Name "Enabled" -Value 1
- Next up, we need to make AnnounceFlags value 5 by running the command mentioned below.
Set-ItemProperty -Path "HKLM:\SYSTEM\CurrentControlSet\services\W32Time\Config" -Name "AnnounceFlags" -Value 5
- To restart the Time service, run – Restart-Service w32Time.
- Now, we need to configure the Firewall, for that, run the following commands.
New-NetFirewallRule ` -Name "Allow NTP" ` -DisplayName "NTP Server Port" ` -Description 'Allow NTP Server Port' ` -Profile Any ` -Direction Inbound ` -Action Allow ` -Protocol UDP ` -Program Any ` -LocalAddress Any ` -LocalPort 123
Now, you have configured an NTP Server.
Read: Change Internet Time Update interval in Windows
How to configure NTP server in Windows Server?
To configure the NTP Server in Windows Server, you must enable the related registry key. Also, you need to configure the AnnounceFlags registry value under W32Time. Once done, we need to restart the Time service and configure the UDP port to allow NTP traffic. To do all this, we recommend you follow the steps mentioned above.
Read: NTP client shows incorrect Time on Windows
How do I setup my own NTP server?
On Windows, setting up the NTP Server is actually pretty simple, all you need to do is configure the registry settings, and once that is done, you can reboot the Windows Time service and then configure the UDP port settings, as mentioned in this post above.
Also Read: Add or change Time Server in Windows.
Leave a Reply