The advent of computers and the Internet has changed the way we write. Digital writing is fast gaining acceptance in today’s digital world. Among a few of the innovative technologies explored, digital writing occupies a prominent space. Microsoft has embarked on a mission to make this experience more innovative and unique. As such, it has decided to expand its Pen support through the new Windows Ink experience.
Technology is dynamic and it is getting updated every minute. Earlier we used buttons on our devices and now the touch is ruling the roost. Touch and pen are giving immense scope to the users to better their Windows user experience. You can draw, do many tasks using them and customize them. Windows 11 has all the features like Windows 10 to let the users use Pen and touch. It has even bettered some features in Windows 11. In this guide, we show you how to Configure Pen shortcuts & Touch settings in Windows 11/10.
Windows Ink experience is just another change in name that the software giant uses to refer to the existing pen support, with new improvements added. For example, you could use your pen to annotate screenshots but you have to configure its settings first. So, let us in this post learn how to configure Pen shortcuts & Touch settings in Windows 11/10.
Configure Pen shortcuts & Touch settings in Windows 11
If you want to use Pen shortcuts and touchpad on your Windows 11 PC and customize them to your use, you can follow the below steps and use them effectively.
- Pair pen with PC
- Add or remove shortcuts to the Pen menu
- Change what the pen does on single or double clicks
- Turn on Touch gestures and Touchpad gestures
- Change your touch gestures
Let’s get into the details of each one and configure them for our usage.
1] Pair pen with PC
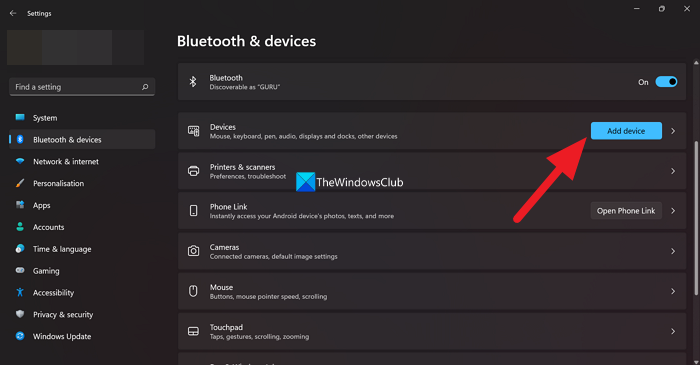
Before you start using the pen on your Windows 11/10 PC, you need to pair the pen to the PC. Only, then you can customize and use the pen on various programs.
To pair a pen with your PC on Windows 11,
- Open the Settings app using the Win+I keyboard shortcut
- Click on the Bluetooth & devices on the left sidebar
- Select Add a device and then Bluetooth. Select the pen from the list of available devices to pair. Make sure the pen is in pairing mode by holding down the shortcut button for seven seconds to make it to that list.
- Select the pen and click on Pair
To pair a pen with your PC on Windows 10,
- Open the Settings app from the Start menu
- Select Devices and then Bluetooth & other devices
- Now, hold down the shortcut button on your pen for seven seconds to turn on pairing mode. Choose the pen from the list of available devices and select Pair
2] Add or remove shortcuts to the Pen menu
You can easily add or remove shortcuts to your Pen menu in just a few clicks. Before that, you need to tap on the screen with the pen to show the pen menu on Windows 11. On Windows 10, you can select Windows Ink Workspace from the taskbar to start using the pen for different purposes.
To add or remove shortcuts to the Pen menu on Windows 11,
- Tap anywhere on the screen with your pen to open the pen menu. It will appear on the corner of your taskbar.
- Select Settings in the pen menu and then select Edit pen menu
- To add apps, select Add or Remove to remove apps from the pen menu.
On Windows 10, you don’t have much to do with the pen menu as it can only be used on Whiteboard, Snip & Sketch. If you open Windows Ink Workspace from the taskbar, you can select Whiteboard or Fullscreen Snip on it. You can also access Pen settings from there.
Read: Best free software to Draw on Screen in Windows PC
3] Change what the pen does on single or double clicks
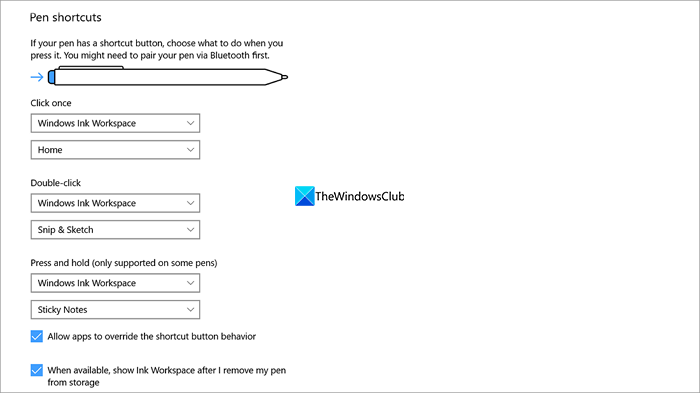
You can also customize what the pen does on different clicks you make using it or its shortcut button on Windows 11/10.
To change what the pen does when you click double-click or hold down the pen’s shortcut button on Windows 11, open the Settings app, select Bluetooth & devices and go to Pen & Windows Ink.
To change what the pen does when you click double-click or hold down the pen’s shortcut button on Windows 10, open the Settings app, select Devices, and then Pen & Windows Ink. You can select what the pen clicks do by using the drop-down boxes under Click once, Double-click, or Press and hold (only supported on some pens).
Read: Configure Pen and Windows Ink Settings
4] Turn on Touch gestures and Touchpad gestures
You can use touch gestures on Windows 11/10 PC to do various tasks easily. There are various default touch gestures you can use when you enable them.
| ACTION | GESTURES |
| Select an item | Tap on the item |
| Scroll | Slide two fingers on the screen horizontally or vertically. |
| Zoom in or out | Pinch in or stretch out two fingers on the screen |
| Show more options or commands (Right-click options) | Press and hold on to the item |
| Show all open windows | Swipe three fingers up on the screen |
| Show the desktop | Swipe three fingers down on the screen |
| Switch to the last open app | Swipe three fingers left or right on the screen |
| Open notification center | Swipe with one finger from the right edge of the screen |
| See widgets | Swipe with one finger from the left edge of the screen |
| Switch desktops | Swipe four fingers to the left or right on the screen |
You can use the above touch gestures when you enable touch on your Windows 11.
To turn on touch gestures on Windows 11,
- Open the Settings app from the Start menu
- Click on Bluetooth & devices
- Select Touch and then turn on Three-and four-finger touch gestures
Like touch gestures, there are some default touchpad gestures, you can use once you enable touchpad gestures on Windows 11.
| ACTION | GESTURES |
| Select an item | Tap the touchpad |
| Scroll | Scroll two fingers on the touchpad horizontally or vertically |
| Zoom in or out | Pinch in or Stretch out two fingers on the touchpad |
| Show more options or commands (right-click menu) | Tap two fingers on the touchpad or press down in the lower-right corner |
| Show all open windows | Swipe three fingers up on the touchpad |
| Show the desktop | Swipe three fingers down on the touchpad |
| Switch between open apps or windows | Swipe three fingers left or right on the touchpad |
| Switch desktops | Swipe four fingers to the left or right on the touchpad |
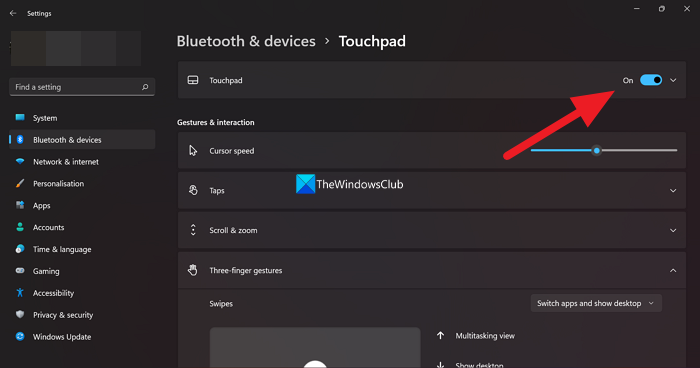
To turn on touchpad gestures on Windows 11,
- Open the Settings app from the Start menu
- Click on Bluetooth & devices
- Select Touchpad and toggle the button beside it to turn it on, on the Touchpad settings page.
The touchpad is turned on by default on Windows 11 and Windows 10. The actions and gestures on the touchpad on Windows 10 are similar to Windows 11, except Windows 10 has some more.
To open Cortana on Windows 10 using the touchpad, you need to tap three fingers on the touchpad, to open action center, you need to tap four fingers on the touchpad, and to switch virtual desktops, you need to swipe four fingers left or right on the touchpad.
5] Change your touch gestures
There are touch gestures that are set by default on Windows 11/10. You can also customize or change them to your convenience in a simple way.
To change the default touch gestures on Windows 11,
- Open the Settings app from the Start menu
- Click on Bluetooth & devices
- Select Touchpad. Then, select Three-finger gestures or Four-finger gestures to change them.
To change the default touch gestures on Windows 10,
- Open the Settings app from the Start menu
- Select Devices and then Touchpad.
- You can customize the gestures on the Touchpad settings page.
These are the steps to configure pen shortcuts and touch settings on Windows 11/10 PC.
Pen shortcuts & Touch settings in Windows 10
First, open Settings > Devices. Here, you can see a new option – ‘Pen and Windows Ink‘ added to the ‘Devices’ section.
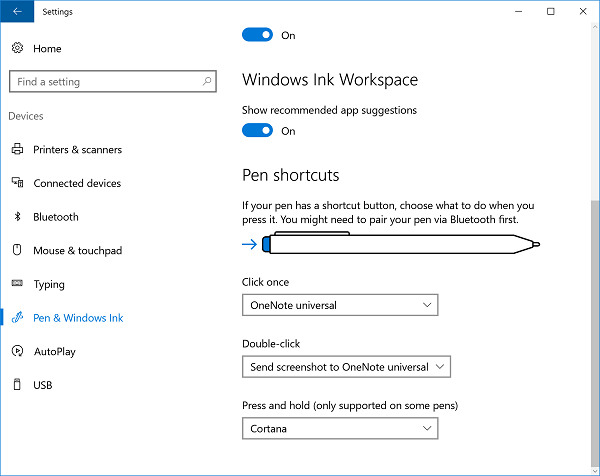
Now, for configuring the shortcuts, open the Windows Ink Workspace. Under ‘Click Once’ heading, select ‘Click once to open my Windows Ink Workspace notes even when the device is locked‘. This setting enables you to open your Workspace even if the device is locked.
The “Double-click” and “Press and hold” options that can be seen below the ‘Click Once’. The Double-click action enables a user to send screenshots to note-taking apps like OneNote, and the “Press and hold” action fires up Cortana, instantly. You can change these settings here.
In addition to the above, you can adjust how accurately your screen should respond whenever you decide to use a pen or finger. To change this, enter ‘Pen and Touch‘ in the search box. Select the Action and then click on the Settings button. Next, you will be able to calibrate and configure settings for Pen and Touch.
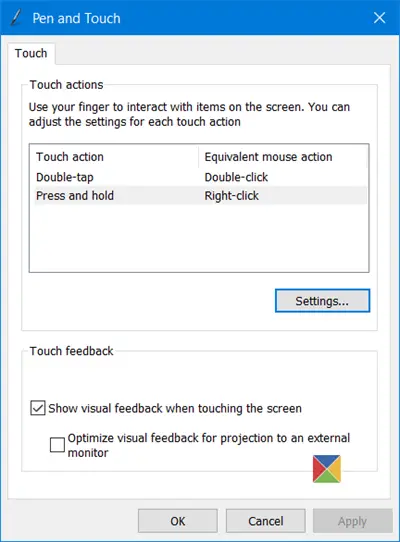
The settings available are:
1] Single click
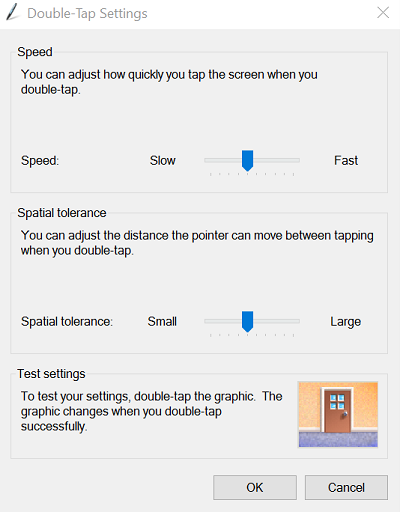
2] Double click – Under this, you can adjust how quickly you can tap a screen when you double-tap. You can also adjust the distance the pointer can move between tapping when you double-tap.
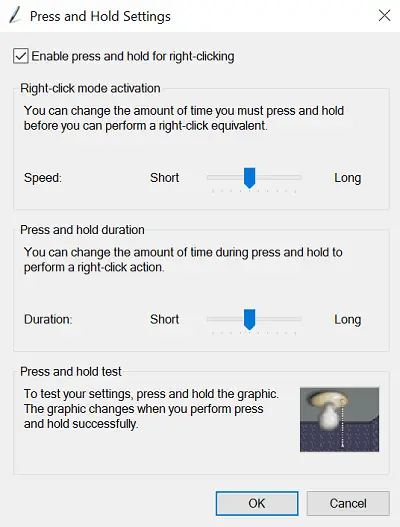
3] Press and hold – Here you can adjust the amount of time during the press and hold to perform a right-click action.
Thus, the Pen shortcuts and Touch settings let you personalize your pen experience, even more, to assure you do not miss out on the settings that rightly fits your needs.