Businesses that deploy Windows Server to manage computers and other policies are crucial. The nice part about managing servers is that you don’t have to be physically around them. You can always remotely log in to the server from anywhere. That means somebody else can also try to login as well. In this post, we will share how you can configure Remote Access Client Account Lockout in Windows Server using the Registry method.
Configure Remote Access Client Account Lockout
If you are wondering why there is a lockout setup in place, then it is to make sure to keep attackers at bay. Once you design, it will make sure to keep attackers who do guesswork and those who perform a dictionary attack. It can happen to a valid user who doesn’t remember the exact password. The lockout makes sure that the user will not be able to try to attack for some time, making the overall security better.
However, it can also lock out legitimate users, which can be annoying. This post will also show how to manually unlock a remote access client.
Configure the registry settings accordingly, depending on what you are using for authentication. If you are using Microsoft Windows Authentication, then configure the registry on the Remote Access Server. But if you are using RADIUS for RAS, then configure it on Internet Authentication Server or IAS.
Here is the list of things we will configure:
- Number of failed attempts before lockout
- The time after which the lockout counter is reset
Make sure to take a backup of the registry before making any changes.
Enable Remote Access Client Account Lockout
To enable Remote Access Client Account Lockout, follow these steps:
- Press Win+R > type regedit > hit the Enter button.
- Navigate to AccountLockout in HKLM.
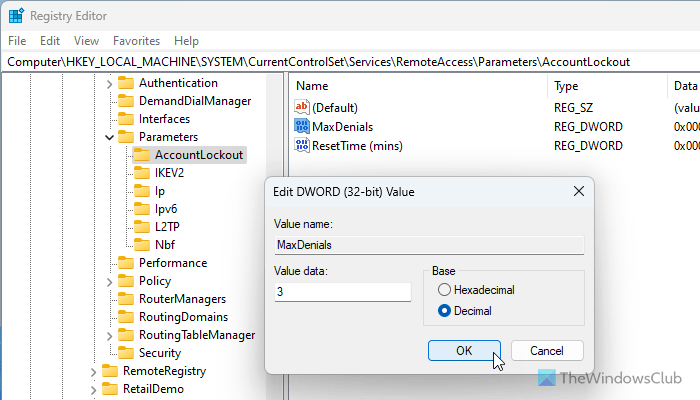
- Double-click on MaxDenials.
- Enter a value above 0.
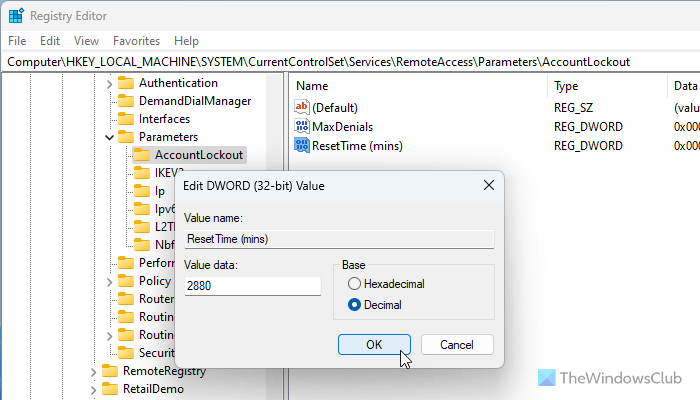
- Double-click on ResetTime (mins).
- Enter a value in Decimal format.
- Click the OK button.
- Close all windows and restart your PC.
To learn more about these steps, continue reading.
To get started, you need to open the Registry Editor. For that, press Win+R to open the Run prompt, type regedit, and hit Enter.
Then, navigate to this path:
HKEY_LOCAL_MACHINE\SYSTEM\CurrentControlSet\Services\RemoteAccess\Parameters\AccountLockout
Double-click on the MaxDenials REG_DWORD value and set a Value data that is above 0.

Set the value to anything above zero, which will also mean it is the number of failed attempts. So, if you set it to two, the third attempt will result in a lockout. Click OK to confirm.
Next, double-click on the ResetTime (mins) value, which is in hexadecimal. However, it is suggested to opt for the Decimal option and set the value accordingly for better convenience.

The default value is two days, so make sure to set it according to your company’s policy.
Click the OK button, close all windows, and restart your PC.
Registry Editing to manually unlock a Remote Access Client
Assuming you have a locked account, and you need to unlock it because the lockout timeout is pretty long. Every time a user is locked out, an entry is made into it in the format of DomainName:UserName. To remover the lock, you need to delete it.
- Open the Registry Editor and navigate to the following path.
HKEY_LOCAL_MACHINE\SYSTEM\CurrentControlSet\Services\RemoteAccess\Parameters\AccountLockout
- Find the Domain Name:User Name value, and then delete the entry.
- Quit Registry Editor and check if the user account is able to login with the right credentials.
That’s about it. Always make sure to back up registry settings before you make any changes.
I hope the post gave you clear insight into how to configure lockout and unblock a remote client.
Read: Fix A user account was locked out error in Windows
Which Windows tool would you use to configure an account lockout policy?
You can use the Local Group Policy Editor to configure an account lockout policy in Windows 11/10. Open the GPEDIT and go to Computer Configuration > Windows Settings > Security Settings > Account Lockout Policy. Double-click on each of the four settings and set the values according to your requirements.
How to set an account lockout threshold for Microsoft Windows?
If you use Windows 11/10, you can open Computer Configuration > Windows Settings > Security Settings > Account Lockout Policy in the Local Group Policy Editor and double-click on the Account lockout threshold setting to set a value you want. However, if you use Windows Server, you can open HKEY_LOCAL_MACHINE\SYSTEM\CurrentControlSet\Services\RemoteAccess\Parameters\AccountLockout and double-click on the MaxDenials. Then, set a value above zero.
Read: Remote Desktop cannot verify the identity of the remote computer.
Leave a Reply