In general, bandwidth is the rate at which data travels to and fro from your computer. In other words, bandwidth is the range covered for data transmission between an upper range and a lower range. Bandwidth is usually controlled by your Internet Service Provider (ISP). However, there exist some settings in Windows, by configuring which you limit the reservable bandwidth for your system.
Primarily, Windows reserves a certain amount of bandwidth for its application requirements and operation purposes. By configuring its setting in the Group Policy, you can easily limit the reservable bandwidth. This article will show you stepwise, how to access or open up the reservable bandwidth on your Windows 11/10/8.
Limit Reservable Bandwidth Setting in Windows 11/10
1. Press Windows Key + R combination, type put gpedit.msc in Run dialog box and hit Enter to open the Local Group Policy Editor. The Group Policy Editor, incidentally, is not available in Windows Home version. It is available only in Windows Pro, Enterprise, etc., versions,

2. Navigate here:
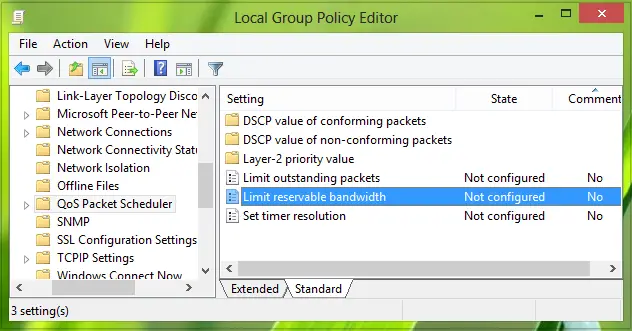
Computer Configuration -> Administrative -> Network -> Qos Packet Scheduler

3. In the right pane of this window, look for the settings named Limit reservable bandwidth, it must be showing a Not Configured status by default. Double click on the same setting to modify it:

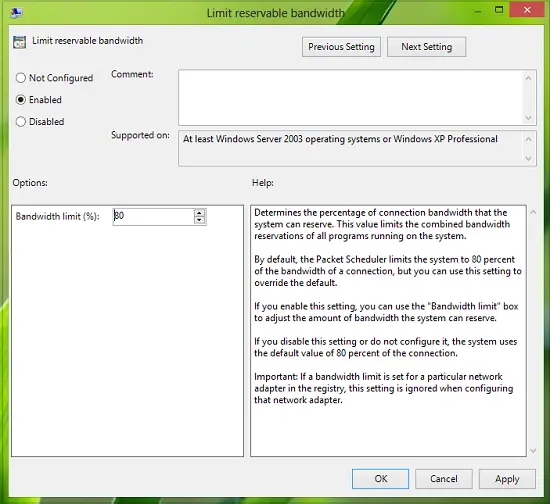
This policy setting determines the percentage of connection bandwidth that the system can reserve. This value limits the combined bandwidth reservations of all programs running on the system. By default, the Packet Scheduler limits the system to 80 percent of the bandwidth of a connection, but you can use this setting to override the default. If you enable this setting, you can use the “Bandwidth limit” box to adjust the amount of bandwidth the system can reserve. If you disable this setting or do not configure it, the system uses the default value of 80 percent of the connection. If a bandwidth limit is set for a particular network adapter in the registry, this setting is ignored when configuring that network adapter.
4. Now, in the above-shown window, select Enabled and in the Options section; you could input the percentage for limiting the bandwidth. If you input 0 percent here, you can gain the reserved bandwidth reserved by the system. UPDATE: Do read the note below.
Click Apply, followed by OK then. You may now close the Local Group Policy Editor and reboot the system with gained bandwidth.
If your version of Windows does not ship with Gpedit, then you may open Regedit and navigate to the following registry key:
HKEY_LOCAL_MACHINE\SOFTWARE\Policies\Microsoft\Windows\Psched
Give it Value Data 0. If Psched does not exist, create it.
Hope you find the tip useful!
NOTE BY ADMIN:
The claim that Windows always reserves a percentage of the available bandwidth for QoS is incorrect. One hundred percent of the network bandwidth is available to be shared by all programs unless a program specifically requests priority bandwidth. This “reserved” bandwidth is still available to other programs unless the requesting program is sending data. If the program that reserved the bandwidth is not sending sufficient data to use it, the unused part of the reserved bandwidth is available for other data flows on the same host, says KB316666.
So what will happen if you change the limit of the reservable bandwidth to zero?
Here is what Microsoft has to say:
The Windows Operating System reserves a fixed percentage of the total Internet bandwidth for the QoS or Quality of Service usage like Windows update, license renewal, etc. Thus, when you limit the Reservable Bandwidth of the operating system to 0, this will affect the operating system activities like Automatic Windows Updates. If a QoS-aware application reserves more bandwidth than it uses, then the unused, reserved bandwidth is available for use by other applications. The reservation does not ensure that the bandwidth will be available to the QoS-aware application because applications that are not QoS-aware might consume too much bandwidth.
More details on TechNet.
What is using my bandwidth in Windows 11?
If you want to check bandwidth usage by devices in Windows 11, then you can track bandwidth usage with the help of your router. Log in with your credentials to access router settings and check for the option or setting that provides detailed data usage. You will be able to see a list of devices including sent packets, received packets, and other information. If you want, you can also use some best free bandwidth monitoring tools (like ISP Monitor, Cucusoft Net Guard, etc.) for Windows PC to check bandwidth and internet usage.
How do I fix limited bandwidth problems?
The best option to get rid of the limited bandwidth problem is by upgrading your internet plan to get a higher bandwidth limit. So, you need to contact your ISP for that. If you don’t want that, then you can increase your internet speed by limiting the connected devices, allowing your computer to receive more data with a Registry hack, performing a virus and malware scan, using an Ethernet cable, upgrading your router, etc.
Hope this helps.