Some users that have Microsoft 365 or Microsoft Office installed on their Windows 11 or Windows 10 computer may get the error message The connection to Microsoft Exchange is unavailable when setting up Outlook or adding a new email ID on their device. In this post, we offer the most suitable solutions to this issue. This error mainly occurs when you have added a @yourdomain.com type of email account to Microsoft Outlook, but you may use these suggestions even if you have not used such a form of an email address.
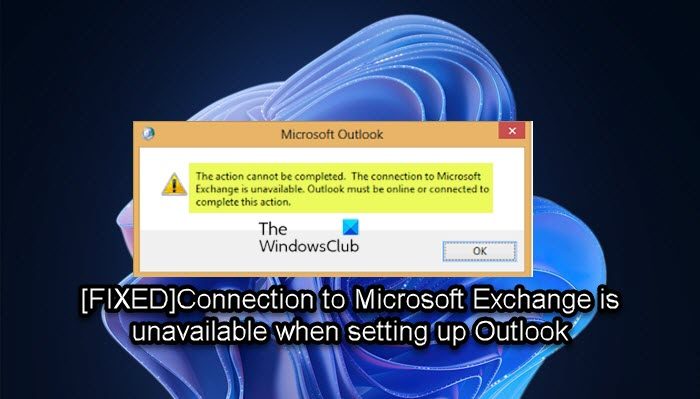
The full error message reads as follows;
The action cannot be completed. The connection to Microsoft Exchange is unavailable. Outlook must be online or connected to complete this action.
This issue can occur if the user has an account at a third-party provider that uses the same email address and password that the user’s Office 365 account uses.
Connection to Microsoft Exchange is unavailable when setting up Outlook
If you’re getting The connection to Microsoft Exchange is unavailable error message when setting up Outlook on your Windows 11/10 PC, you can try our recommended solutions below in no particular order to resolve the issue on your system.
- Delete Default Profile
- Create a New Outlook Profile
- Update or create your Outlook profile with RPC encryption
- Disable the encryption requirement on all CAS servers
- Deploy a Group Policy setting to update existing Outlook profiles with RPC encryption
- Run Microsoft Support and Recovery Assistant
- Create new alias for the Office 365 user
- Change the user name or password
The first, three can be configured by the end-user, while 4 and 5 are only for Servers.
Before you proceed with the solutions below, make sure your PC is not experiencing internet connectivity issue and that the Exchange server is not offline – if you are an IT or Exchange administrator, the Microsoft Remote Connectivity Analyzer can help you diagnose a number of issues, like Outlook account setup, connectivity issues, etc.
Let’s take a look at the description of the process involved concerning each of the listed solutions.
1] Delete Default Profile
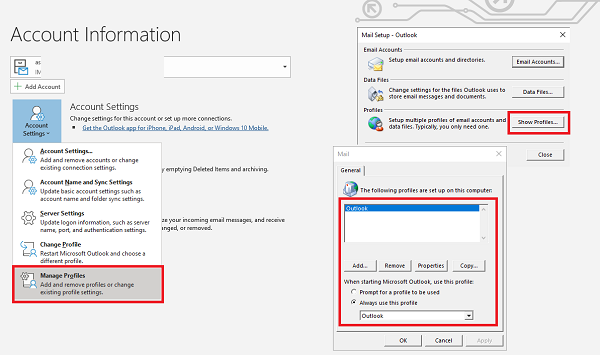
- Launch Outlook, and then click on Info > Account settings dropdown > Manage Profile
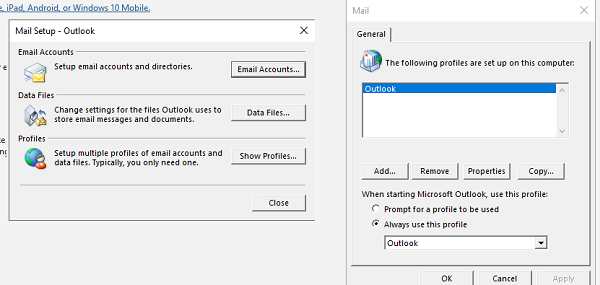
- It will open the Mail Setup window. Click on Show Profiles button.
- Delete the default profile by clicking on the Remove button.
- Restart Outlook.
When you remove the profile, all offline cached content for its account will be removed. However, you can backup the OST profile to reuse it.
When you relaunch Outlook, you will have to create a new profile, and then go through the setup process again.
2] Create a New Outlook Profile
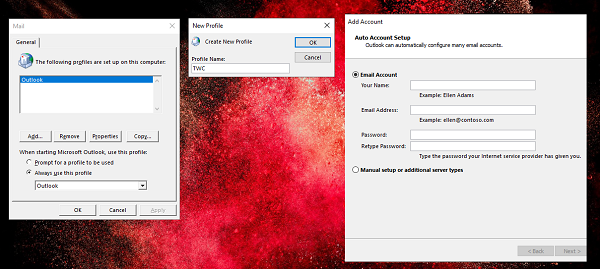
If you do not want to delete, you can create a new default profile. At the Mail Setup > Profiles section, you can click on the Add button, and then give a name to the profile. Next, you need to add the email accounts you want to add. Make sure to properly configure the email account, so the error doesn’t reappear. Also, make sure to set that as the default profile.
3] Update or create your Outlook profile with RPC encryption
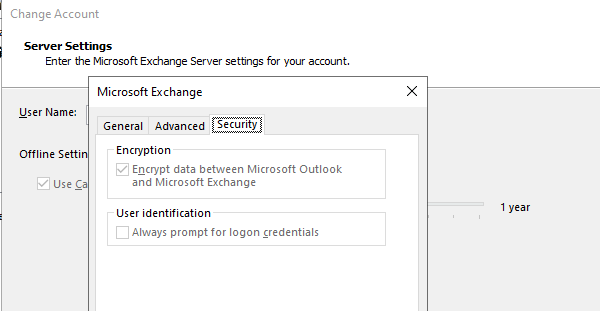
Most of the users have all email accounts under one single profile. One of the email accounts may be having trouble with that is running Microsoft Exchange Server. These are usually corporate accounts that haven’t been configured properly.
- Launch Outlook, and then click on Info > Account settings dropdown > Manage Profile
- Click on E-mail Accounts > select the email which is configured with Exchange Server, and then click on Change > More Settings
- In the Microsoft Exchange window, switch to Security tab
- Select Encrypt data between Microsoft Office Outlook and Microsoft Exchange.
- Click Ok and exit
It should fix the issue if it were because of RPC encryption error.
4] Disable the encryption requirement on all CAS servers
This part is specifically for IT admins who can disable encryption requirements. Microsoft warns that it should be only used where you cannot immediately deploy the necessary RPC encryption settings on your Outlook clients. Run the following command in the Exchange Management Shell:
Set-RpcClientAccess –Server <Exchange server name> –EncryptionRequired:$False
You must run this cmdlet for all Client Access servers that are running Exchange Server 2010 or later versions. Rerun this command for each Exchange server that has the Client Access Server role. Also, make sure to disable RPC encryption, which we talked about in the above step.
However, make sure to enable it back again after deployment with changes to the RPC requirement on Outlook.
5] Deploy a Group Policy setting to update existing Outlook profiles with RPC encryption
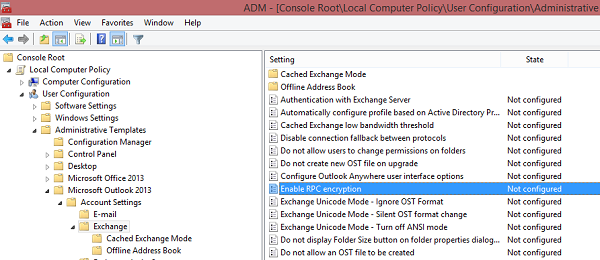
You can also change RPC settings on the server-side by using Group Policy. Navigate to User Configuration > Administrative Templates > Microsoft Office “Version number” > Account Settings > Exchange. Locate policy Enable RPC encryption and disable it.
6] Run Microsoft Support and Recovery Assistant
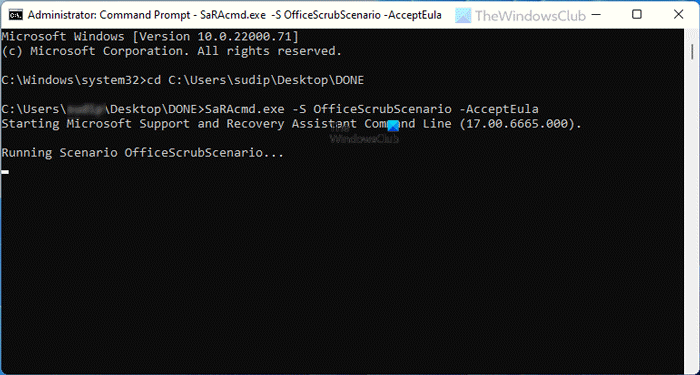
If you have run into the connection to Microsoft Exchange is unavailable error when setting up Outlook on your Windows 11/10 PC, you can run the Microsoft Support and Recovery Assistant tool GUI version or the command-line version and see if the issue in focus is resolved.
The SaRA tool can help you with Outlook if:
- Outlook won’t start
- Can’t setup Office 365 email in Outlook
- Outlook keeps asking for password
- Outlook keeps “Trying to connect…” or gets “Disconnected”
- Shared mailboxes or shared calendars don’t work
- Problems with Calendar
- Outlook not responding, keeps crashing or has stopped working
- Outlook can’t send, receive, or find the email
- Email in Outlook not syncing
7] Create new alias for the Office 365 user
This solution requires you to create a new alias for the user in Office 365, and use it to set up Outlook. To carry out this task, do the following:
- Sign in to the Exchange admin center.
- Select Recipients.
- Select Mailboxes.
- Double-click the user’s mailbox.
- Select Email address,
- Select Add.
- Select SMTP.
- Now, add a new alias that uses the
.onmicrosoft.comdomain (example;john@contoso.onmicrosoft.comalias).
Now, instead of the user’s email address use the alias that you just created to set up Outlook. During the Outlook setup process and you’re prompted again to enter credentials, use the user’s actual Office 365 email address.
8] Change the user name or password
This is a simple solution to the issue in highlight, which involves changing the user name or password of the user’s Office 365 account or of the user’s third-party account so that it is unique for the user’s Office 365 account.
9] Restore Registry settings
This is a bit tricky, but it would be easier if you follow all the steps carefully. To perform this step, you need two computers running the same Windows OS and version of Outlook.
Now open the Registry editor on the other computer where Outlook is working smoothly. Navigate to the following path:
HKEY_CURRENT_USER\Software\Microsoft\Windows\CurrentVersion\Explorer\User Shell Folders
Right-click on the User Shell Folders and select Export.
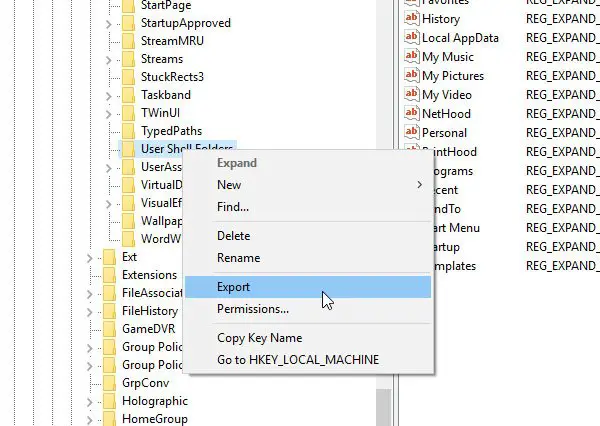
Choose a location where you want to save the .reg file and save it accordingly.
Now copy the file to the computer on which you are facing issues.
Now, press Win+R, type regedit to open the Registry Editor. Then, click on File > Import. Select the .reg file that you have copied recently to add the information to your system.
Remember to backup Registry files and create a system restore point first.
We hope these methods helped you to resolve Outlook-connected issues with Microsoft Exchange.
How do I fix Outlook The connection to Microsoft Exchange is unavailable?
To fix The connection to Microsoft Exchange is unavailable error on your PC, try the following suggestions:
- Edit registry.
- Update your Outlook profile.
- Create a new Outlook profile.
- Delete your Outlook profile.
- Use flushdns command.
- Restart Microsoft Exchange services.
- Disable your antivirus.
- Set the WINS IP addresses on your PC.
How do I connect Microsoft Exchange to Outlook?
To set up or connect Microsoft Exchange server to Outlook, follow these steps:
- Open Outlook.
- Next, open Control Panel.
- Select Mail.
- Click Show Profiles and choose the Outlook profile you want to change.
- Locate the Services tab and click on the Add Service button.
- Enter your Exchange Server information, including the name of the server and your specific mailbox name.
How do I change Microsoft Exchange from Online to Microsoft Exchange?
You need to turn off Cached Exchange Mode, but keep in mind Outlook will be slower to process changes in the Global Address List, or will be unable to find certain emails when you search for them. Follow these instructions:
- Open Outlook.
- Click the File tab.
- Click Account Settings, and then click Account Settings from the drop-down.
- On the E-mail tab, click the Exchange account, and then click Change.
- Under Microsoft Exchange server, select or clear the Use Cached Exchange Mode check box.
Why is Outlook disconnected from Exchange Server?
One possible cause why Outlook is disconnected from Exchange Server is that you’re using Outlook and you disabled the Encrypt data between Microsoft Office Outlook and Microsoft Exchange profile setting. The default configuration for Exchange Server 2013 requires RPC Encryption from the Outlook client. This prevents the client from being able to connect.
Leave a Reply