Ransomware is rampant today, and you need to take additional care to secure your Windows computer, apart from just installing an antivirus software. While one can always use an anti-ransomware software, Windows 11/10 now makes it easier by introducing Controlled Folder Access feature in Windows Defender Security Center. Let us see how to enable and use Controlled Folder Access in Windows 11/10 – which is a part of the Exploit Guard feature in Windows Defender.
 Controlled Folder Access in Windows 11/10
This security feature comes with Windows 11/10, and you will find it included in Windows Defender Security Center – Now called Windows Security. If you enable Controlled Folder Access on any folder, your system will keep monitoring all the changes in real-time and let you know if any unauthorized access is occurring. Moreover, if an unauthorized process tries to access that protected folder, it will be blocked immediately, and you will be notified right away.
Which are the default protected folders

Enable Controlled folder access using Group Policy Editor
You can also use the Group Policy Editor. Run gpedit.msc and navigate to the following setting:
Computer configuration > Administrative templates > Windows components > Windows Defender Antivirus > Windows Defender Exploit Guard > Controlled folder access.
Double-click the Configure Controlled folder access setting and set the option to Enabled. The options are:
- Enable – Suspicious are not be allowed to make changes to files in protected folders.
- Disable – All apps can make changes to files in protected folders.
- Audit Mode – Change will be allowed but will be recorded in the Windows event log.
Turn on Controlled folder access using PowerShell
Run PowerShell as administrator and execute the following command:
Set-MpPreference -EnableControlledFolderAccess Enabled
Instead of ‘Enabled’ you can also use ‘AuditMode’. Use ‘Disabled’ to turn the feature off.
If you enable Controlled Folder Access, all your Library folders such as Documents, Pictures, Videos, Music, Favorites as well as Desktop will be protected automatically. These are the default folders. However, the best part is that you can add any other folder to the list. One important thing is you cannot change the folder location or move that protected folder from one place to another after adding that to your list. If you do so, this security feature will no longer be able to protect your folder.
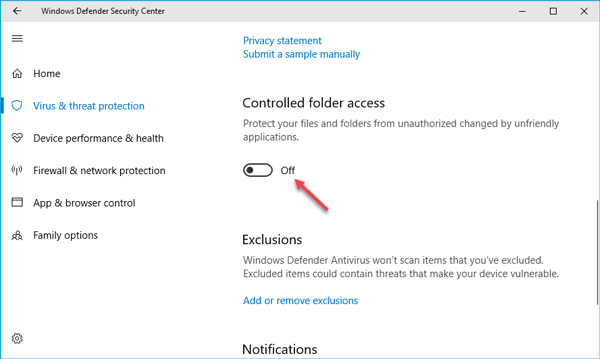
So how do you enable and use Controlled Folder Access in Windows 10? Open Windows Defender Security Center. For that, right-click on the Windows Defender icon and select Open. Select Virus & threat protection and scroll down to find Controlled folder access. By default, it is turned Off. You need to toggle the button to turn it On.
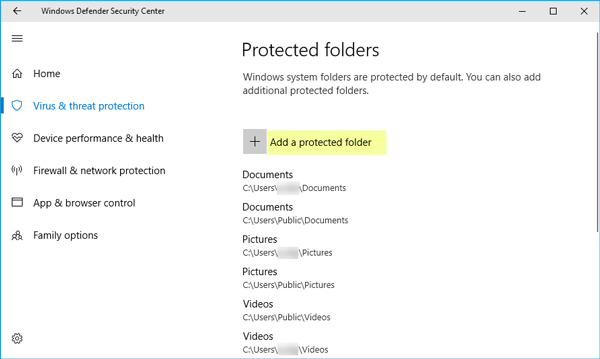
Then you will find two more options – Protected folders and Allow an app through Controlled folder access. Click on “Protected folders” to manage the folders that are being protected right now. You may not be able to remove any folder from the list, but you can certainly add more folders by clicking on the Add a protected folder button.

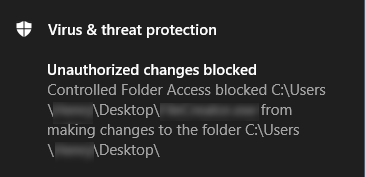
If you have enabled Controlled folder access and on a folder and if any unauthorized app or process tries to access it and change its contents, the attempt will be stopped, and you will see a Unauthorized changes blocked notification in the bottom right corner of your screen.
Read: How to configure Controlled Folder Access using Group Policy & PowerShell.
Allow an app through Controlled folder access
According to Microsoft, most of the apps are allowed to use Controlled folder access. However, Microsoft determines whether an app should use your protected folder or not.
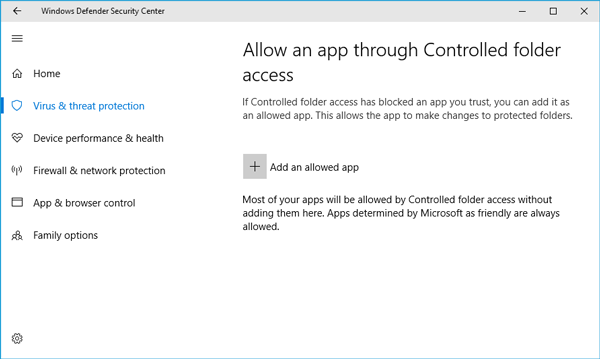
If an app is blocked, but you want to allow it to use your protected folders, you can select “Allow an app through Controlled folder access” option and then click on Add an allowed app.

You can select the app that you want to allow access.
Ransomware protection in Windows gets better with this feature, and we recommend that you enable & use this feature to protect your data from Ransomware.
So I have Protected Folders enabled, and downloaded Firefox Portable 57, and I received the popup that access was denied as this article states would happen, so I added Firefoxportable.exe via “Add an allowed app” feature, but when I open Firefox Portable I still get a blocked message. Do you know why? Shouldn’t it be allowed full access, or do I need to restart the computer?
This article doesn’t explain squat! What does allow an app actually mean in ;practical terms? Does protection have to be toggled every time a change is made in a protected folder or app?
I agree with @bobbyphoenix:disqus, this article would be better received if it explained in detail how to also remove items from the protected list. Personally I find the Protected Folder feature a nightmare to use and isn’t worth the trouble it causes. At first I thought it was a useful addition to the OS and after receiving annoying pop-ups that it wasn’t turned on I changed the setting to ON and added some additional folders including those found on other drives. Now I can’t download anything from the internet and 95% of the programs on my computer generate a warning about protected folders upon launch. What makes this even more problematic is that although whole drives can be removed from the protected folder access the same cannot be said about the locations chosen by default by Windows. Clearly this feature is still in it’s infancy and needs lots of work to make it worth using. I’ve had to completely disable this feature just to use my computer!
How do you find an app if you want to grant access? When I try to authorize an app, I get dumped into Windows Explorer. Why doesn’t the error message allow you to directly authorise the app that triggered the warning? Anyway, like other users I turned it off.