When creating a virtual machine, you are asked to select a disk type, you can either go for Fixed Disk or Dynamic Disk. What if you went for a Fixed Disk and later on realized that you need a dynamic one, or vice-versa? Well! You can convert one into another. In this post, we will see how you can convert a VirtualBox Fixed Disk to a Dynamic one or vice-versa.

Dynamic Disk: A dynamic disk is a type of virtual hard disk that starts with a small size and grows as you add data to it within the Virtual Machine. Dynamic disks are efficient in terms of storage space because they only use the host storage space that is needed, but they can slightly impact computer performance as the disk expands.
Fixed Disk: A fixed disk has a specific size and can’t grow when required. Virtual machines with fixed disks perform better than dynamic ones as they don’t have to distribute their resources to expand the size. However, the disk can fill up eventually, causing storage scarcity.
How to convert a VirtualBox Fixed Disk to a Dynamic or vice versa?
If you want to convert a VirtualBox Fixed Disk to a Dynamic one or vice versa, follow the below steps to resolve the issue.
- Make sure you have ample space
- Change the storage format of your Virtual Disk
- Remove the renamed VDI and add the new one
Let us talk about them in detail.
1] Make sure you have ample space

Before we convert the storage type, you must check and make sure that your drive has enough space to accommodate a separate disk image. For instance, if the size of the virtual disk you want to convert is 70GB, you should have at least 70GB of free disk space available for the conversion process.
Once the conversion is complete, and if everything works correctly, you can delete the original virtual disk file to free up disk space, but initially, there should be adequate space.
To check the size of your disk, in VirtualBox, right-click on the disk, select Settings > Storage, click on your VDI, and check the Virtual Size of the file. If you have enough space, proceed with the conversion. If you don’t have enough space, make some and then move to the next step.
Read: How to speed up a VirtualBox Virtual Machine
2] Change the storage format of your Virtual Disk

Before changing the format, power off your Virtual machines if running. Once done, follow the steps mentioned below.
- Open Command Prompt by searching it out of the Start Menu.
- Now, enter the following command to reach the default install location of the VirtualBox application, if you have given a custom location, make the required changes to the command given below.
cd "C:\Program Files\Oracle\VirtualBox"
- Now, we need to list all the VMs to fetch their locations, for that, you must run the following command.
VBoxManage.exe list hdds
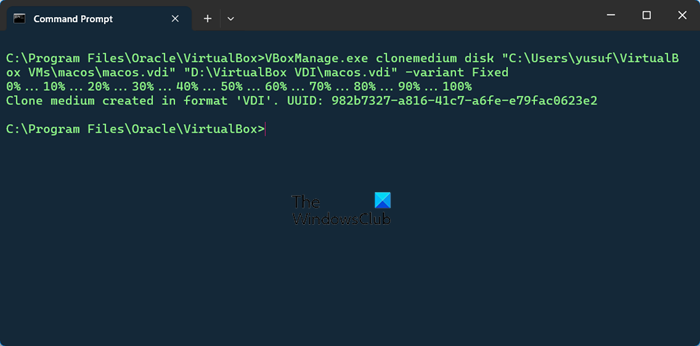
- You need to copy the location of the VDI and insert it into the following command to change its format.
To Convert from Fixed to Dynamic
VBoxManage.exe clonemedium disk "source.vdi" "destination.vdi" –variant Standard
To convert from Dynamic to Fixed
VBoxManage.exe clonemedium disk "source.vdi" "destination.vdi" –variant Fixed
If you cannot run the command and it says there is a syntax error, just write ‘-variant’ manually and re-run it. Also, make sure that the location of the source and destination are exactly the same but the file names are different if you don’t want to deal with the hassle of reconfiguring the VDI as I did.
Now, we need to reshuffle things a bit. For that, go to the location of your VDI, change the name of the source file to something else, and then rename the destination to match that of the original file.
Read: VirtualBox displays Black screen and not Booting guest OS
3] Remove the renamed VDI and add the new one

Now that we don’t require the older VDI, we can remove it and add the new one. Follow the steps mentioned below to remove the inaccessible VDI image.
- Launch Oracle VirtualBox.
- Go to File > Tools > Virtual Media Manager.
- Click on Refresh.
- Select the VDI in question and then click on Release.
- Now, click on Remove.
- If there is more than one inaccessible VDI, make sure to remove all of them.
Execute the steps given below to add a new VDI image.
- Select the Virtual Machine and click on Settings.
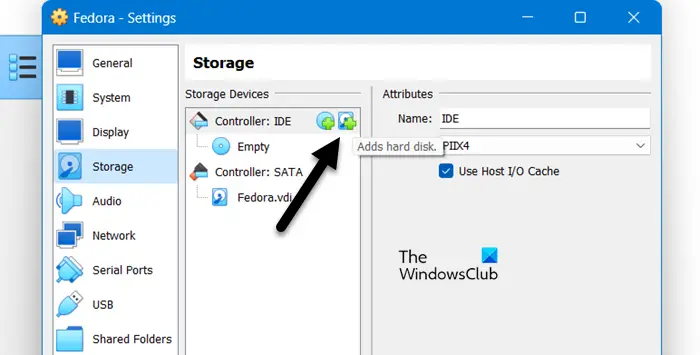
- Now, go to Storage and click on the second Plus (+) icon placed next to “Controller:IDE”.
- Click on Add, go to the location where the file is stored, and add it.
- Once it is added to the Hard Disk Select utility, select the VDI from the Not Attached section and then click on Choose.
- Finally, click on Ok
That’s it! Start your VDI as your storage format is changed.
Read: How to enable Drag and Drop support in VirtualBox?
Which is better Dynamically allocated or Fixed size VirtualBox?
The main difference between the dynamically allocated and fixed size is that the latter allocates all the space for the drive at once, while dynamically allocated only takes up space as the VM needs it. So, if your VM doesn’t use all of the hard drive size, dynamically allocated won’t take up all of the space, but fixed size will. In other words, dynamically allocated grows with your VM, while fixed size takes up all the space at once. However, when it comes to performance, fixed is better.
Read: VirtualBox Failed to attach the USB device to the virtual machine
How to convert between fixed and dynamic disks in VirtualBox?
To convert from fixed to dynamic, use VBoxManage.exe clonemedium disk "source.vdi" "destination.vdi" –variant Standard, whereas, to convert from dynamic to fixed, use VBoxManage.exe clonemedium disk "source.vdi" "destination.vdi" –variant Fixed in the Command Prompt after going to VirtualBox’s directory.
Also Read: How to install VirtualBox Guest Additions on Windows.