Sometimes we have to keep old computers regardless of their speed as it contains programs and files that are useful. If there are no hardware issues with the old computer, then you can keep that computer, but if you think that the hardware of the old computer may fail, then it is advisable to turn it into a virtual machine that you can launch using VirtualBox.In this article, we will learn how to convert a physical machine to a virtual machine in VirtualBox.

How to convert a Physical Machine to a Virtual Machine in VirtualBox
If we want to convert a Physical Machine to a Virtual Machine in VirtualBox, we need first to change the physical hard drive to a virtual one using a free utility called Disk2vhd. Then, since VirtualBox can not use VHDX, which is the format in which Disk2vhd converts our Virtual Machine, we need to change its format to VDI. Once we have the VDI file, we can create a new VM in VirtualBox and mount the newly created VDI file. If you want to do all this, execute the following steps in the given order.
- Convert a physical disk with Disk2vhd
- Convert the VHDX image file to a VDI file
- Create a new VM in VirtualBox using the VHD file
Let’s talk about them in detail.
1] Convert a physical disk with Disk2vhd

To convert a physical machine to a virtual machine, you need to convert the physical machine’s hard disk to a Virtual Hard Disk image file (VHD or VHDX). To do that, you need to download the disk2vhd utility from microsoft.com. The Disk2vhd utility will turn a real drive into a Virtual Hard Disk image file (VHD or VHDX) for use in VirtualBox. Follow the prescribed steps to do the same.
- Before converting the drive we need to download and extract the Disk2vhd.zip file on your old computer.
- Right-click disk2vhd64.exe in the extracted folder and choose Run as administrator. Then hit Yes when the UAC prompt appears.
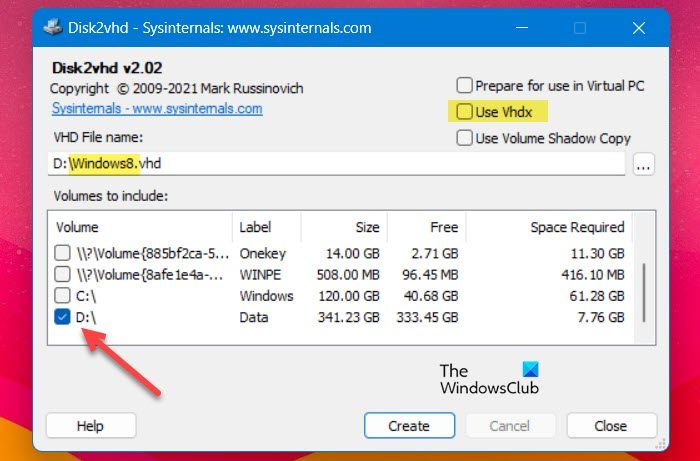
- When Disk2vhd opens, untick Use Vhdx, and select the physical disk that you want to convert to the virtual disk from Volumes to include.
- Select a destination folder and type a name for the created virtual disk file (e.g. “Windows7.vhd”).
- Now, click on Create button to create the virtual disk image from the physical disk.
If you want to create a virtual disk on the same machine that Disk2vhd is running on, save the virtual disk file to a different drive other than C. If, for some reason, you have created a VHDX file, go to the next step to convert it to VHD.
Read: How to configure the Virtual Switch in Hyper-V
2] Convert the VHDX image file to a VDI file
VHD disc image files can be read by VirtualBox without any issues, but it does not support VHDX files. So, if you have a VHDX file, follow the steps given below to convert it to VDI.
- Open Command Prompt as Administrator.
- Type the following command and press enter button.
cd "c:\Program Files\Oracle\VirtualBox\"
- Now type the following command in the command prompt to convert the VHDX file to a VDI file:
VBoxManage clonehd <source-filename>vhdx <destination-filename>.vdi –format VDI
Replace <source-filename> with the filename you want to change along with its path and then <destination-filename> with the converted VDI file.
For example: VBoxManage clonehd C:\VHDX\Windows11.VHDX C:\VHDX\Windows11.VDI –format VDI
Read: How to install VirtualBox Guest Additions on Windows
3] Create a new VM in VirtualBox using the VHD file

After creating a VDI file which is supported by VirtualBox, all we have to do is create a new Virtual Machine and then mount it. To do the same, follow the prescribed steps.
- Open VirtualBox Manager on your computer and select New to create a new VM machine.
- Write down its name for the VM machine and click Next.
- After that, you need to specify the memory size for the new VM and click the Next button.
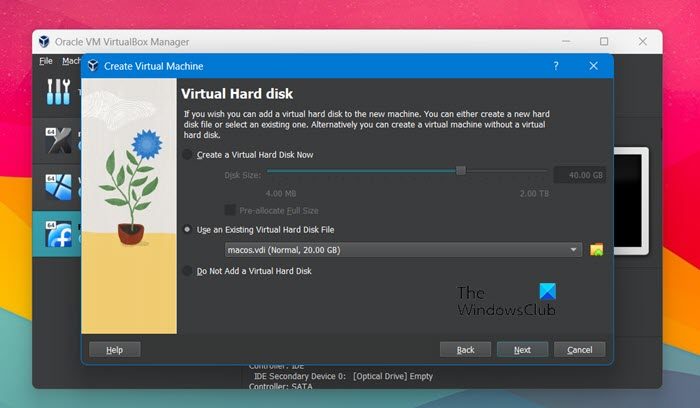
- Select Use an existing virtual hard disk file and click Browse.
- Now, click on the Add button and select the VHD (or the VDI) file.
- Finally, click on Create button to create the new VM machine.

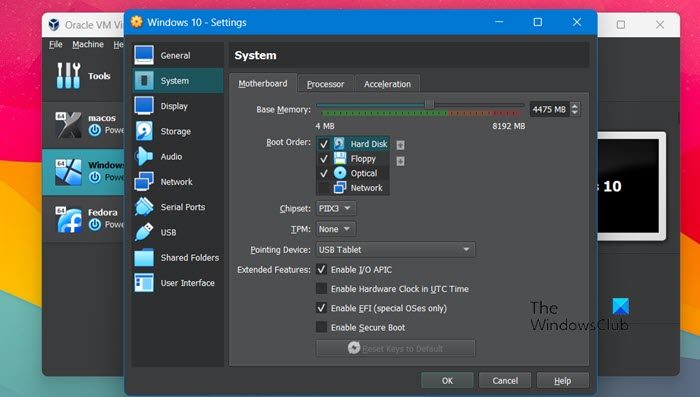
Once the virtual machine is created, right-click on it, go to System, and then make the following changes to the Motherboard settings:
- Make Hard Disk the first boot device; for that, tick and select Hard Disk and then click on the arrow icon.
- Check I/O APIC extended feature. If not selected, the VM machine wouldn’t start.
- If the guest OS is UEFI based, Enable EFI (special OSes only).
Now, start the Virtual machine.
Read: How to convert VMware to Hyper-V
Thus, you can create a virtual machine from a physical machine with the help of this guide.
Also read: How to install macOS in VirtualBox on Windows 11.