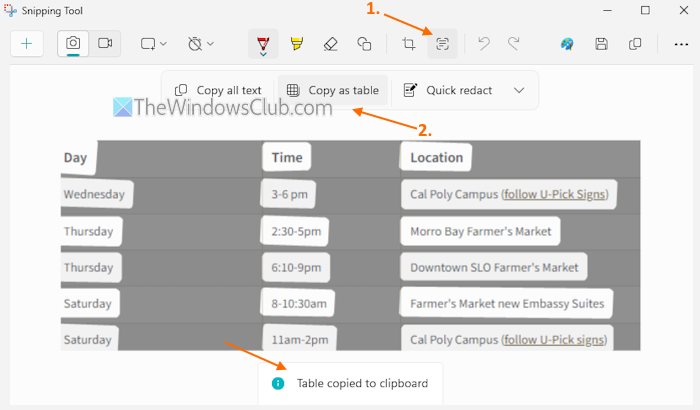
This tutorial shows you how to copy all text as a table from a screenshot in Snipping Tool on a Windows 11 PC. For this, we will use the Copy as table feature. It’s a new feature that generates structured table data from the captured snip, which contains rows and columns along with text in each row and column for the table.

When the table is ready, copy it to the clipboard and paste it into Microsoft Excel, email, Google Sheets spreadsheet, etc. This can be helpful when you find some data on a webpage or image and want to fetch that data as a table. Copying text from a webpage or another source normally results in pasting it in an unorganized way, but using this feature of the Snipping Tool helps to get the data just like we want it.
The Copy as table feature will soon be available in the Stable release. Before using this feature, make sure the screenshot doesn’t contain extra text (say a separate line or paragraph) or an unwanted area; otherwise, it won’t work. Also, using the Full screen, Window, and Freeform snipping modes won’t help you get the output.
How to copy all Text as Table from a Screenshot in Snipping Tool

Here are the steps to copy all text as a table from a screenshot in the Snipping Tool on Windows 11:
- Open a webpage or app that contains the image or data
- Launch the Snipping Tool app. Though you can press Win+Shift+S hotkey to take a snip, that might not open the Snipping Tool window for further process. That’s why you have to open the Snipping Tool app first
- Select the Rectangle option for snipping mode on its interface
- Use Ctrl+N or the New button to take a screenshot and it will automatically open in the Snipping Tool window
- Click the Take actions icon on the top-middle part (just next to the Image crop option). It will start the processing on the snip. You can also crop the snip if some unwanted area is captured
- Now you will see a Copy as table option. Click on it
- Snipping Tool will generate the output and it will be copied to the clipboard
- Open a new file in Excel, Google Sheets, or any application and paste the output
- Use the Word Wrap option and adjust the column width to see the table data properly.
Related: How to convert Table to Text and Text to Table in Word
This feature works well except for one thing. If there is more than one line in the input cell or row, then for each line, it creates a separate row when we paste the output. We hope this bug will be fixed as the feature progresses.
That’s all!
Now read: Change the default folder to save Screenshots and Screen Recordings in the Snipping Tool
How do I extract text from a Snipping Tool?
If you want to extract text from an image using the Snipping Tool, take a screenshot of the image first. The snip will open in the Snipping Tool interface. There, press the Text Actions icon, and it will scan the screenshot. Once done, use the Copy all text option. You can also select the text of your choice and copy it. A Quick redact option is also present that can be used to hide phone numbers and email addresses from the extracted text before you can copy and use it.
Read: Snipping Tool screen recorder No sound problem in Windows 11
How do you copy an entire page using Snipping Tool?
The feature to copy an entire webpage or application using the Snipping Tool is absent. It can only capture the visible area of the page or an app and not the full content. To capture more parts, you have to scroll down and then take another snip. But, there are some good free tools to take scrolling screenshots. ShareX, PicPick, and Screenshot Captor are the tools to take a long screenshot in Windows, similar to taking a long or scrolling screenshot on Android and iOS.
Read next: How to enable Snipping Tool to show recent Android screenshots.
Leave a Reply