If the Windows Recovery Environment (WinRE) is not working and you receive a message Could not find the Recovery Environment in Windows 11/10, then this post will show you how to enable Windows Recovery Environment. Sometimes you might face an issue where you cannot boot into Windows RE. There can be multiple reasons, but have you ever wondered where Windows RE is available on your computer?
Windows Recovery Environment not working

During Windows Setup, Windows initially places Windows RE Image file in the installation partition. If you have installed Windows on C drive, it will be available at the C:\Windows\System32\Recovery or C:\Recovery folder. It’s a hidden folder. Later, the system copies this image file into the recovery tools partition. It makes sure that one can boot into recovery if there is a problem with the drive partition.
Could not find the Recovery Environment
The error usually happens when either Windows RE is disabled or the Winre.wim file is corrupt. So, if you get an error where the Windows Recovery Environment is not working, here is how you can fix it:
1] Enable Windows RE or WinRE

- Open PowerShell or Command Prompt with admin privileges.
- Type
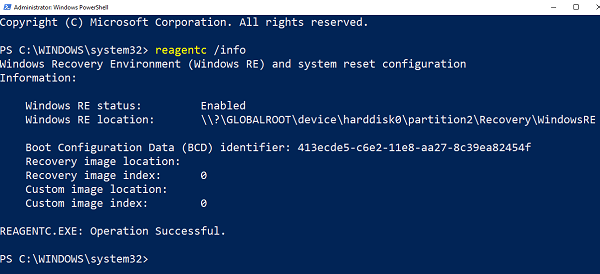
reagentc /infoand hit Enter. - If the output says Status as enabled, you are all set.
To enable Windows RE, type reagentc /enable and hit Enter. A success message at the end will ensure Windows RE is available.
For your information, to disable it, one uses reagentc /disable.
2] Fix Winre.wim corrupted or missing

In either case, you will need a new copy of Winre.wim. You can search on the computer, or you can find the file on another similar computer where Windows RE is working. Once you locate the file, copy it from another computer. You need to set the image path to a new location.
Next, execute the following command to change the path of the WIM file to the new location. These steps should be used when the Windows RE file path is different from the usual spot.
Reagentc /setreimage /path C:\Recovery\WindowsRE
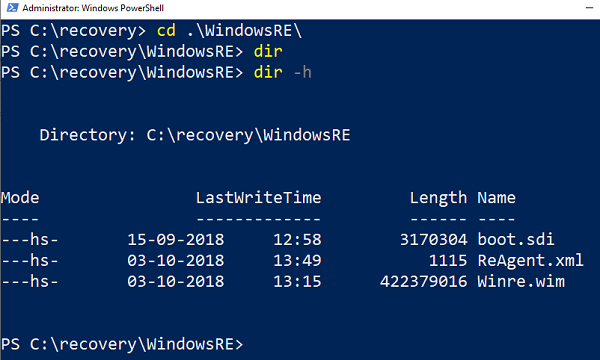
If the file is corrupted, you can copy it from another computer. Copy it to the C:\Recovery path and then set the path again. Make sure to verify the path with reagentc /info command.
The Recovery folder is hidden and not accessible using Windows File Explorer. Also, the WINRE folder inside it is hidden. You will have to use PowerShell or Command Prompt to access them. Before copying, make sure to disable WINRE on that computer and enable it later.
Related: Cannot boot into Windows Recovery Environment
3] Invalid WinRE Reference in Windows Boot Loader
The Windows Boot Loader determines whether to load Windows RE. The loader may be pointing to an incorrect location.
Open PowerShell with admin privileges and execute this command:
bcdedit /enum all
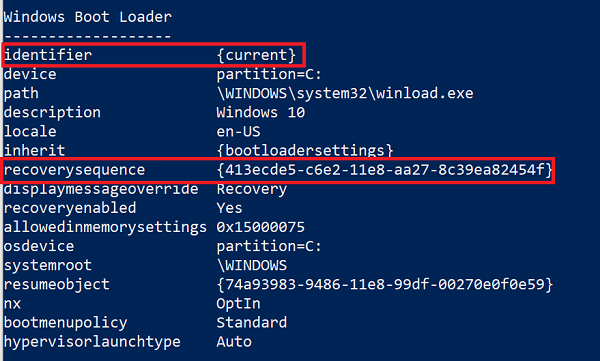
Look for an entry in the Windows Boot Loader identifier set as Current.

In that section, find “recoverysequence” and note the GUID.
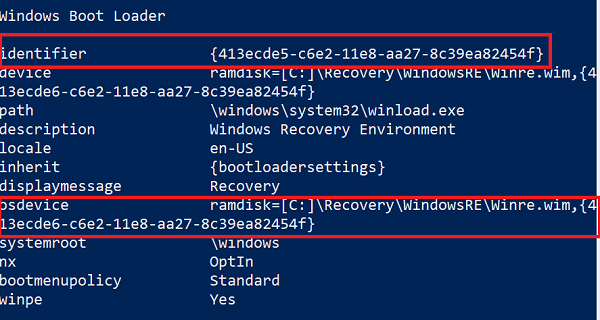
Again, in the result, search for Windows Boot Loader identifier set as the noted GUID.

Make sure that the device and osdevice items show the path for the Winre.wim file and they are the same. If not, we will have to point the current identifier to one which has the same.
Once you find the new GUID, run the command:
bcdedit /set {current} recoverysequence {GUID_which_has_same_path_of_device_and_device}
See if this resolves the issue.
4] Create a Recovery Media
Download Windows ISO file using the Media Creation Tool. Create a recovery drive and so the needful. Check if this resolves the issue.
All the best.
Fix REAGENTC.EXE The Windows RE image was not found error

If you receive REAGENTC.exe: The Windows RE image was not found error message when you try to enable Windows Recovery Environment, run the DISM Tool to repair a potentially corrupted system image and see if it helps. If it does not help, then you will have to use the Reset PC option.
Read: REAGENTC.EXE Operation failed, An error has occurred
Fix Windows Advanced Options Missing in Recovery Environment
If Advanced Options is missing in the Recovery Environment in Windows 11/10, open Command Prompt with admin privileges, type reagentc /enable and hit Enter. A success message at the end will ensure that Advanced Options in Windows RE is available.
Leave a Reply