CPU clock speed, or the speed of processing instructions for a system, may be based on the hardware specifications. Lower speed can impact system performance, so the steps below can be applied to resolve the problem.
![CPU Stuck at low clock speed in Windows [Fix] CPU stuck at low clock speed in Windows](https://www.thewindowsclub.com/wp-content/uploads/2024/09/CPU-stuck-at-low-clock-speed-in-Windows.jpg)
Fix CPU Stuck at low clock speed in Windows 11/10
Fixing the problem of the CPU being Stuck at low clock speed in Windows requires changes to the Power Management and Processor State settings, along with identifying software conflicts as detailed below:
- Disable LLPPM from the Windows Registry
- Disable Intel PM Driver
- Change Processor State
- Troubleshoot in Clean Boot
1] Disable LLPPM from the Windows Registry
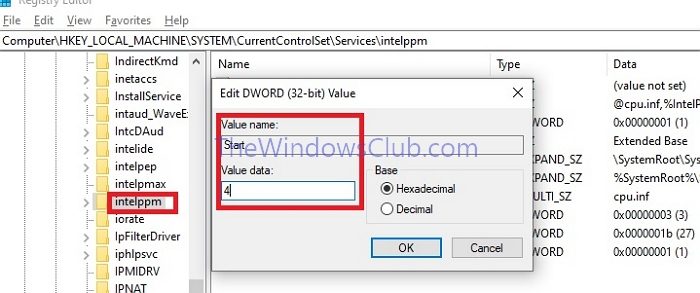
In Low latency Power Management Profile (LLPPM), the system goes into power-saving mode when idle for a while. Such power-saving states generally tend to reduce or limit the processor clock speed. Hence, disabling it can prevent the system from reducing the power consumption aggressively:
- Open the Registry Editor by typing regedit in the Run dialogue box and pressing Enter.
- Navigate to
HKEY_LOCAL_MACHINE\SYSTEM\CurrentControlSet\Services\intelppm
- Double-click on the Start key and change its value to 4.
- Close the Registry Editor and restart the system to apply the changes.
2] Disable Intel PM Driver
Systems with Intel processors generally have their software that controls the CPU and the fan speed to save power. However, conflicts may arise with system components or their settings, which can limit the speed of the CPU clock. Hence, disabling it can help us in avoiding any potential system conflicts. To do so:
- Restart the system by holding the SHIFT key to boot into Advanced Startup options.
- In the Advanced Startup screen, navigate to Troubleshoot> Advanced Options > Command Prompt to open the Terminal Prompt and type the below command to enter the Drivers folder:
cd C:\Windows\System32\drivers
- Rename the Intel PPM file inside the folder by typing:
ren intelppm.sys intelppm.sys.bak
- Restart the system to allow the CPU to improve the clock speed as it cannot locate the ppm file now.
3] Change Processor State
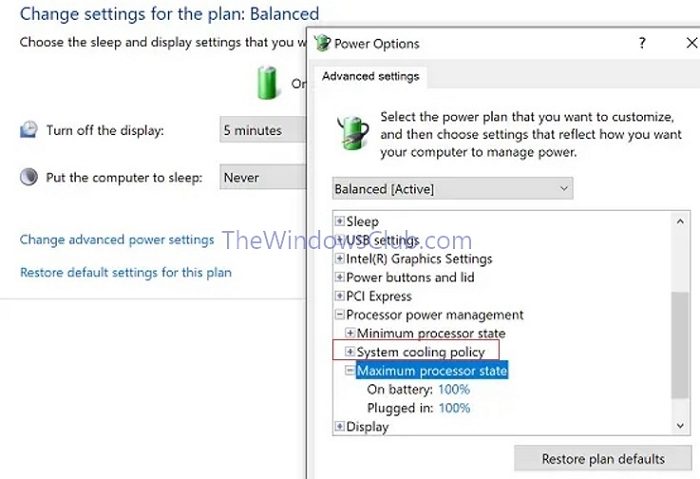
Setting the Processor state to the highest available option allows the CPU to adjust or raise the clock speed based on workload demands. To do so:
- Open the Settings App by pressing the Win + I keys together.
- Navigate to Power Options > Change plan settings > Change advanced power settings.
- Choose Processor Power Management -> Maximum Processor State.
- Select 100% for both On Battery and Plugged in
- Click on the + sign beside the System Cooling Policy option and set it as Active to avoid overheating.
4] Troubleshoot in Clean Boot
Clean boot loads the system with a minimal set of drivers. It helps us to identify if any specific driver or application is responsible for the inability of the CPU to work at a higher clock speed. To do so:
- Type msconfig in the Run dialogue box and enter to open the System Configuration Utility.
- Click on the Services Tab and tick the check box beside Hide All Microsoft Services.
- Click the Disable All button, click Apply, and then OK to restart the system.
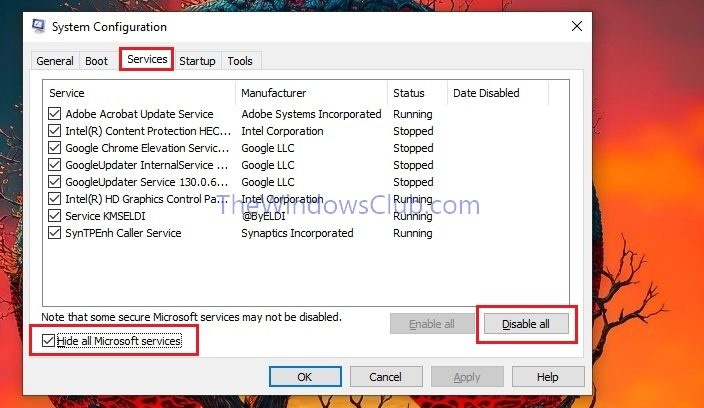
If you don’t encounter any issues, you need to enable other services individually and then determine which caused the spike.
How to fix a CPU stuck at 100%?
End high-resource consuming processes: To free up the CPU by ending processes that consume high CPU :
- Open the Task Manager by pressing the CTRL+SHIFT+ESC
- Check for the processes consuming the maximum CPU resource, and right-click on it to click on End Process.
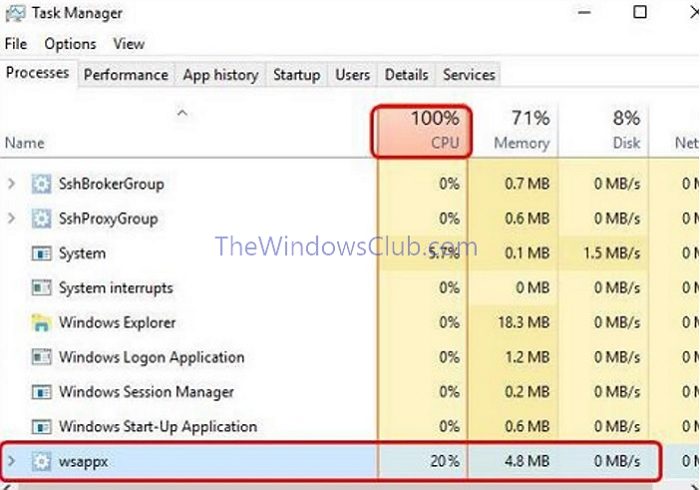
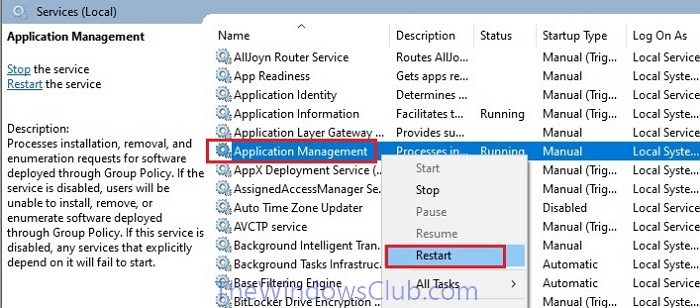
Restart Application Management Service: Restarting the service responsible for managing and monitoring applications can clear out temporary files or processes that are consuming a lot of CPU.
- Open the Services window by entering services.msc in the Run dialogue box.
- Locate the Application Management service and right-click on it and click on Restart.
Reset the Power Plan: Unnecessary power usage and potential overheating can cause high CPU usage. Changing the power plan to balance performance and energy efficiency can help resolve the issue.
- Open the Settings page by typing the same in the Desktop Search Bar and click on Hardware > Power Options.
- Choose the Balanced option, then click Change Plan Settings and Restore Default Settings for this Plan.
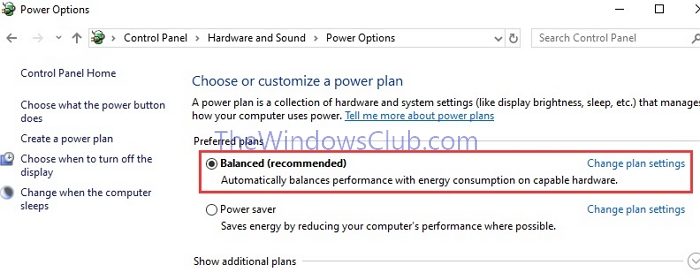
- Click on Save Changes to apply the settings.
Read: Fix 100% Disk, High CPU, Memory or Power usage in Windows
Why is my CPU stuck at 0.38 GHz when the charger is plugged in?
Thermal throttling or issues with Power Management can lead to such situations due to:
- Processor Overheating: causing thermal throttling. Hence, ensuring that the laptop’s fans and vents are clean and clear can be a solution.
- Power Settings: Setting the power-saving mode can limit CPU performance. Hence, changing the Power Plan to High Performance or Balanced may help the CPU increase the clock speed.
What do you do when the CPU is stuck?
Checking for processor overheating and changing the Power Options can help resolve the issue. If it’s stuck at a higher speed, follow the steps mentioned in Question 1 to resolve the issue.
Leave a Reply