In this post, we will show you how to create 7z or TAR files from Files Explorer on a Windows 11 PC. With an earlier update, Windows 11 received a new feature that allowed users to open and extract 7z and TAR archives natively. However, creating these types of archives required an external app. The good news is that this is no longer the case. Windows 11 now includes the ability to create 7-Zip and TAR archives (in addition to ZIP) directly within the operating system, eliminating the need for third-party software. It will gradually be rolled out to the Windows stable version.
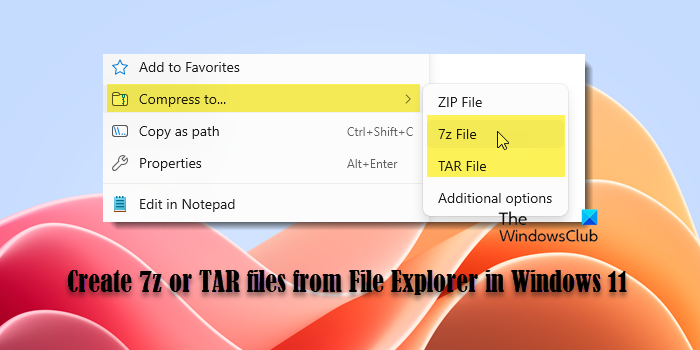
While the new feature is exciting, it won’t be instantly accessible to everyone. It’s part of a beta build, and Microsoft will release it to users in phases. Initially, only a selected group of users will have access to it, but over time, the feature will become available to more users as Microsoft continues the rollout.
Create 7z or TAR files from File Explorer in Windows 11
To create 7z or TAR files from the context menu in File Explorer, you need to follow these steps:
- Open File Explorer.
- Navigate to the target files.
- Select and compress the files into a 7z or TAR archive.
Let us take a detailed look at the process.
Create a 7z File natively in Windows 11
Open File Explorer and navigate to the location containing the files and folders you want to compress. Select the desired files/folders, right-click, and select Compress to > 7z File.
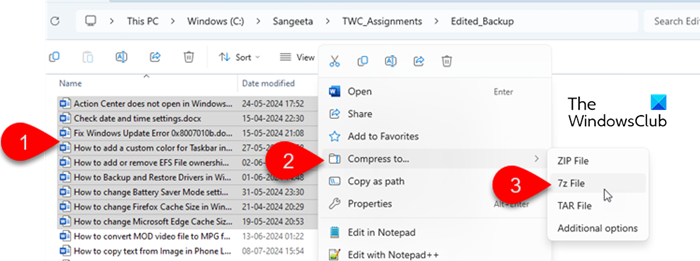
An archive file will instantly be created using the default compression method and level. Now you have to rename the file and you’re done.

If you want greater control over creating the archive (and you’re not in a hurry), you can choose to go through some advanced steps. Here’s how:
Right-click the selected files/folders and select Compress to > Additional options.
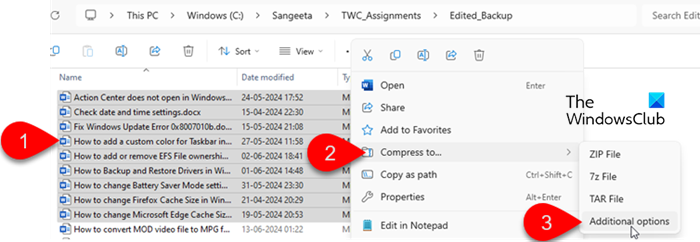
A Create Archive wizard will appear.
Make sure 7z is selected in Archive format dropdown and click the Browse button to choose the location where the archive will be stored (default is where the original files are located).
Next, select the Compression method – Store, Deflate, BZip2, LZMA1, LZMA2 (default), or PPMd.
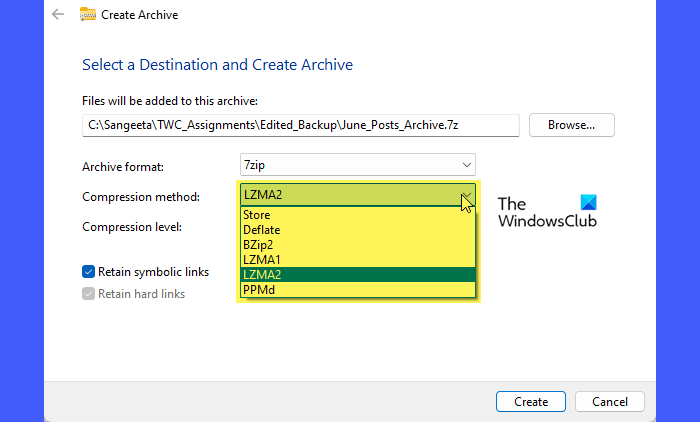
Next, select the Compression level – 0 (Faster) to 9 (Smaller). A lower compression level (closer to 0) will result in a faster compression process but a larger file size, while a higher compression level (closer to 9) will take longer to compress but produce a smaller file size.
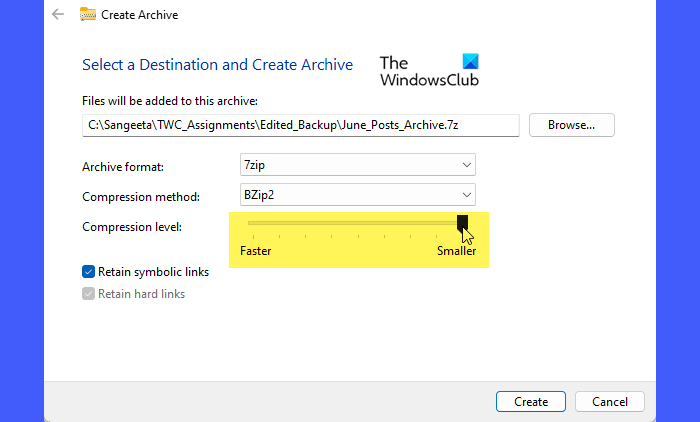
Next, ensure the Retain symbolic links option is checked to preserve links pointing to other files or directories. The Retain hard links option maintains hard links within the archive, ensuring they point to the same data blocks after extraction.
Once you’re done, click the Create button. The 7z file will be created based on the specified settings.
Create a TAR File natively in Windows 11
Creating a TAR file natively in Windows 11 follows the same process as above.
To use the default compression method and level, right-click selected files/folders, select Compress to, and choose the TAR File option.
To use custom compression settings, right-click selected files/folders, select Additonal options, then follow these steps:
Click the Browse button to change the destination folder for the compressed archive (default is the current folder).
Next, select a TAR archive option under the Arhcive format dropdown. The GNU option is the most commonly used, but TAR offers various options such as POSIX pax interchange, Restricted POSIX pax interchange, and POSIX ustar.
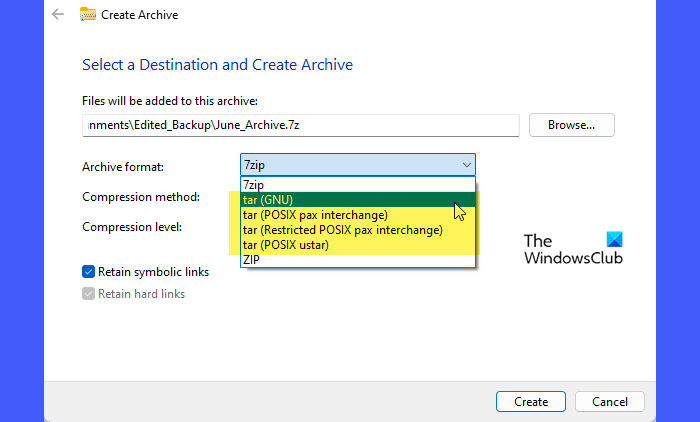
Next select a Compression method and a Compression level. Keep the the ‘Retain symbolic links’ option selected and click the Create button. The TAR file will be created as per the specified settings.
Note:
- Since Windows 11 supports many archival formats natively, you can use File Explorer to open and extract these 7z/TAR files.
- If you can’t see the options, go to Settings > Update & Security > Windows Update. Click ‘Check for updates‘ and install any available updates. If the feature is still not available, it might not be rolled out to your device yet. Keep an eye on Windows updates, as Microsoft will eventually release the feature to all users.
That’s all about it. I hope you find this useful.
Read: Unzip, open, or extract TGZ, GZ, TAR.GZ Files in Windows.
How to extract .7z files in Windows 11?
To extract .7z files, use Windows 11’s native support for .7z archives in File Explorer. Right-click the file and select Extract All from the context menu option. Then in the Extract Archive wizard, click the Browse button to select the destination folder and click the Extract button. You may also use a third-party File Archiver software such as 7-Zip to extract files from .7z archives.
How to create a rar file in Windows 11?
To create a RAR file in Windows 11, download and install WinRAR. Right-click the files or folders you want to compress, select Add to archive, choose RAR as the archive format, and click OK. The RAR file will be created in the specified location. WinRAR is a paid software, but it offers a trial version that can be used with limited functionality.
Read Next: How to open RAR files in Windows.
Leave a Reply