If you are an aspiring Windows Server admin learning ways to expand your knowledge, you have stumbled upon the right destination. In this post, we will see how you can create a Child and Tree Domain in Windows Server to help you organize and manage the network efficiently based on your organization’s requirement.
Create a Child and Tree Domain in Windows Server
In Windows Server, a child domain is a subdomain under a parent domain, inheriting policies and trust relationships. For example, if the parent domain is example.com, a child domain might be sales.example.com.
On the other hand, a tree domain is a separate domain within the same forest that does not share a contiguous namespace with the root domain. For instance, if the root domain is example.com, a tree domain could be example2.com.
The main difference is that child domains share a namespace with their parent domain, while tree domains have unique namespaces. Yet, both can share resources through trust relationships within the same forest.
To create a child and tree domain, follow these steps:
- Install Active Directory Domain Service
- Set Child and Tree Domain
- Configure DNS
1] Install Active Directory Domain Service
First, install the Active Directory Domain Services Server Role on your Windows Server to prepare it for the sub-domain creation. To do so:
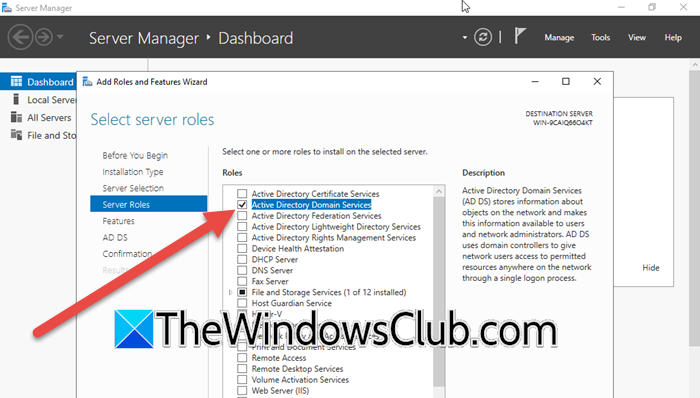
- Open Windows Server and go to Server Manager.
- Now, click on Add roles and features.
- Click on Next, select Role-based or feature-based installation, and then click on Next.
- Tick Select a server from the server pool and click on Next.
- Now, tick the checkbox of Active Directory Domain Services and then keep clicking on the Next button until you reach the Confirmation page.
- Once you are there, tick the Restart the destination server automatically if required option and click on Install.
- While the installation is in progress, you need to click on Promote this server to a domain controller.
Move on to the next step.
2] Set Child and Tree Domain

When you click on Promote this server to a domain controller, you will be greeted with the Deployment Configuration wizard, and from there, we will configure the child and tree domain. You can follow the steps mentioned below to do the same.
- When you are on the Deployment Configuration screen, click on Add a new domain to an existing forest, and set the Select domain type as Child Domain.
- Now, you need to enter the Parent domain name (it is better to click on Select and then traverse through the forest to select the domain) and New domain name. Click Change to supply the credentials to perform this operation.
- Once done, click on Next.
- Next up, we need to configure a Tree Domain. A tree domain operates independently from its parent domain, whereas a child domain is a subdomain of the parent. To configure it, you must set the Select domain type to Tree Domain. After entering the required credentials, click “Next” to continue.
- Once you are on the Domain Controller Options tab, set the Domain functional level, and then boxes associated with the Domain Name System (DNS) server and Global Catalog (GC).
- Enter the password for DSRM and confirm it.
- In the DNS Options tab, tick Create DNS delegation and click on Next.
- Now, go through the changes you have made and click on Next.
During the prerequisite check, you might face a DNS issue. This means the domain you are trying to set up isn’t connecting to the parent domain. You will need to configure the DNS server to fix this and move on to the next step to do the same.
Read: How to install Active Directory and add users
3] Configure DNS
As mentioned earlier, to eliminate the DNS issue, we need to make some configuration, so minimize the Active Directory Domain Services Configuration Wizard, and then follow the steps mentioned below.
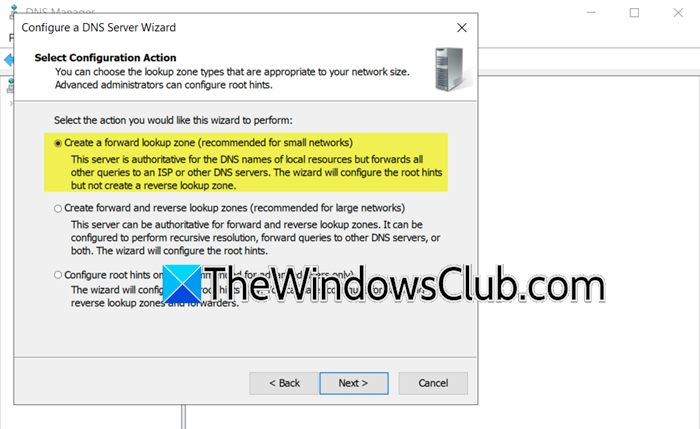
- In the Server Manager, go to the DNS tab, right-click on the server, and click on DNS Manager.
- In the DNS Manager, right-click on your server and click on Configure a DNS Server…
- Click on Next, then select Create a forward lookup zone (recommended for small networks). Click on Next.
- Now, select This server maintains the zone and click on Next.
- You need to populate the Zone name field and click on Next.
- Select Allow only secure-dynamic updates and click on Next.
- You then have to configure the forwarders that facilitate this server’s ability to resolve queries. Input the IP Address along with the Fully Qualified Domain Name (FQDN) and ensure that the validation process is completed successfully. Click on Next.
- Let it search for Root Hints. Finally, click on Finish to confirm.
Once done, you can reboot your computer, and your child or tree domain will be created successfully.
Read: Active Directory Users and Computers not responding
How do you create a new domain tree?
To create a new domain tree, you must first install the Active Directory Domain Services Server Role on your computer. Once done, you can promote your server to a Domain controller and then add a new Tree to your domain.
Read: How to backup and restore Active Directory in Windows Server
Why create a child domain?
A child domain is created to help organize and manage resources in large networks more effectively. It allows splitting a parent domain into smaller units, such as divisions or locations (e.g., sales.example.com). This structure makes delegating administrative tasks easier, applying specific policies for different groups, and managing security efficiently. Child domains also inherit trust relationships from the parent domain, enabling seamless resource sharing across the organization. By using child domains, administrators can maintain a clear and scalable structure while ensuring that different departments or locations have the flexibility to operate independently within the same domain hierarchy.

Leave a Reply