Users may occasionally have issues with performing a full System Backup Image, which can lead to the question of whether the operating system is at fault. No one wants to lose their data, whether personal or business.
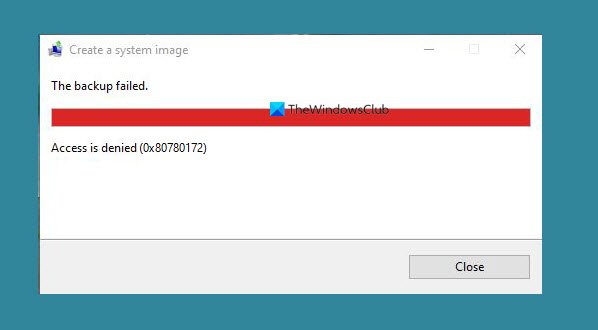
System Image backup failed with error 0x80780172
We understand that several users who were trying to back up their computer using the default tool known as Backup and Restore, came across the following error:
There are no items specified to be backed up (Error 0x80780172)
From our experience, it is safe to say the problem can be solved. However, the error is not always linked to a particular issue, so with that in mind, we’re going to discuss multiple ways to solve this problem once and for all.
When you try to create a System Image, the backup fails with error 0x80780172 on Windows 11/10, then this is what you need to do to fix the issue.
- Enable Windows System Protection
- Is there enough space on your hard drive?
- Make sure Volume Shadow copy is enabled
- Delete every restore point
- Get rid of the WindowsImageBackup folder
Let us talk about this in more detail.
1] Enable Windows System Protection
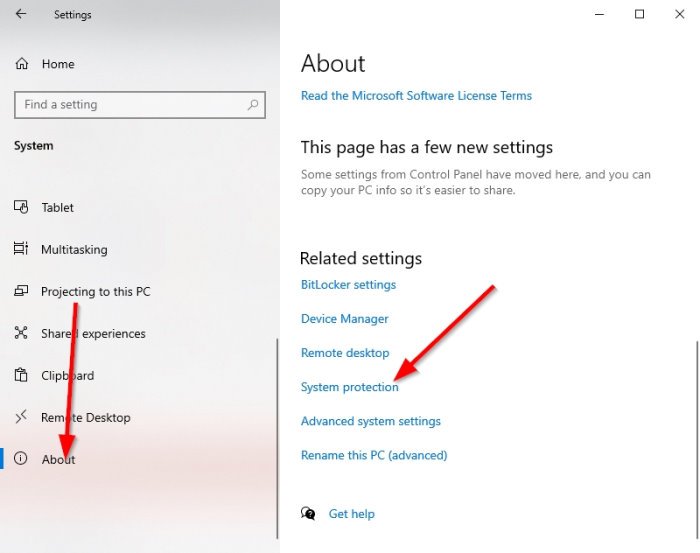
You might be wondering why it is we need to enable the Windows System Protection feature. Well, there are times when it is disabled, and you have no idea about this. When this happens, you will likely come across error 0x80780172, so how do we enable it?
Open the Settings app by clicking on the Windows key + I. Navigate to System > About, then look for System Protection and click on it right away.
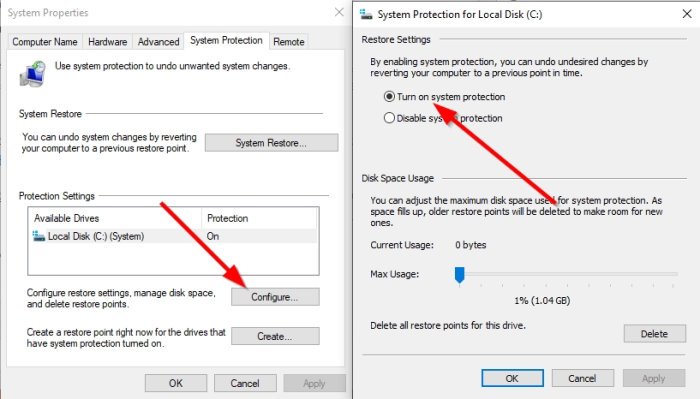
After the System Protection window pops up, please select Configure, and from there, tick the box beside Turn on system protection. Finally, hit Apply > OK and restart your computer before attempting to back up your content.
2] Is there enough space on your hard drive?
Here’s the thing: to create a system image for backup purposes, the hard drive must have enough space. If it is lacking, then Error 0x80780172 will show its ugly head, and we do not want that to happen at all.
Read: Free up disk space by deleting previous System Images and Backups.
3] Make sure Volume Shadow copy is enabled
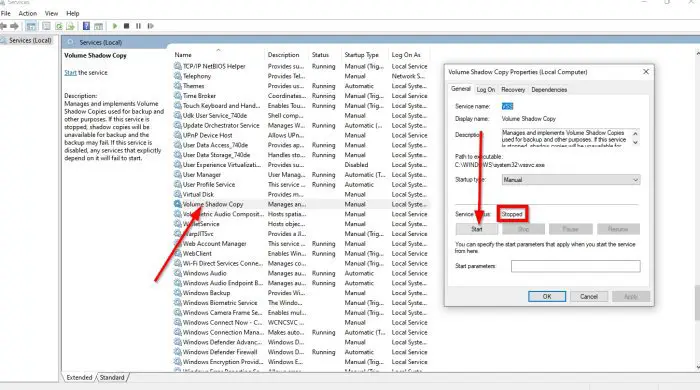
Again, it might just be another case of something important being disabled. This time, it is Volume Shadow Copy, and as expected, we will have to enable it for things to return to normal.
To enable Volume Shadow Copy, please click on the Windows key + R, then copy and paste services.msc into the box and hit Enter. Now, when you see the appearance of the Services window, please scroll down until you come across Volume Shadow Copy.
Right away, look at the status, and if it is set to Stopped, right-click on it and select Start. Once you’re confident the Volume Shadow Copy is running, you will now want to scroll up until your eyes gaze upon the File history service.
Right-click on it, then select Start. Finally, attempt to create a new System backup
4] Delete every restore point
If things still fail to work as they should, then your best bet is to remove all restore points. But not only that, you should turn off System Protection as well.
In order to turn off System Protection, simply right-click on the Window button, then select System. Alternatively, you can fire up the Settings menu by selecting the Windows key + I, then navigate to System > About.
Next, click on System Protection which should showcase a new window. When this window shows up, select Disable System Protection, then complete by clicking on Apply.
Once you have created the System Image, remember to re-enable System Restore again.
5] Get rid of the WindowsImageBackup folder
There is likely a bug associated with the backup file; therefore, you will have to delete the WindowsImageBackup folder.
To remove this folder, please open File Explorer, then navigate to this folder and delete it:
C:/System Volume Information/WindowsImageBackup
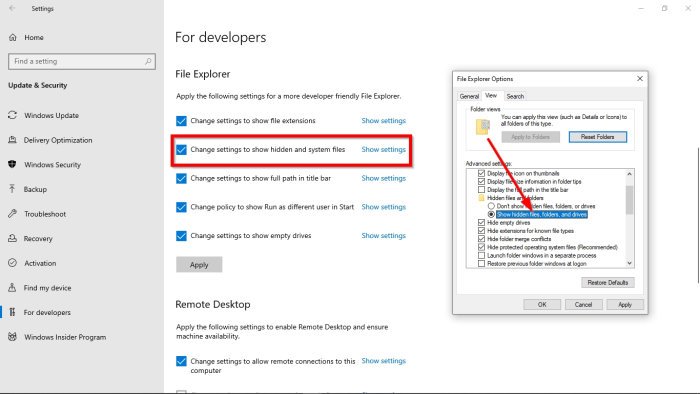
Bear in mind that you won’t be able to access the folder in some situations due to security restrictions. To fix this problem, select the Windows key + S, then type Show hidden files. When it comes up in the search results, click on it to open the window.
Under the File Explorer section, please click on Change settings to show hidden and system files. From there, go on ahead and enable Show hidden files, folders, and drives.
The next step, then, go ahead and look for Hide protected operating system files, then uncheck the box beside it.
Return to the root drive and attempt to delete the WindowsImageBackup folder once more. After you’ve done that, restart your computer and check if everything is working as it should.
Related read: System Image Backup failed, Error 0x80780038.
Leave a Reply