After we have set up an FTP Server on a Windows computer, it will be accessible within a Local Network. But if you wish to access the hosted files remotely, it brings in some limitations. To overcome these limitations and make this hosted FTP Server accessible via the Internet, you might have to tweak some settings further. However, configuring an FTP Server to be available via the Internet on a Windows 11/10 computer can be some of a task. We will be discussing it today.

Create FTP Server that can accessed from Outside or External Network
We will be configuring our routing settings for this.
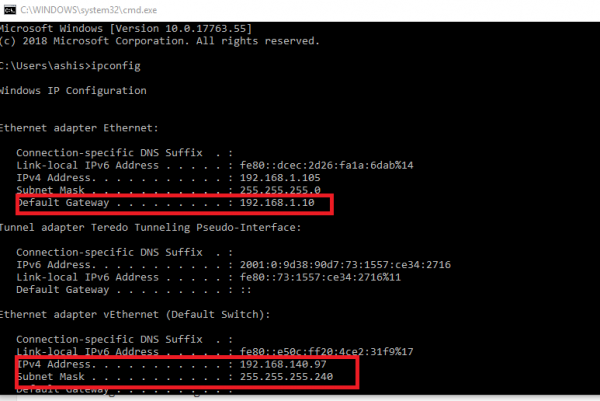
Start by, opening the Command Prompt command line by searching for cmd in the Cortana search box or hit WINKEY+R to launch the Run utility and type cmd and hit Enter.
Now, type in the following command to get the details about your network-

ipconfig
You need to now note down the Default Gateway IP Address. It will be in the format of 192.xxx.xxx.xxx where the number of digits in each block is maximum to 3.
Now, open the default web browser installed on your computer and type in that address in the address bar and hit Enter.
When you get a prompt for the credentials, enter the username and password for your router and log in.

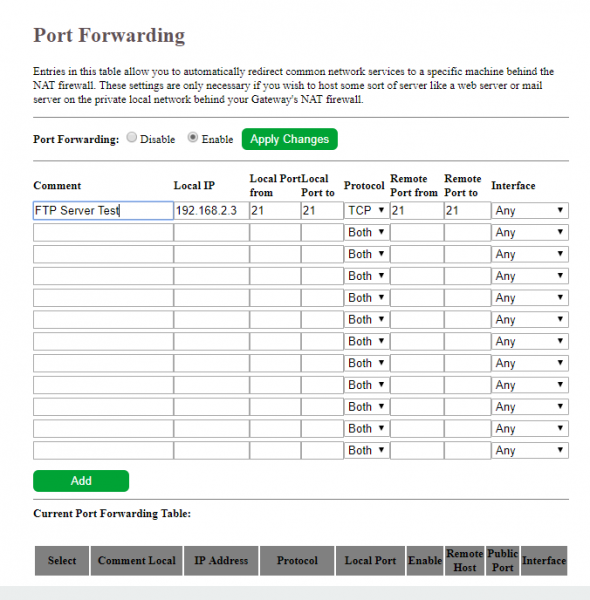
Navigate to the WAN or NAT settings and look up for Port Forwarding.
Now, you need to configure the port forwarding settings as the following settings,
- Service Name – Name it anything you like.
- Port Range – You need to use 21 as the port number only.
- Local IP – Get the IPv4 value from the results you get from the ipconfig command above and enter it here.
- Local Port – You need to use 21 again only. No other value should be used.
- Protocol – Use TCP as the protocol to be used.
Once done, you need to save and apply the changes.
This should finally enable accessibility of your FTP Server from an external network via the Internet on both Client and Server end.
But before all this, you need to create and configure an FTP Server on Windows 11/10.
How do I access an FTP Server on my PC?
You can access an FTP Server on your PC via Windows Explorer by adding a Network Location. Open Windows Explorer and select This PC. Now, right-click and select Add a network location. On the Add Network Location wizard, click Next and then select the Choose a custom network location option. Click Next and enter your FTP network address. Click Next and follow the on-screen instructions to set up the FTP domain on your PC. After that, you can access the FTP Server from your PC.
How do I create an FTP Server on Windows?
Windows 11/10 has a built-in FTP Server service that lets you set up an FTP Server on your computer without installing any third-party tool. To set up FTP Server, you have to enable the FTP Server in Windows Features. Now, you can create FTP Server on Windows 11/10.
That’s it. I hope this helps.