A Form is a formatted document with fields containing data from a Table or Query in Microsoft Access. A Query is a request for data. A Form is an efficient way to locate data. In Access, you can create forms by using the Form tools found on the Create Tab; in the Form Group, these Form Tools are:
- Form: Create a Form that allows you to input data into one record at a time.
- Form Design: In Design View, advance changes can be made to Forms, for instance, adding custom control types and writing code.
- Blank Forms: Create Forms with no controls or format.
- Form Wizard: Show the form wizard that helps you to create easy customize forms.
- More Forms: More Forms includes:
- Multiple items: Create records that display multiple records at once.
- Datasheet: Create Forms that display multiple records with one record per row.
- Split Form: Create a split window that shows the datasheet in the upper section and a Form in the lower section to input data about the record chosen in the datasheet.
- Model Dialog: The model property is used to specify whether a Form or Report opens as a model window.
How to create a Form in Microsoft Access
A Form allows the user to Navigate the database system to locate records quickly and view, insert, modify, and maintain records. In this article, we are going to discuss:
- How to create a Form for a Query or Table, using Form
- How to Edit and Delete Data in a Form
- How to Navigate through Records.
- How to add and delete rows and Records in a Form
How to create a Form for a Query or Table in Access

In this article, we will create the form by using the form tool called Form, which is the simplest of them all.
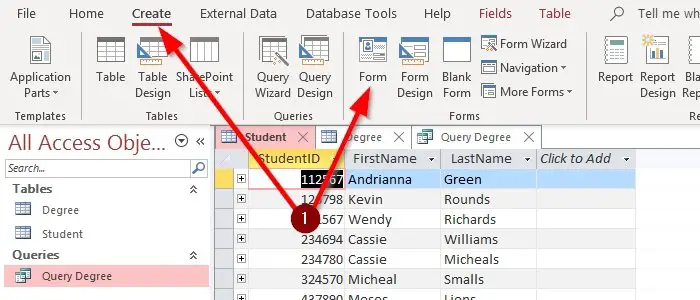
Select the Query or Table in the Navigation Pane. Go to the Create Tab; in the middle of the Create Tab window, there is the Form Tools Group. Select Form, and a simple form will be created; Click Save a dialog box will appear asking you to name your query or table once you name your query or table. Select OK.
How to Edit and Delete Data in a Form in Access

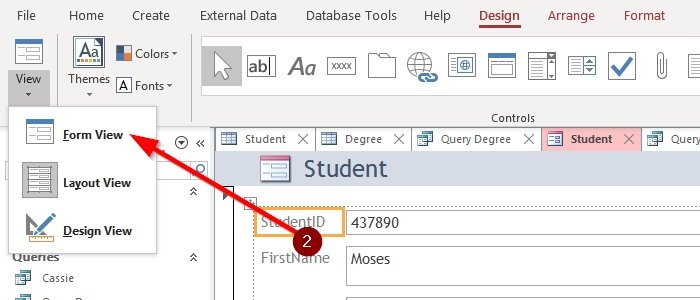
Suppose the user wants to add data to the Form. The user should go to the top-left corner of the Form Window, click on View, select Form View, click on any of the records, now you can delete and edit your data. To know which View you are in, look at the bottom left of the Form window.
How to Navigate through Records in Access

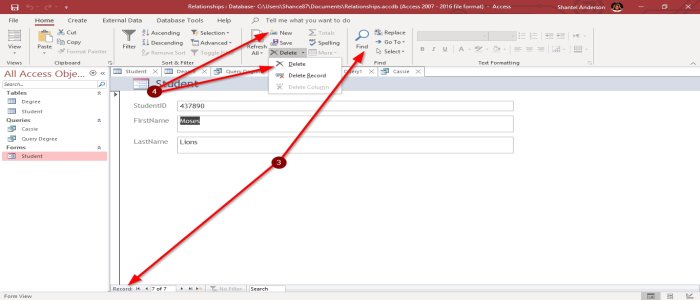
On the bottom-Left of the Form Window, you will see the Navigation Buttons. It looks like a play button; if you use your cursor to point over them, it will show you what the buttons are used for. These buttons are First Record, Previous Record, Next Record, Last Record, which performs the command which their name implies.
The other option to navigate through your Records is the box between the Navigation Buttons, the Search Box at the end, or on the Form View window Home Tab, select Find in the Find Group. Type in what you want to find in the record, then click Find. Next, the record you are looking for will show in the Form then close.
How to add and delete rows in Form in Access
In the Form View window, Home Tab in the Records Group, select Delete, then click Delete Record a dialog box will pop up asking you if you want to delete Record. Click Yes, the record will be deleted. To delete a row, select the row you want to delete and click Delete. In the layout view, you can right-click on row select Delete or Delete Record.
To add another record, go to the Records Group in the View Form window. Select New; a new record will appear, enter your data, or select New (Blank) Records on the bottom near the navigation buttons.
In Layout View, right-click on the row and select Insert; choose where you want to place the row.
Also read: How to Create, Edit, and Delete a Table Relationship in Access.
Let us know in the comments if you have any problems and will get back to you.
Leave a Reply