Everyone who does graphics work, whether professionally or as a hobby, will at some point want to create black-and-white photos. You can create instant black-and-white photos using Desaturate in Photoshop.
There are a couple of ways to desaturate a photo in Photoshop. You can do it the quick way or you can choose the method that gives you some control over how much saturation. The first way is just going to the top menu bar and choosing Image then Adjustments and then Desaturate or Shift + Ctrl + U. this method desaturates the image without you having any control over how much. The other method is going to the top menu bar and clicking Image then Adjustment and then Hue/Saturation or Ctrl + U. This will bring up a window with sliders. To adjust the saturation only, you click and move the saturation slider. Let us see the process involved in detail.
To saturate means to fill with something, for example, you can saturate a sponge with a liquid, so you essentially fill it. desaturate is the opposite, you are removing something, for example, you remove the water from the sponge. In photoshop desaturation is the same, just imagine the image as a sponge and the water as color. When you desaturate an image you remove the color and leave it just black and white.
Create instant Black-and-White Photos using Desaturate in Photoshop
Learning how to create instant black-and-white photos using Desaturate in Photoshop is a useful skill to learn. It will save you valuable time. This skill can also be used to create other images with other colors. Follw these steps to make Black-and-White Photos from Color using Desaturate in Photoshop:
- Add image to Photoshop
- Duplicate Image layer
- Apply Desaturation
- Add a Levels adjustment layer
1] Add image to Photoshop
The first step is to get the image into Photoshop. There are a few ways that the image can be opened in Photoshop. One way is to go to File then Open or press Ctrl + O. When the Open window appears, search for the image, click it and press Open. You can also open the image by searching for the image on your device then right-clicking on it and selecting Open With then Adobe Photoshop (version number). You may also open the image in photoshop by clicking it and then dragging it into photoshop. Whichever method is used to open the image in Photoshop will add the image on a canvas and it will also appear in the layers panel on the right.

This is the original image that will be used in the article.
2] Duplicate image layer
The next step would be to duplicate the image. duplicating the image allows you to work on a copy and not the original image. this protects the original from accidental edits. This helps because if there is an edit that went wrong, then the original can be duplicated again to create another copy to work with. To duplicate the image click it and drag it down to the Create a new layer icon at the bottom of the layers panel then release it or press Ctrl + J. A new image layer will be created and placed above the original layer. The layer can also be duplicated by clicking it and going to the top menu bar then clicking Layer then Duplicate layer. A new image layer will appear above the original layer in the layers panel.
3] Apply Saturation
The next step is to turn the image black and white by applying desaturation.

To apply the Desaturation go to the layers panel and click on the image then go to the top menu bar and click Image then Adjustments then Desaturation. The shortcut for Desaturation is Shift + Ctrl + U.

This is the image with the Desaturation applied.
Desaturate with control
You may want to desaturate with some amount of control over the process and the levels.
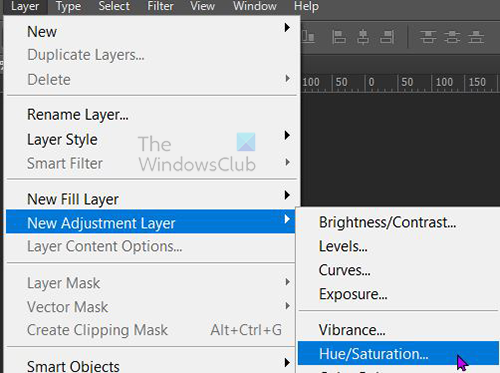
This can be done don’t by selecting the image then going to the top menu bar and clicking Image then Adjustments then Hue/saturation. You can also click the image and then press Ctrl + U.
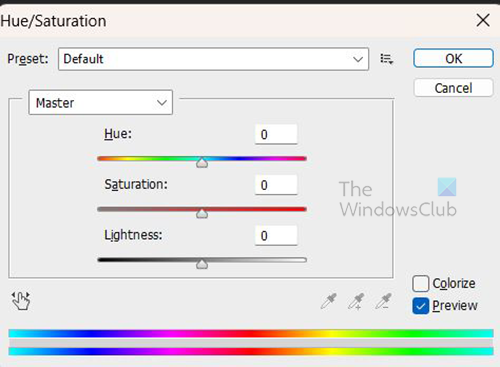
The Hue/Saturation adjustment window will appear and you will see sliders on it. all the sliders are set to 0. You can use the saturation slider to adjust the level of saturation in the image. Moving the saturation slider to the left will take the image closer and closer to black and white. you can also click in the value box and type in a value or click and then use the direction keys to go up or down. you may also experiment with the other sliders to see what results you will get.
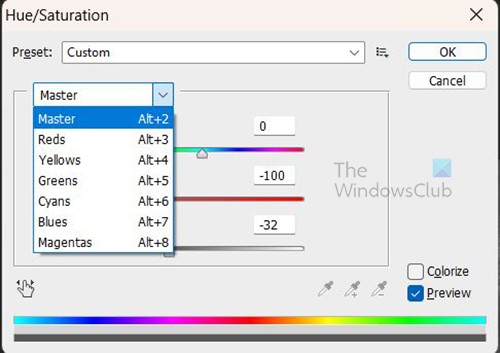
You can also click the word Master to get a dropdown with individual color channels that you can select to adjust.
Desaturate with control on a different layer
You may want to make desaturate without working directly on the image. this can be done by creating a Hue/saturation layer above the image copy.

To create the Hue/saturation layer click on the image then go to the top menu bar and click Layer then New adjustment layer then Hue/Saturation.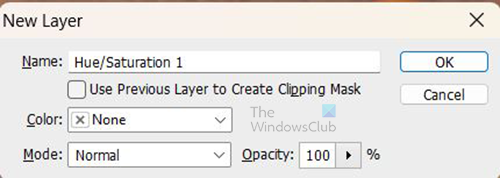
A New layer box will appear asking you to name the new Adjustment layer. You can choose to give it a name or just press Ok to keep the default name. the new adjustment layer will be placed above the image copy layer. 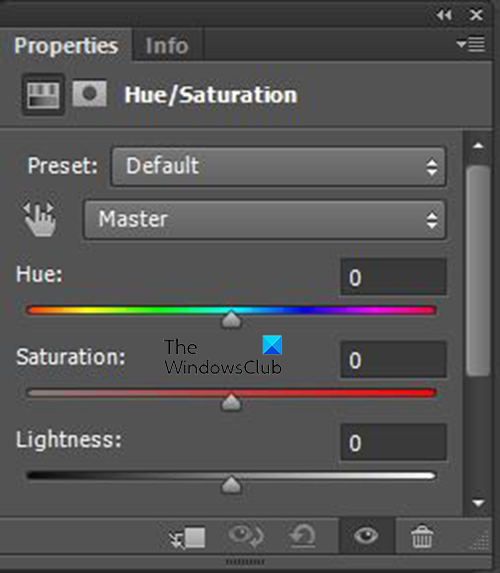
When you press Ok, you will see the Hue/Saturation adjustment layer appear in the layers panel and a Properties window with the controls for the Hue/Saturation will appear beside the layers panel. In the Hue/Saturation adjustment properties window you will see sliders. All the sliders are at 0. You can control how much saturation by sliding the Saturation slider to the left to make the image darker. You can also experiment with the other sliders to see what you get.
4] Add a levels adjustment layer
After all that is done, you may want the image to be darker. This can be done by adding a Levels adjustment layer, as the name suggests, the levels adjustment will be placed on a separate layer.
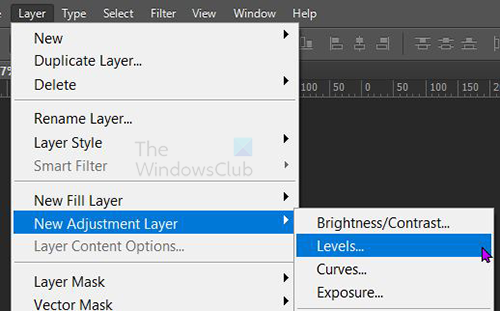
To create the Levels Adjustment layer go to Layer then New adjustment layer then Levels.
The New layer window will appear for you to name the levels layer, you can choose a name or just press OK to close and add the new layer.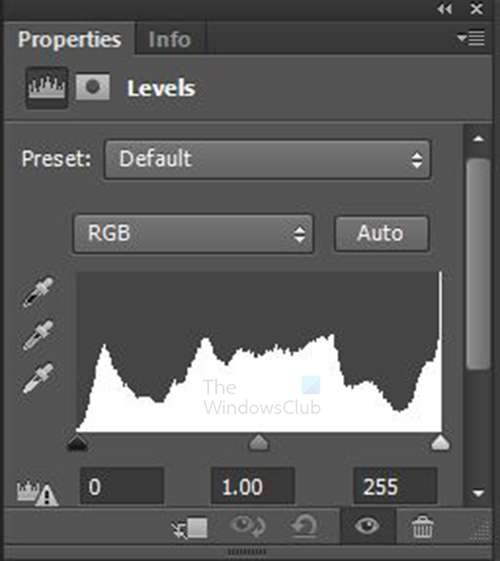
The properties for the Levels adjustment layer will appear showing a graph and some sliders. The sliders can be adjusted to get different effects on the image. Adjust and observe the changes that are made to the image.
This is the image with the levels adjusted.
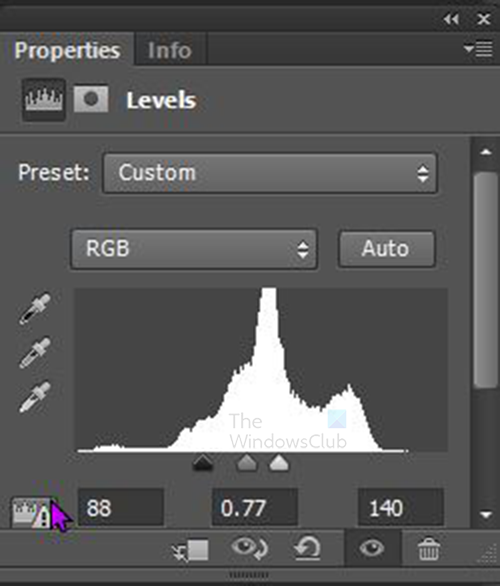
This is the properties showing the levels adjustments that have been made.
Read: How to separate the Subject from the Background in Photoshop.
Leave a Reply