In this article, we will show you how to create, delete, and use a Custom List in Microsoft Excel. The Custom List feature is useful for the users who have to type a specific list in every Excel spreadsheet. If this is the case with you, this post will help you save time.

How can an Excel Custom List make your work easier and faster?
Excel has some built-in Lists that include names of the days and names of the months. You cannot edit or delete these built-in lists. Let’s understand the benefits of these built-in lists. Let’s say, you have to prepare data for weekly analysis of rainfall. In this data, you have to enter days’ names. If you do not know the usage of the Custom Lists, you have to type the days’ names manually which will take time. On the other hand, the user who knows the usage of the Custom List will type only the name of the day, say, Monday, and drag the cell. After that, Excel will fill all the cells with the days’ names in the correct order. This is how a Custom List makes your work easier and faster.
Can you create your own Custom List in Excel?
Yes, you can create your own Custom List in Excel. You can find the respective option int he Advanced category. From here, you need to use the Edit Custom Lists option to start creating the list. In this article, we have explained the process of creating, deleting, and using a Custom List in Microsoft Excel.
How to create a Custom List in Excel
The steps to create a Custom List in Microsoft Excel are as follows:
- Launch Microsoft Excel and create a Custom List.
- Go to “File > Options.”
- Select the Advanced category from the left pane.
- Click on the Edit Custom Lists button.
- Import your Custom List from the Excel worksheet.
- Click OK.
Let’s see these steps in detail.
1] Launch Microsoft Excel and create a Custom List. Here, we have created a sample list of names of some states of the USA.
2] Click on the File menu and then select Options. This will open the Excel Options window.
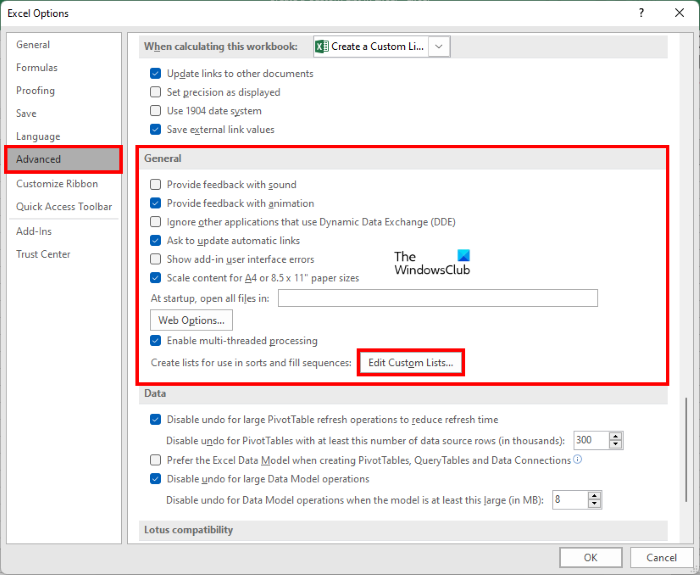
3] In the Excel Options window, select the Advanced category from the left side. Now, scroll down the right side and click on the Edit Custom Lists button. You will find this button in the General section.
4] Now, click inside the box next to the Import list from cells. After that, select the range of the cells to insert the list. See the below screenshot.
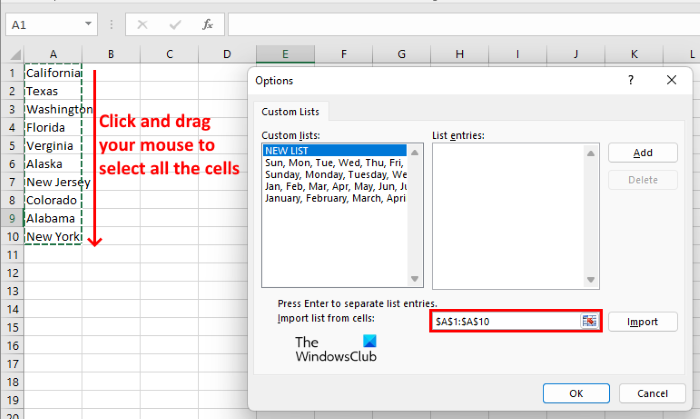
5] Click on the Import button. When you click on the Import button, your list will be added to the Custom LIsts menu. Now, click OK and exit the Excel Options window.
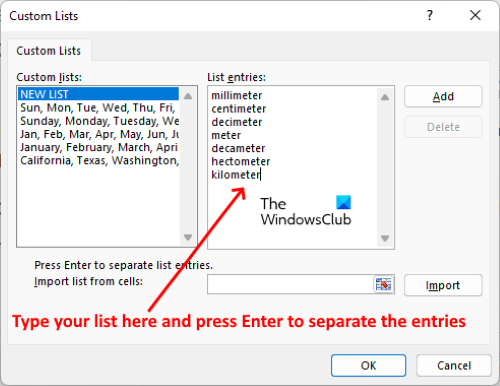
You can also create a Custom List from the List Entries box. For this, first, type your Custom List in the List entries box and then click on the Add button. This will add your list to the Custom Lists menu.
How do I delete a Custom List in Excel?
Deleting a Custom List is easy. You need to select the list that you want to delete and then click on the Delete button. We have explained the steps for the same above in this article. No matter whether you have one or multiple lists in your spreadsheet, you need to follow the same steps to delete them all.
We have learned how to create a Custom List in Excel. Now, let’s see how to delete a Custom List in Excel. As we have described previously in this article, you cannot delete the built-in list in Excel. But you can delete those you have created.
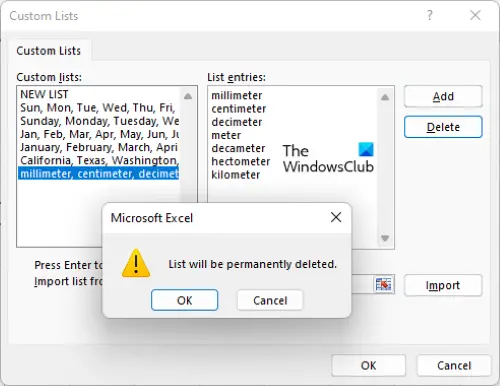
To delete a Custom List in Excel, go to “File > Options > Advanced > Edit Custom Lists.” After that, select the list that you want to delete from the Custom Lists menu and then click on the Delete button. A popup window will appear showing you a message “List will be permanently deleted.” Click OK. This will delete the Custom List from Excel.
How to use a Custom List in Excel
Now, let’s talk about how to use a Custom List in Excel.
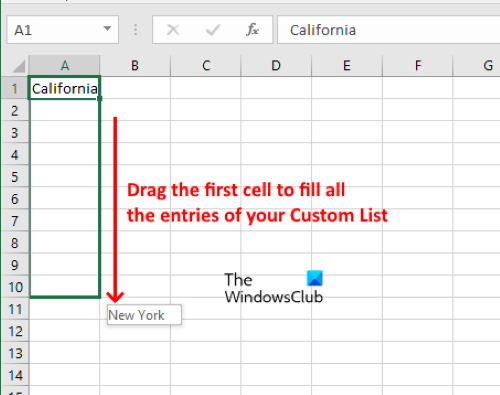
Follow the instructions below:
- Click on a cell in the document in which you want to insert your Custom List.
- Type the name from which your Custom List starts.
- Drag the cells to the bottom. This will fill up all the remaining entries automatically.
What are the two ways to create a Custom List?
The following are the two ways to create a Custom List in Microsoft Excel:
- By using the Import option.
- By using the List Entries box.
We have explained both of these methods above in this article.
That’s it.
Read next:
Leave a Reply